¶ Introductie
Op deze pagina leest u hoe u het versturen of ontvangen van mail vanuit JOIN ZD via Exchange Online kunt configureren. Wij adviseren om hier altijd ondersteuning van een Decos Consultant voor in te schakelen.
Deze functionaliteit is beschikbaar vanaf versie 2024.2.
Deze pagina is bewust geschreven in het engels en om die reden niet vertaald naar het NL.
¶ Contents
1. Create an Azure Enterprise Application and allow it access to Exchange Online.
2. Generate an application secret.
3. Copy application details to JOIN Admin configuration.
4. In PowerShell, grant the application access to mailboxes.
5. In JOIN Admin, configure mailboxes for Exchange Online.
6. Decide on e-mail save format and start registration
Throughout this guide, these placeholders are used:
TENANT_ID |
Azure tenant id of the organization, can be found on the Azure AD Overview page. |
APPLICATION_ID |
ID of the Enterprise application created in step 1, found on the Overview page of the Enterprise application. |
OBJECT_ID |
Object ID of the enterprise application, also on the Enterprise application’s Overview page. |
¶ 1. Create an Azure Enterprise Application and allow it access to Exchange Online.
- Log in to Azure Portal as a customer administrator.
- Go to Azure Active Directory, then select Enterprise Applications from the menu.
- Click on
+ New application, then+ Create your own application.
Give the application a recognizable name and select the option to “Register an application to integrate with Azure AD (App you’re developing)”.
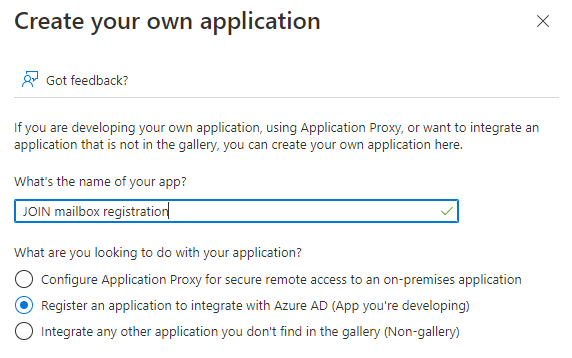
Click the [Create] button. In the next window, leave “Accounts in this organizational directory only” selected, then click [Register]. - Go to the list of App registrations and find the newly created application by name.
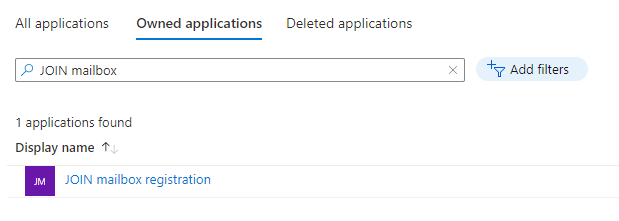
Click on the link to configure the App registration. - Go to API permissions, then click on
+ Add a permission. - In the Request API permissions panel, select APIs my organization uses. Search for “office 365 exchange”, then select “Office 365 Exchange Online”.
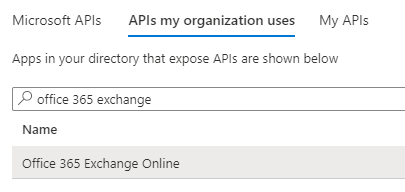
- Click on Application permissions, then select:
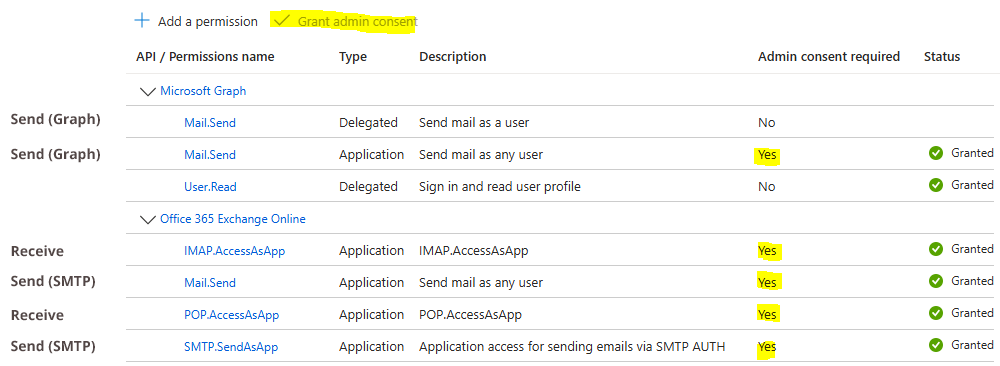
- IMAP.AccessAsApp and POP.AccessAsApp if you want to use Exchange Online for automatically registering received e-mail.
- (JOIN 2024.2 or newer) Mail.Send and SMTP.SendAsApp if you want to use Exchange SMTP for sending e-mail.
- (JOIN hotfix 1074 or newer) If you want to use Microsoft Graph instead of SMTP for sending e-mail, click on Microsoft Graph in the list of permissions and add Mail.Send both as Delegated permission and as Application permission. Even if the mailbox to be used for sending is shared, you still need to add Mail.Send, not Mail.Send.Shared.
- Click on [Add permissions]. The selected application permissions need admin consent. If you cannot click on Grant admin consent, ask an Azure administrator with sufficient rights to do it.
It is important that Grant admin consent is done as soon as possible, it may take some time for Azure to apply the permissions to the new application. After the permissions have been granted, the permissions will have a green check symbol.
¶ 2. Generate an application secret.
- Go to Certificates & secrets in the App registration, then click on
+ New client secret. Enter a description and select the maximum possible expiration period (mailbox registration in JOIN will stop working when the secret expires).

Click on [Add] to add the secret. - Now copy the Value of the secret to Notepad and save the text file. You can access the value only once -just after creating the secret- in Azure Portal.

When you return to Certificates & secrets later, you can only see the first few letters of the value. There is no way to access the full value again.

- Also note the Expiry date of the secret in the same text file. In JOIN Admin the date will need to be entered in yyyy-MM-dd format. Azure Portal uses American notation, MM/dd/yyyy.
- Go to Overview for the App registration and copy the values of Application (client) ID and Directory (tenant) ID to the same text file.
- Go back to Enterprise Applications and select your application from that list. On the Overview page, copy Object ID and paste it to the text file as well.
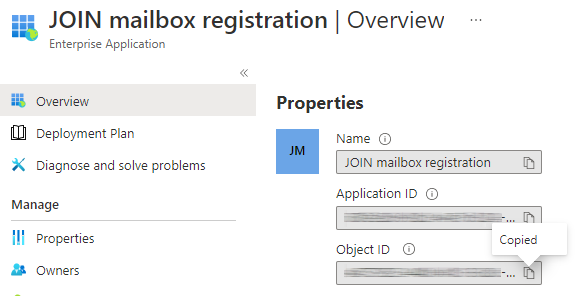
Object ID of the Enterprise application is not the same as the object ID of the App registration.
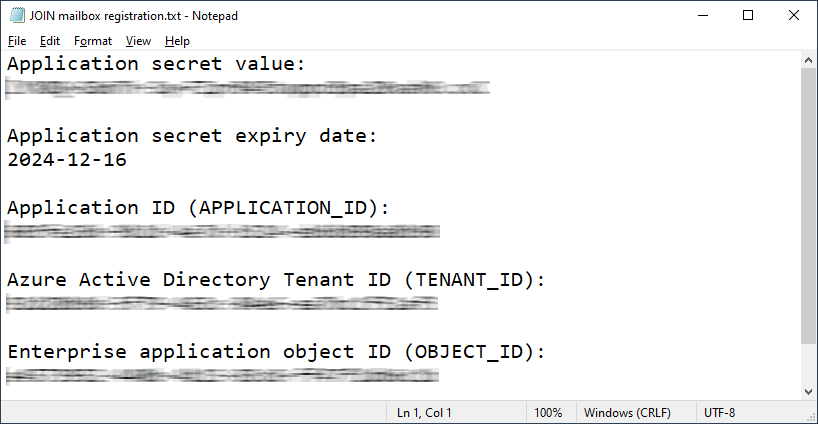
- Save the text file after copying all values to it. JOIN Admin needs the Application ID, secret value and expiry date and the Tenant ID. In PowerShell you will use Tenant ID (
TENANT_ID), Application ID (APPLICATION_ID) and Enterprise application object ID (OBJECT_ID).
¶ 3. Copy application details to JOIN Admin configuration.
- Open JOIN Admin and go to Configuration.
- Filter on
exchange online, then enter Application ID, Application secret value, Application secret expiry date and expiry date and Azure Active Directory Tenant ID by copying the values you saved to the text file in step 2.

- JOIN 2024.2 or newer: choose whether you want to use Exchange Online for reception, sending or both:

- Hotfix 1074 or newer: choose whether you want to use Microsoft Graph or SMTP for sending:

- Save configuration settings.
¶ 4. In PowerShell, grant the application access to mailboxes.
- Make a list of all Exchange Online e-mail addresses for which you want to automatically register all incoming e-mail, or that you want to use for sending e-mail via Exchange. Only e-mail addresses in the Azure AD for the tenant hosting the enterprise application can be used.
- If Exchange Online is used for sending e-mail, the default mailbox (standaard mailbox) must be an Exchange Online mailbox as well.
- Open PowerShell as administrator. Log in as an Exchange administrator account:
az login - Install the Exchange Online management module if you did not use it before:
Install-Module -Name ExchangeOnlineManagement
When prompted, typeAto allow all required modules to be installed. - Import the module after installing it:
Import-module ExchangeOnlineManagement
Again typeAto “Always run”. - Connect to Exhange for your organization, using the tenant ID you saved in step 2. Replace
TENANT_IDbelow by the saved value:
Connect-ExchangeOnline -OrganizationTENANT_ID
If you are prompted to log in or an error message is shown, the logged in user does not have sufficient permissions to connect to Exchange Online. - Register an Exchange Online service principal for the enterprise application, using the Application ID and Enterprise application object ID you saved earlier:
New-ServicePrincipal -AppIdAPPLICATION_ID-ServiceIdOBJECT_ID
This step is only needed once per application. When you try it for an application that already has a service principal, you’ll get a message that a principal is already present. - For each e-mail address to be used in JOIN, execute this PowerShell statement:
Add-MailboxPermission -Identity "EMAIL_ADDRESS" -UserOBJECT_ID-AccessRights FullAccess - If you want to use the mailbox for Exchange SMTP, also execute the following:
Set-CASMailbox -Identity EMAIL_ADDRESS -SmtpClientAuthenticationDisabled $false
When you use Microsoft Graph for sending, this command is not required.
In the above, replace EMAIL_ADDRESS by an e-mail address from the list you compiled earlier. Repeat the Add-MailboxPermission command for each address on the list. JOIN can only automatically register e-mails for Exchange Online mailboxes where this is done.
To later check which e-mail addresses the enterprise application can access, use this PowerShell command:
Get-Mailbox | Get-MailboxPermission | where {$_.user.tostring() -eq "OBJECT_ID" -and $_.IsInherited -eq $false}
Replace "OBJECT_ID" by the enterprise object ID for the registered application within quotes. Note that the command is quite slow for a large organization, because Get-Mailbox will search through all e-mail addresses in the Azure AD. Output will be a list with one line per e-mail address:

¶ 5. In JOIN Admin, configure mailboxes for Exchange Online.
After giving the Azure enterprise application access to all Exchange Online e-mail addresses for which you wish to register e-mail automatically, mark them as Exchange Online mailbox in JOIN Admin.
¶ When you want to use Exchange Online for sending e-mail
In JOIN 2024.2 or newer, Exchange Online can be used for sending e-mail via Exchange SMTP. In hotfix 1074 or newer, Microsoft Graph can be used instead of SMTP.
If you checked Use Exchange Online for sending e-mail, also do the following:
- Go to the default mailbox (standaard mailbox).
- Ensure Use Office 365 Exchange to send e-mail is checked.
- Ensure the e-mail address and mailbox name are both set to the same address.

- Ensure the application has been granted the correct permissions.
- Ensure the application is authorized to use the configured mailbox for Exchange Online. When SMTP is used, also enable authenticated client SMTP submission (SMTP AUTH) in Exchange Online (
Set-CASMailbox).
¶ When you want to use Exchange Online for automatically registering received e-mail
Registering e-mail automatically works best if you create a separate document book for each e-mail address.
- Create a document profile that at least includes these fields:
SUBJECT1(E-mail subject),DOCUMENT_DATE(E-mail date),EMAIL1(From),EMAIL2(To) andEMAIL3(CC). This zip contains an example document profile:
E-mail_registration_profile.zip - Create one or more document books for e-mail registration and link them to the e-mail registration profile. Set the Files directory for each book.

- Go to E-mail management > Other mailboxes.
- Create a Mailbox configuration for each e-mail address where e-mails should be automatically registered.
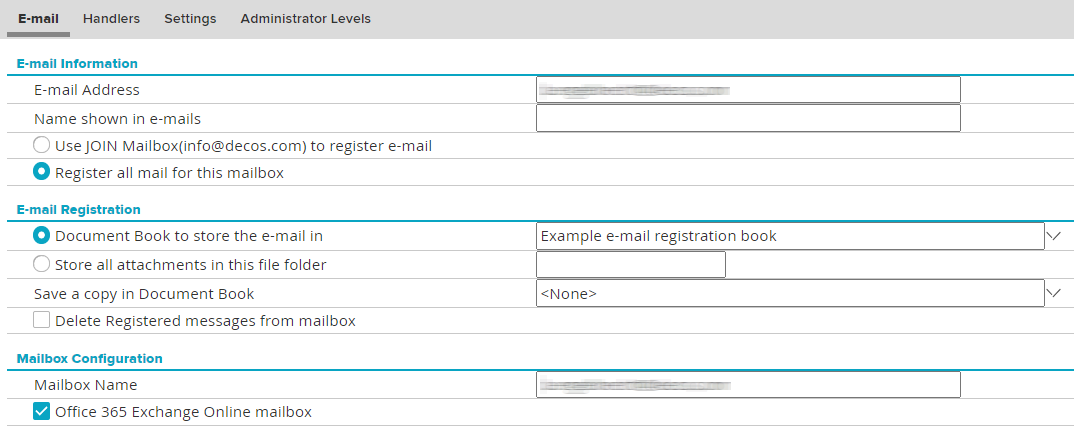
- Select Register all mail for this mailbox and Document Book to store the e-mail in. Select the book where e-mails for this mailbox should be saved in the drop-down next to the document book option.
- Set both E-mail Address and Mailbox Name to the primary e-mail address of the Exchange mailbox.
- Check Office 365 Exchange Online mailbox.
¶ 6. Decide on e-mail save format and start registration
This step is required when you want to register incoming e-mails, not for sending e-mail.
JOIN can save incoming e-mails in two formats:
a. Body text and attachments as separate files
b. The full e-mail as one file in EML-format (you can still access attachments from JOIN)
Before registering e-mails, decide on the format you prefer. Go to JOIN Admin configuration and search for “store received messages”. Check the box to use EML format, leave it unchecked if you prefer separate files:

Restart the JOIN background service after finishing e-mail reception configuration in JOIN Admin. If all is well, registration will start soon after restarting the service.