¶ Management
In the menu of the option “Management” you can access the following four items:
- Users
- Templates and Codes
- System
- Tables
¶ Users
In the Users section you will find an overview of those who use the system. You can search for users in the list by using the search fields, and by clicking on the overview icon you can obtain a clear overview of all users. In the registration screen you can change a number of details of a user (eg password), provided you have the correct rights. When you have changed data, you can save it by clicking on the save icon. New user accounts are created in the system’s Admin Tool.
In the system you have the right to handle your own cases. However, it can happen that you want to handle the documents of a colleague (for example during holidays or illness). For this, you can use the function ‘Delegate actions’. This function can be found in the registration screen.
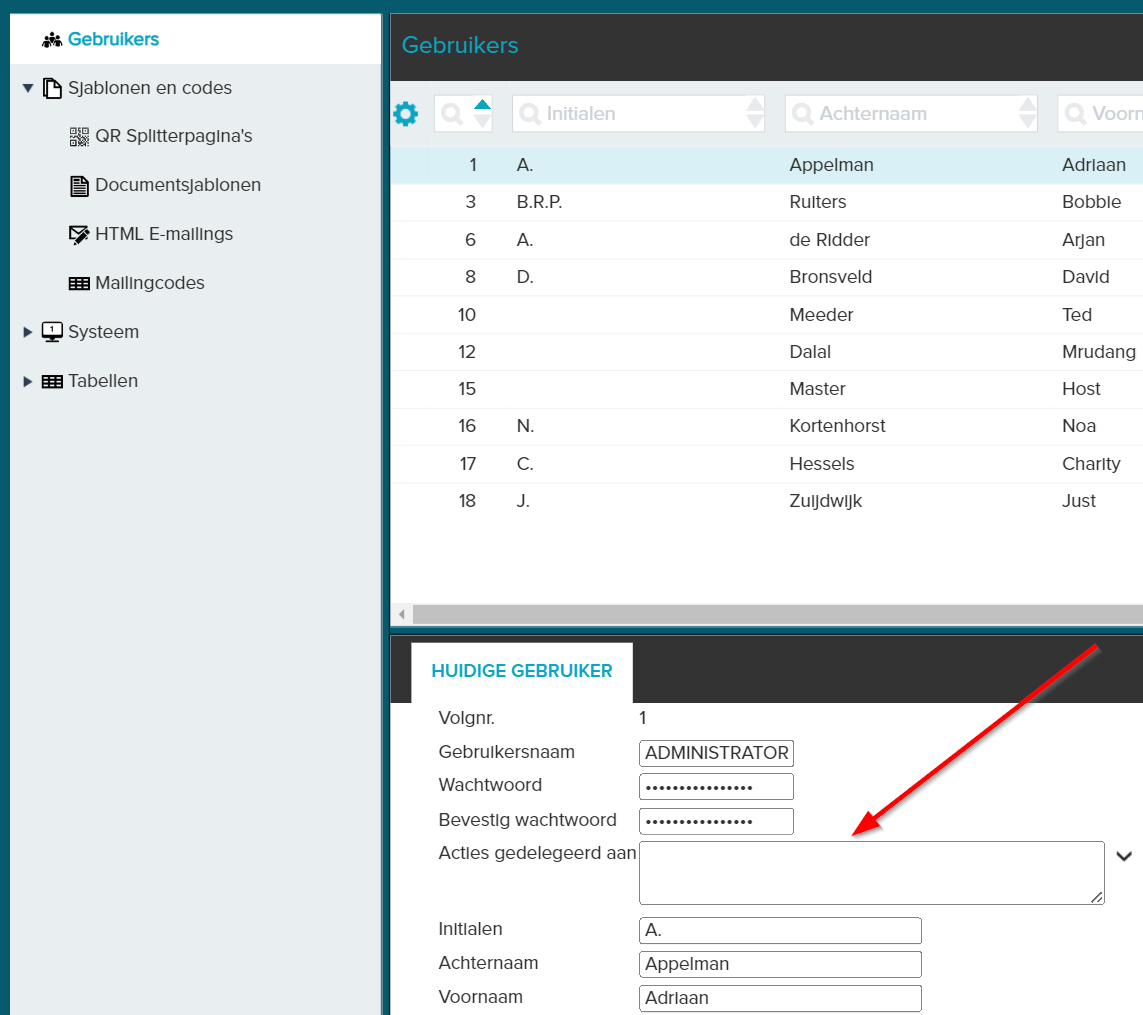
You can then determine which other users you want to delegate your work to, or which other users can view your work queue. If you want to delegate your work to more than one user, you can select multiple users by separating them with a semicolon ( ; ). If you want to see the work queue of other users, their actions must be delegated to you.
¶ Templates and Codes
Under the Templates and Codes section you can manage ‘QR Splitter Pages’, ‘Document Templates’, ‘HTML E-mailings’ and ‘Mailing Codes’.
¶ QR Splitter Pages
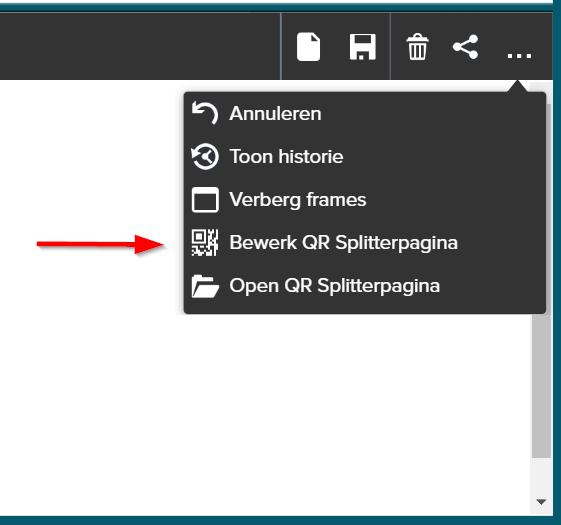
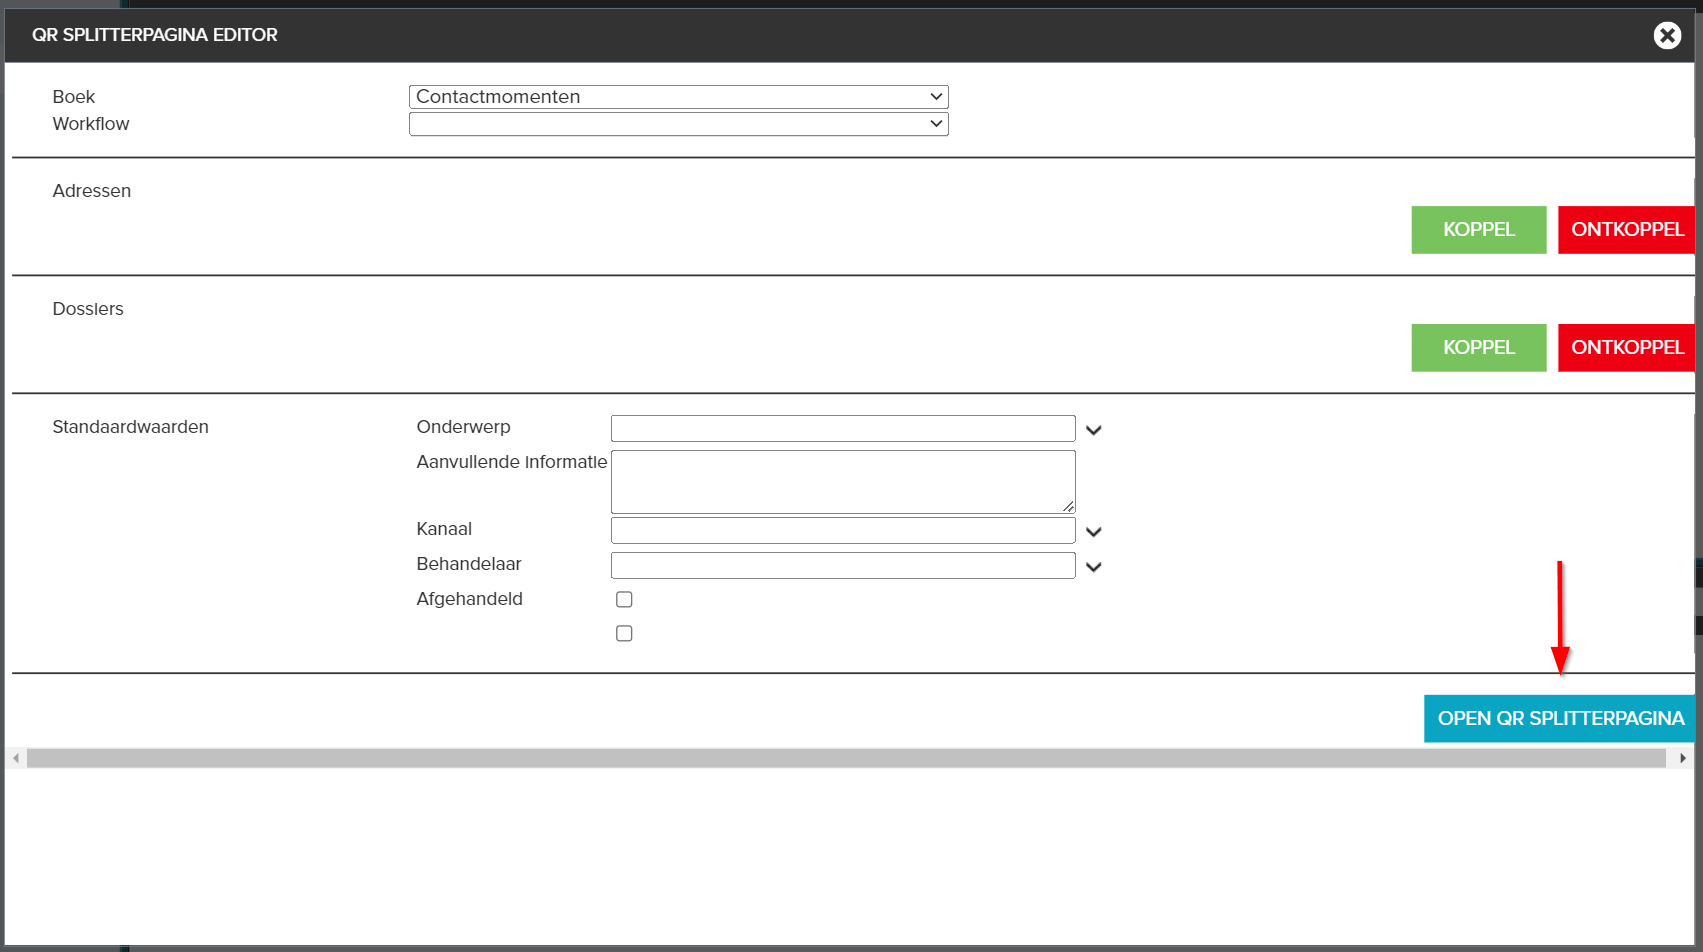
QR Splitter pages are used to separate scan batches from each other, after which the scans are automatically entered into JOIN, and provided with predefined characteristics. By clicking on the new registration icon in the registration screen you can register a new QR Splitter page by characteristic and subject. By clicking the Edit QR Splitter Page feature button in the registration screen, you can edit your QR Splitter page.
The fields displayed after opening the page and their function are listed below:
| Field | Function |
|---|---|
| Collection | Use the drop-down arrow to select the collection under wich the scans should be automatically registered |
| Workflow | Using the drop-down arrow, select a workflow that should be started automatically |
| Addresses | Here you can select the address of the organization |
| Dossiers | Here you can select the dossier in which the scans should be included |
| Default values | assigning default values to the registration |
| Open QR splitter page | By clicking on this you can open the new QR splitter page and then print it |
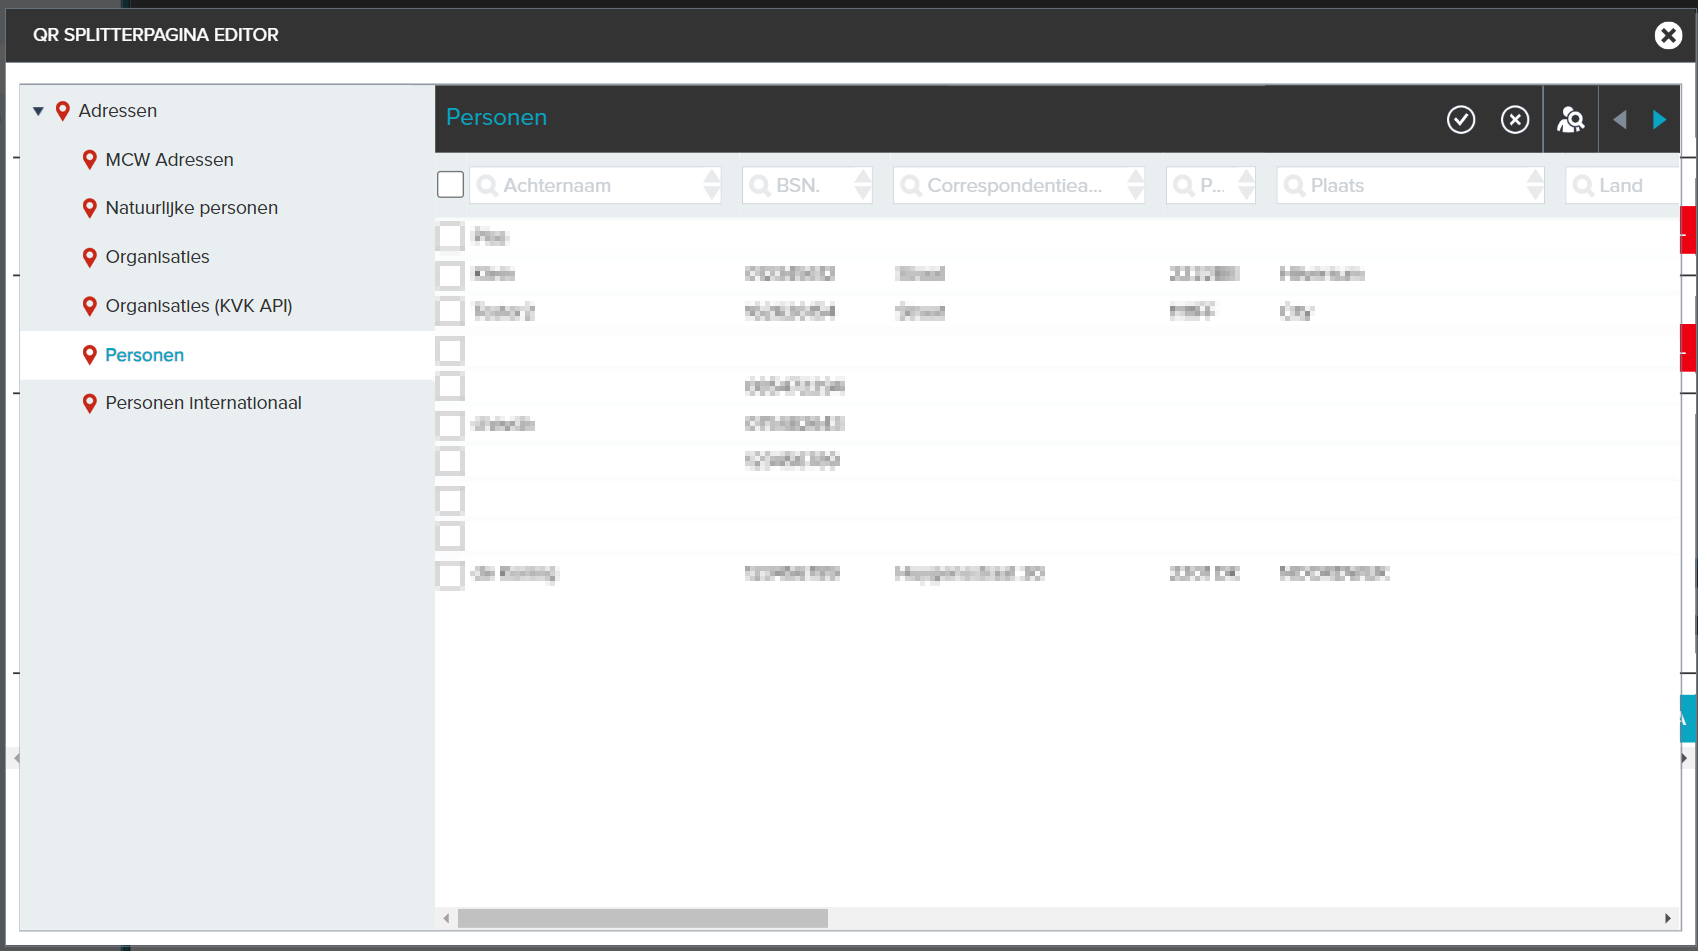
You can select the addresses and files by clicking the green link button that you can find next to the relevant field. When you have clicked on this, you can select the (non) natural person(s) or the dossier collections by ticking the box and then clicking the link icon. You can unlink the addresses and / or files by selecting them on the QR Splitter page editor page and then clicking on the red unlink button.
You can open the QR Splitter page by clicking the blue button ‘Open QR Splitter page’. It is also possible to open the QR Splitter page with a button in the registration screen.
On this page you will find the following components:
- QRCode
- Name of the page (the ‘characteristic’ you specified)
- Description (when to use it)
- Book (where is the registration stored)
- Workflow (which workflow is automatically started)
After you have gone through all the fields of the QR Splitter page editor and you have opened the QR Splitter page, you can use the new page for bulk scanning.
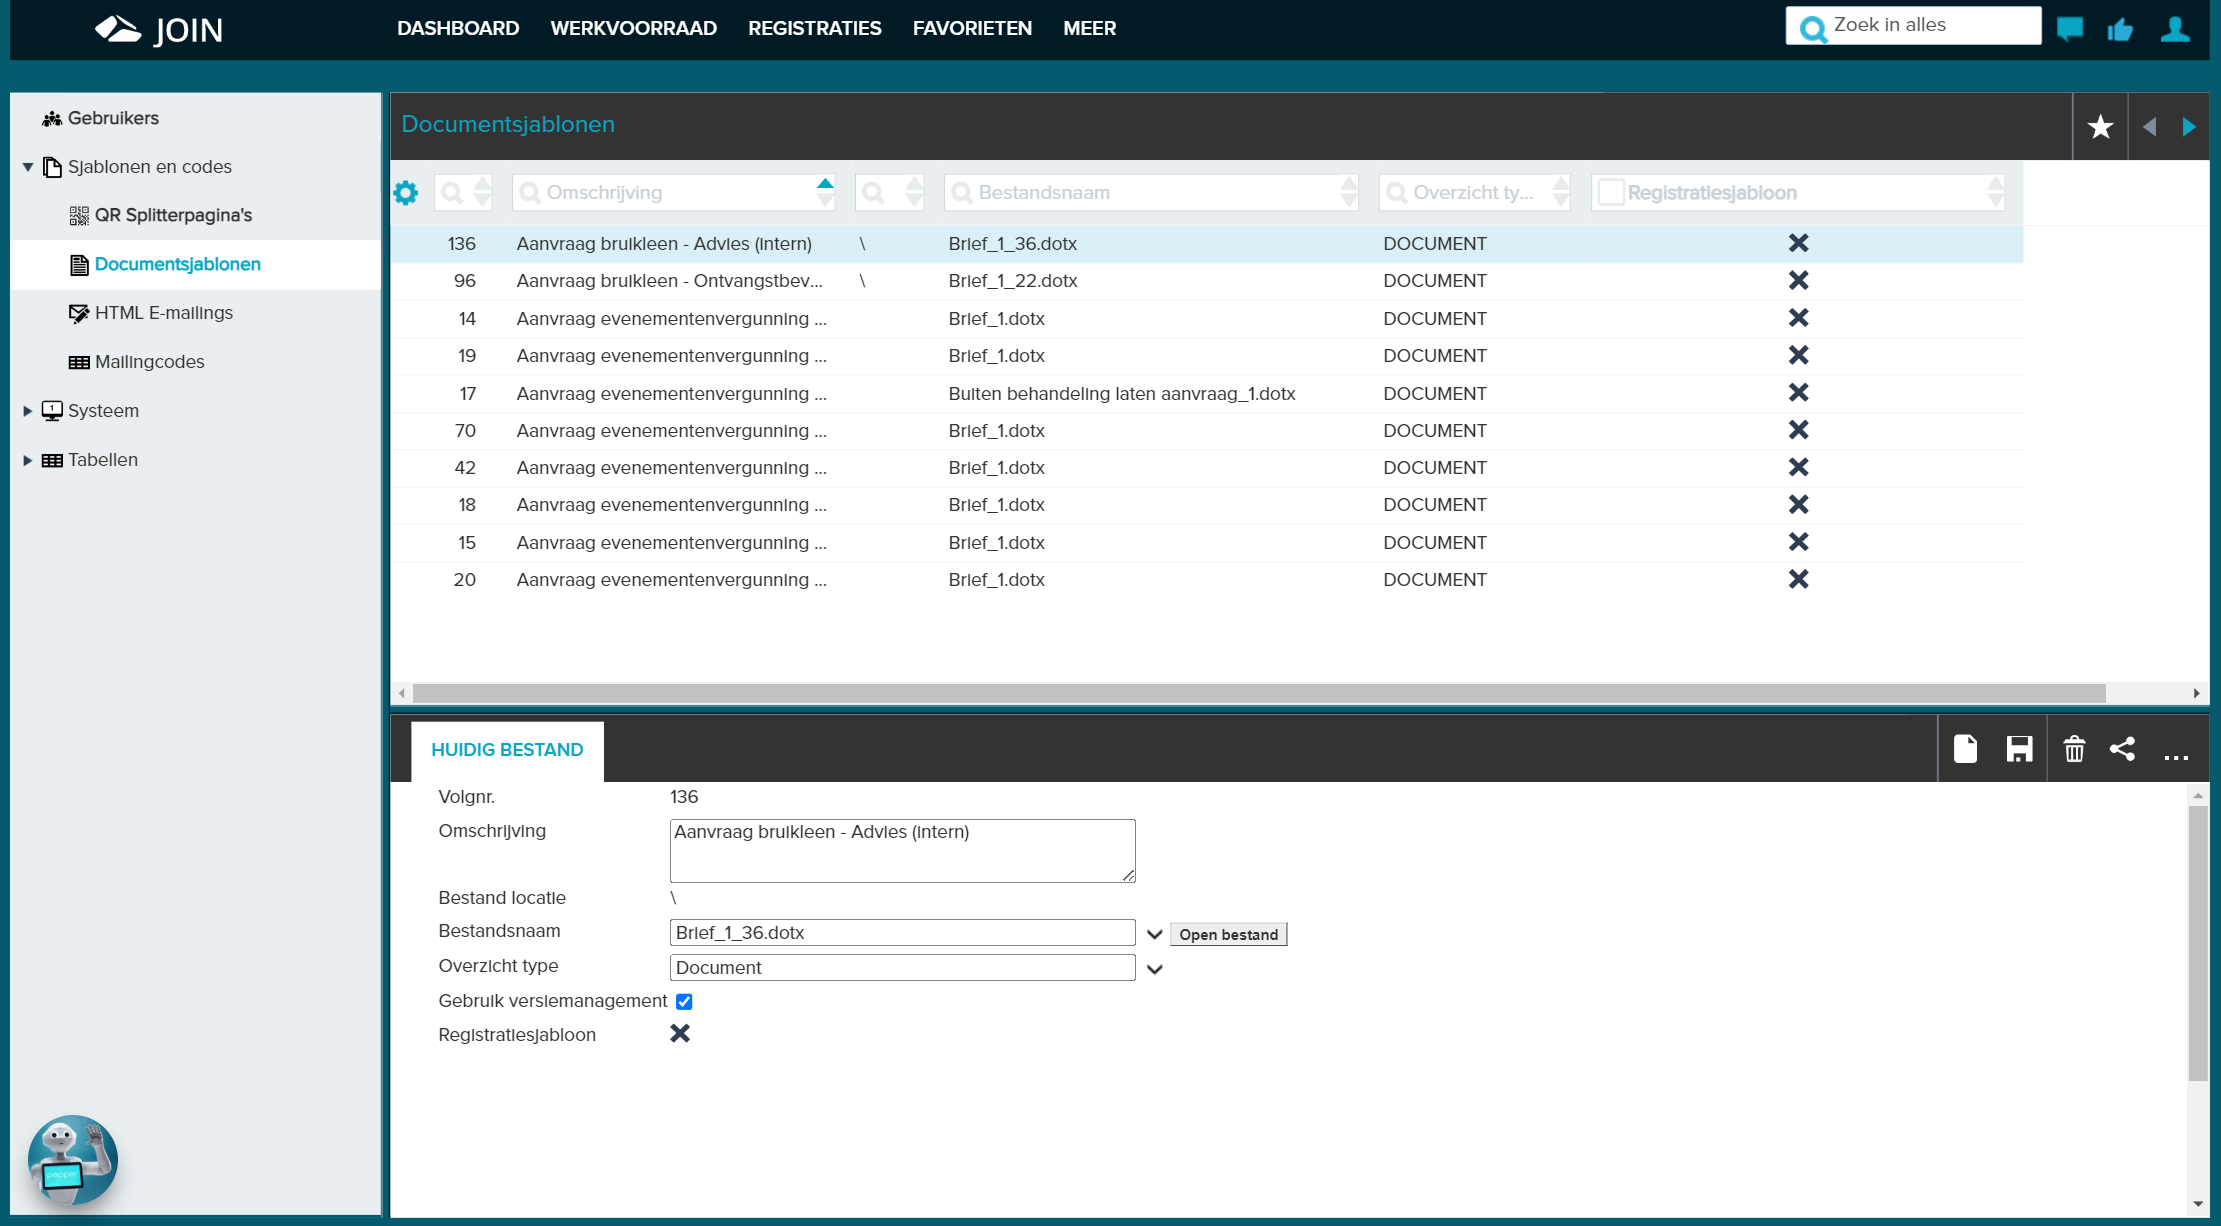
¶ Document templates
Document templates are created in the system’s Admin Tool. However, if an existing template needs to be edited, it can be useful to make the adjustment from the application as a user with extended rights. To do this:
- Open the ‘Document templates’ section. The contents of the folder are displayed in the list;
- Select the template you want to modify using the search fields;
- In the Registration screen click on the blue marked link ‘Open file’ behind the file name;
- Make the desired changes to the template and click Save.
¶ HTML E-mailings
You can send HTML e-mailings to a group of contacts or a group of companies or contacts associated with a mailing code. The HTML templates for these mailings can be created and edited in the ‘HTML E-mailings’ section. Sending HTML e-mailings is a right, this can be set per user in the Admin Tool of the system.
Creating a new HTML E-mailing is done in two steps. First, register the new HTML E-mailing and fill in the registration details as follows:
- Click on the button ‘new registration’ in the toolbar of the Registration screen;
- The e-mail address that the recipient of the mailing will see is displayed in the sender field. The e-mail address of the person registered in Decos is automatically displayed here. You can adjust this manually;
- Then fill in a description, for example “New patch Decos”
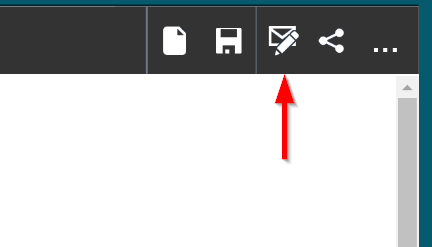
Then, you compose the HTML E-mailing. Click on the Edit button in the toolbar of the Registration screen.
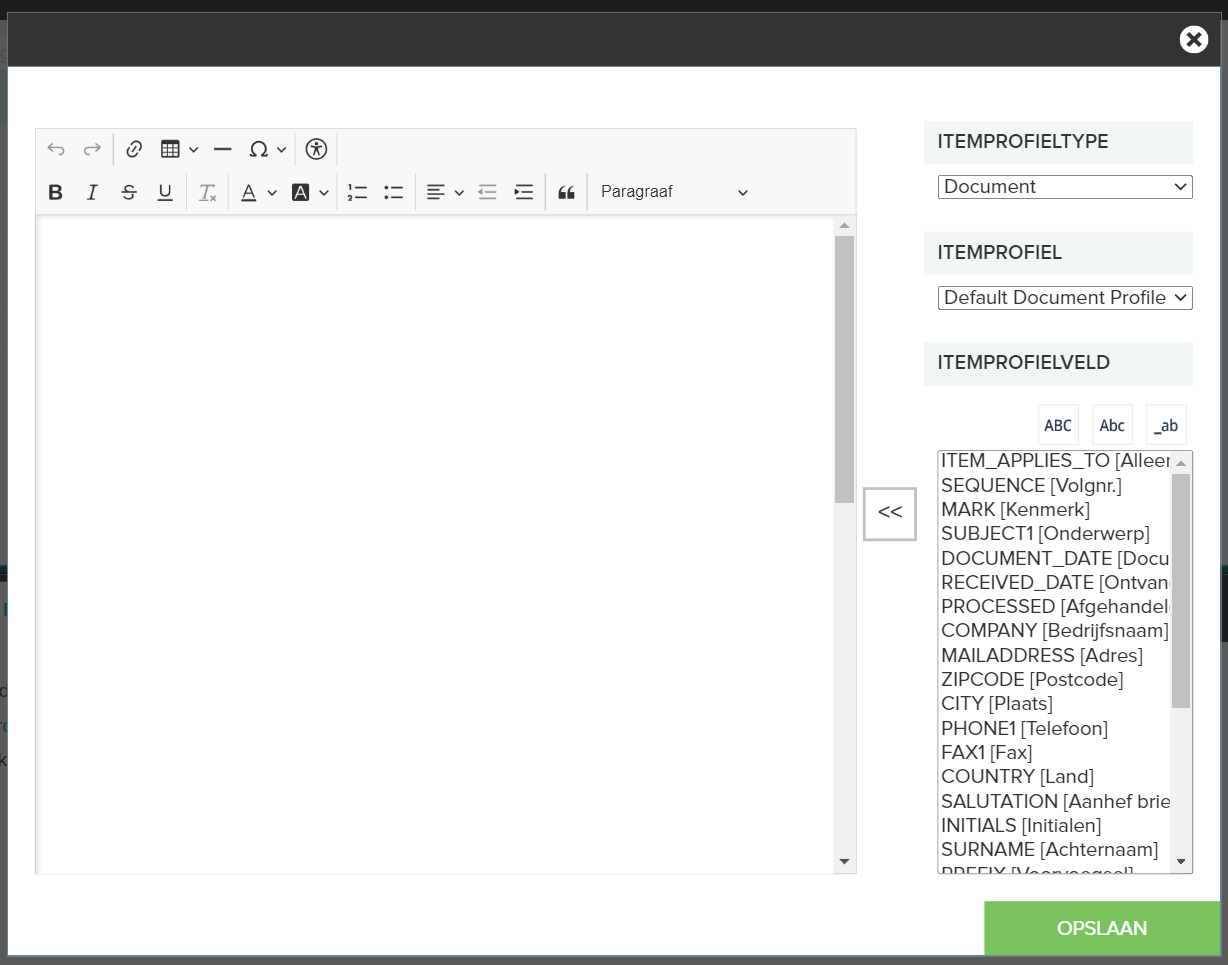
You will see the Decos HTML Editor appear on the screen and you can now compose the HTML E-mailing:
- On the right side of the page, choose an item profile type (eg Document);
- Choose which item profile this HTML E-mailing should be linked to. The available item profiles depend on the item profile type you have chosen;
- After this, the internal Decos fields that belong to the selected item profile are automatically displayed. You can select these fields for your HTML E-mailing by clicking on the appropriate field and clicking on the button with the two arrows pointing to the left or you can double click on the field. If you do not make a choice, this HTML E-mailing can be linked from any document registration;
- In the text area of the Editor you can enter the text for the mailing and thus use the selected fields (eg COMPANY);
- You will then design this HTML E-mailing. To do this, you can use the toolbar above the Template Editor (see image) which allows you to add different fonts and sizes, background and text colors, alignment, font styles and images;
- You close by pressing Save.
¶ Mailing Codes
Mailing codes are used to group specific addresses or contacts. You can create a new mailing code by clicking on the ‘mailing codes’ section and then on the ‘new registration’ button in the registration screen. Here you can add the name of the mailing code and the description. This new mailing code can now be linked to addresses and people in the following ways:
¶ Link via Administration
Click on the ‘mailing codes’ section in the Menu and select the correct mailing code from the List. Then in the Registration screen you will see the function ‘Current mailing code’ and if you click on the arrow function next to it, the functions ‘Contacts’ and ‘Addresses’.
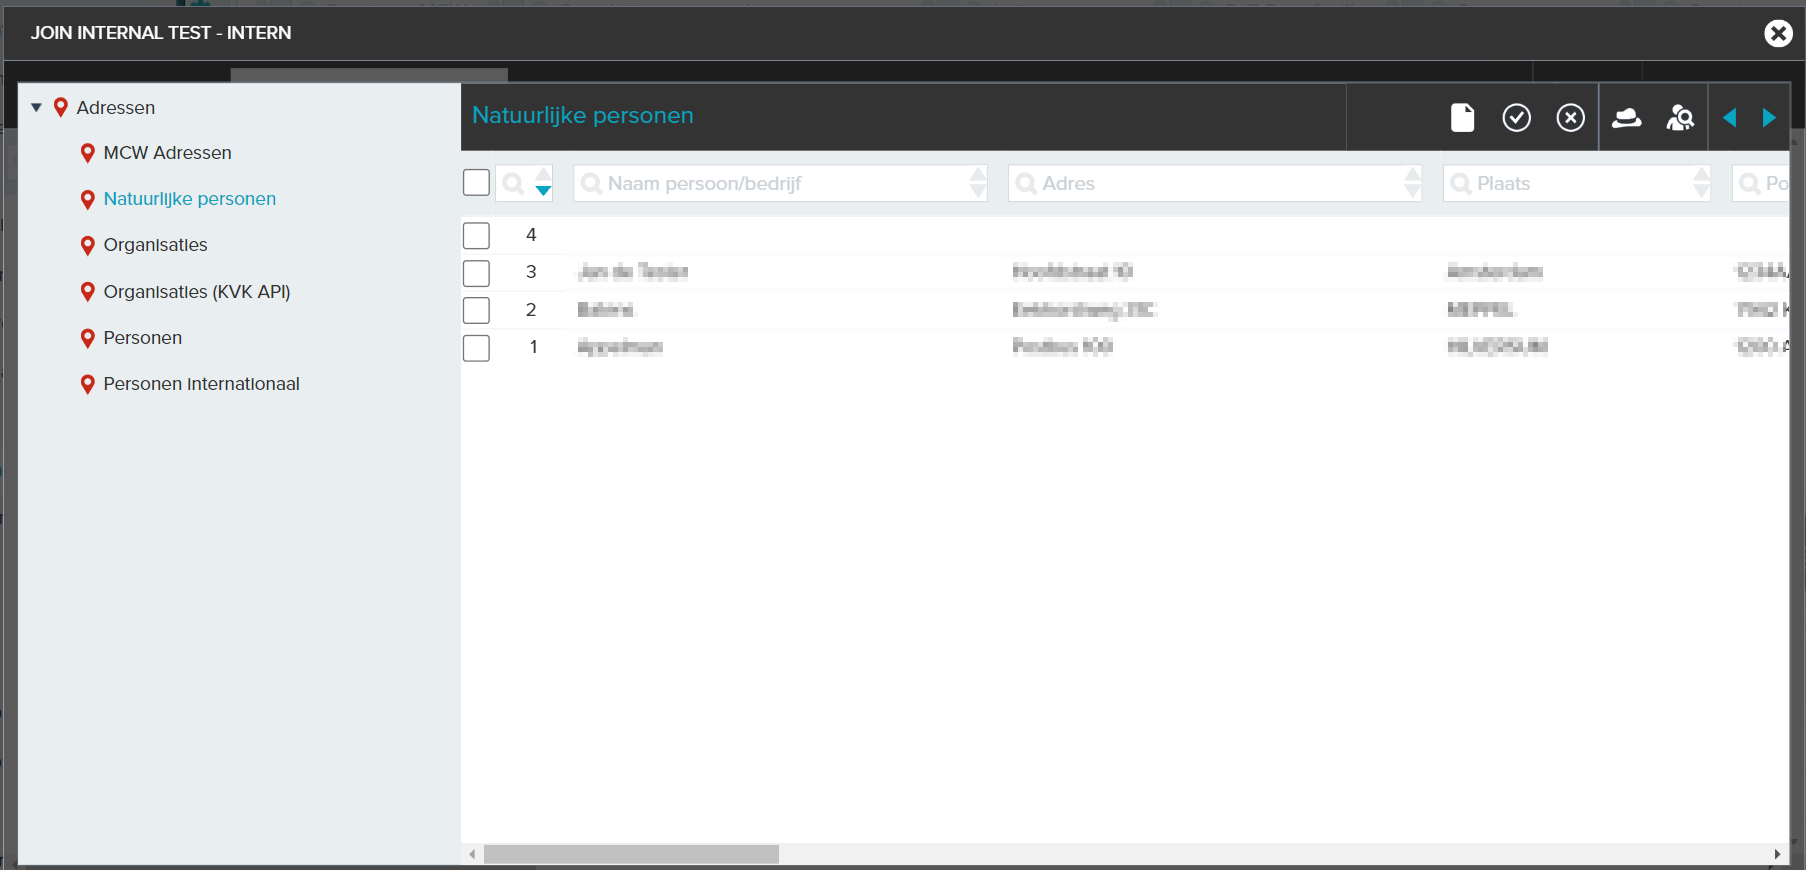
If you click on the Contacts option and then the Link button, you will be taken to a page where you can select a contact from the Contact Book by placing a check mark next to that person. You can then link that person by clicking the link icon.
If you opt for the Addresses function, a natural or non-natural person can be selected and linked from an Address Book via the Link button.
If you do not want to select a contact person or address, you can cancel the link by clicking on the cancel icon next to the link icon. To unlink a contact, after clicking on the ‘Contacts’ or the ‘Addresses’ function, click on the unlink icon and select the contact / address you want to unlink and then click on the unlink icon
If you have linked a (non) natural person, you can also select a contact person for this (non) natural person in two ways. If a contact person is already known at the address, you can select the contact person by placing a check mark under the address in the registration screen. If the contact person is not yet known for the address, you can link it by first clicking on the address and then on the function contacts under the drop-down arrow.
Then click on the link icon, select the contact person by placing a check mark in front of it and finally click on the link icon. You can choose to hide the contacts linked to the address by clicking the hide contacts icon.
You also have the option of adding an address yourself by clicking on the ‘new registration’ function button and then adding a (non) natural person by clicking on ‘natural persons’ or ‘non-natural persons’. You can use the ‘merge order’ function to determine the order of your addresses in the registration screen.
¶ Linking via the Address Book
On the ‘Registration’ page in the ‘Natural Persons’ or ‘Non Natural Persons’ book, select a registration in the List. On the registration screen, click on the option Mailing Codes. The application administrator can grant access to this function. After pressing the Link button, you can select the desired mailing code. The result is a mailing sent to an organization without a contact.
However, if you want to send the mailing to a contact person or employee of the organization in question, you select the Contacts function in one of the books on the registration screen. If you click on the name of the desired contact person, you will get the registration details of this person on the screen. Then click on the function button ‘Associated mailing codes’ in the toolbar.

Then click on the link icon and you can select the desired mailing code. The result is a mailing that is sent to an organization with a contact person.
¶ Linking through the ‘Contacts’ Book
Open a registration in the ‘Contacts’ book and select the Mailing Codes function button in the registration screen. The desired mailing code can be selected via the Link button. The result is a mailing addressed to someone from your contact book. The address used is the preferred address indicated for the contact person.
Decos assumes that you only want to send a mailing to the same person once. If a contact person is associated with two organizations, you can determine yourself at which address the mailing should be received. In the Contact Book, check the box below the preferred address and then save it. If you uncheck the linked addresses, the mailing will be received at the private address.
¶ System
In the book ‘System’ you will find the components that can be used to manage the system.
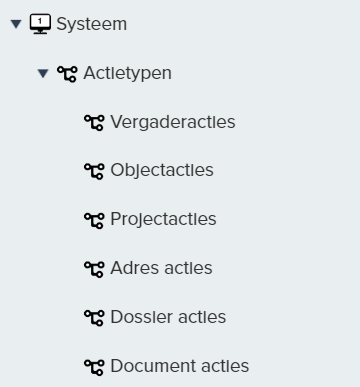
¶ Action types
To guarantee timely and correct handling of documents, various actions can be linked to a registration. For example, you can determine which route the document must follow, which actions must be taken and when the document must be processed at the latest (the processing date).
Actions can be linked to addresses, documents, dossiers and other workflow items. For example, an action for addresses can be “make address change”.
Before actions can be assigned, they must first be created. You do this by clicking on the ‘Action types’ section in the ‘System’ book and then clicking on the type of action type within which you want to create a new action. The different action types you can choose from are listed below.
If your organization does not have a license to use the workflow module, you can assign actions to users in your organization via the Default routes subfolder.
¶ Create and assign action type
¶ Create
The example below explains how to create an action that can be used for documents, step by step.
- In the Menu, open the panel Management -> System -> Action types;
- Select the action type Document actions; the content of the action type becomes visible in the list;
- In the Registration screen, click on the New registration icon and fill in the details of the new action;

- At Description, enter the action (in this example it is Evaluate) and determine whether or not setting a reminder date is mandatory by choosing a value from the table using the drop-down arrow (in this example A = Allowed);
- Enter the reminder period in days and the minimum time of the action;
- Determine the use of the workflow via the drop-down arrow. If you choose Parallel, the following action can already be performed during the Evaluation. If you choose Sequential, the next action will not be started until the Evaluation has been completed;
- Check the option Calculate in working days if this is desired;
- You can indicate that the action is for informational purposes only;
- If authentication is required, this option can be checked. The practitioner must then log in again to perform the action;
- Finally, you can indicate to which item profile this action should be linked.
- Click on Save; the document action is saved and ready to use.
¶ Process Descriptions
For an action type, you can enter a description about the steps to follow for that action. This can be done by clicking on the drop-down arrow next to the option ‘current action’ and then on the option ‘process description’.
¶ Assign action
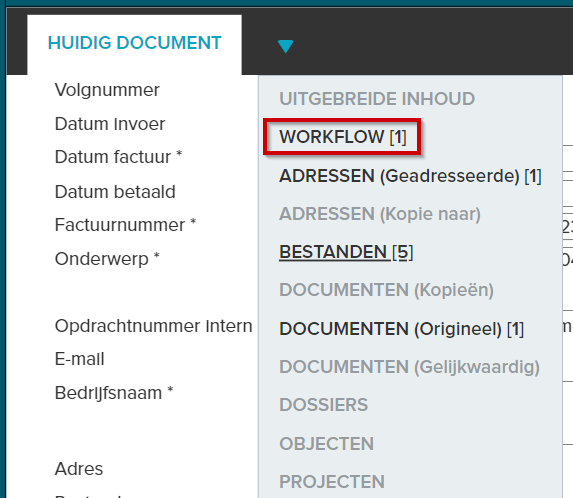
You can assign the created document action to a document by clicking on the option Registrations in the portal and then on the book ‘Documents’. In this book you choose a subbook of your choice and within it the document to which you want to assign the document action. When you have selected the document, click on the drop-down arrow in the registration screen next to the option ‘current document’ and click on the workflow option.
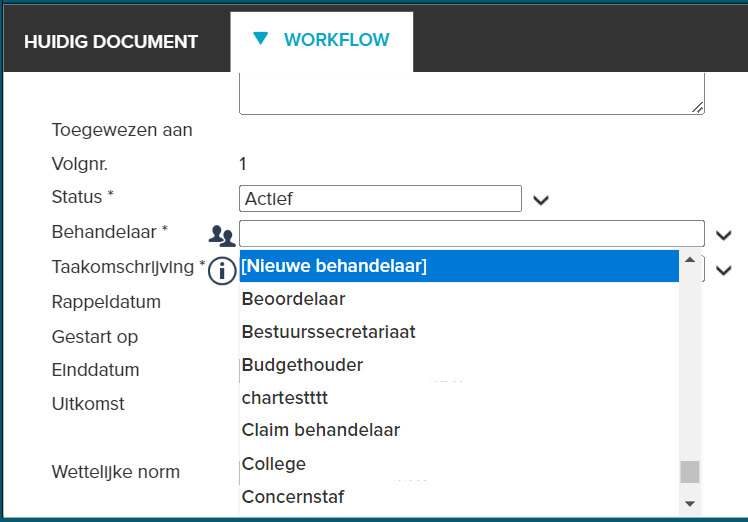
In the workflow function you can already see activities that are assigned by default to the documents of that subbook. However, if you want to add another action, you can do this by clicking on ‘new registration’.
After this, a new manual activity will appear on the screen and by clicking on it you will enter the page where you can choose a document action using the drop-down arrow and also assign it to a person using the drop-down arrow.
¶ Action in Worklist
This action appears in the work list of the person concerned under the name of the document book where the action was assigned. You can find the action by clicking on the option ‘Work list’ in the portal, then selecting the person to whom the action has been assigned using the drop-down arrow and then clicking on the document book under which the action is located.
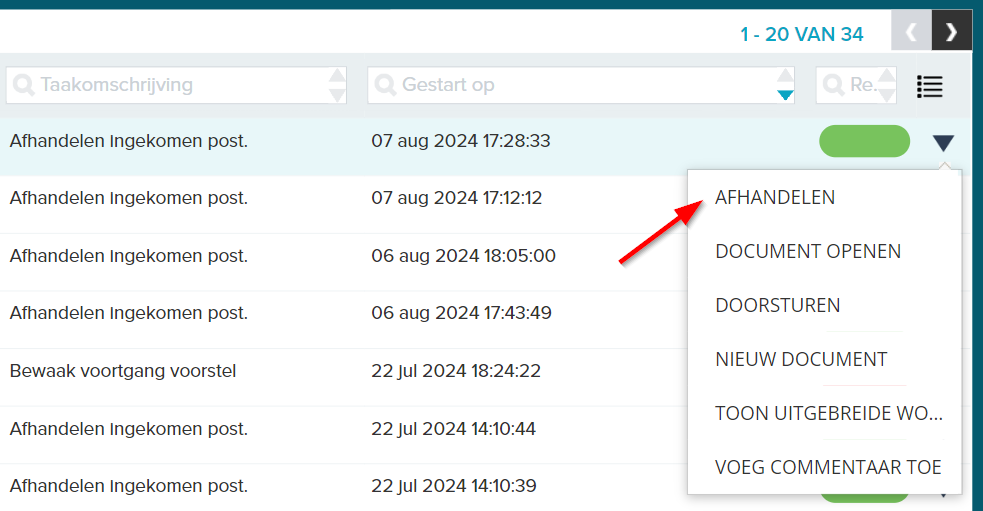
By clicking on the drop-down arrow next to the action you can choose to handle the activity.
If the person to whom the action has been assigned wants to know what the action entails, this person can view the ‘process description’, if this has been added, by clicking on the action. This brings the person to a page with, among other things, the characteristics of the promotion. By clicking on the info icon next to the question ‘what should I do’ under the heading ‘characteristics’, the person will find the description of the action.
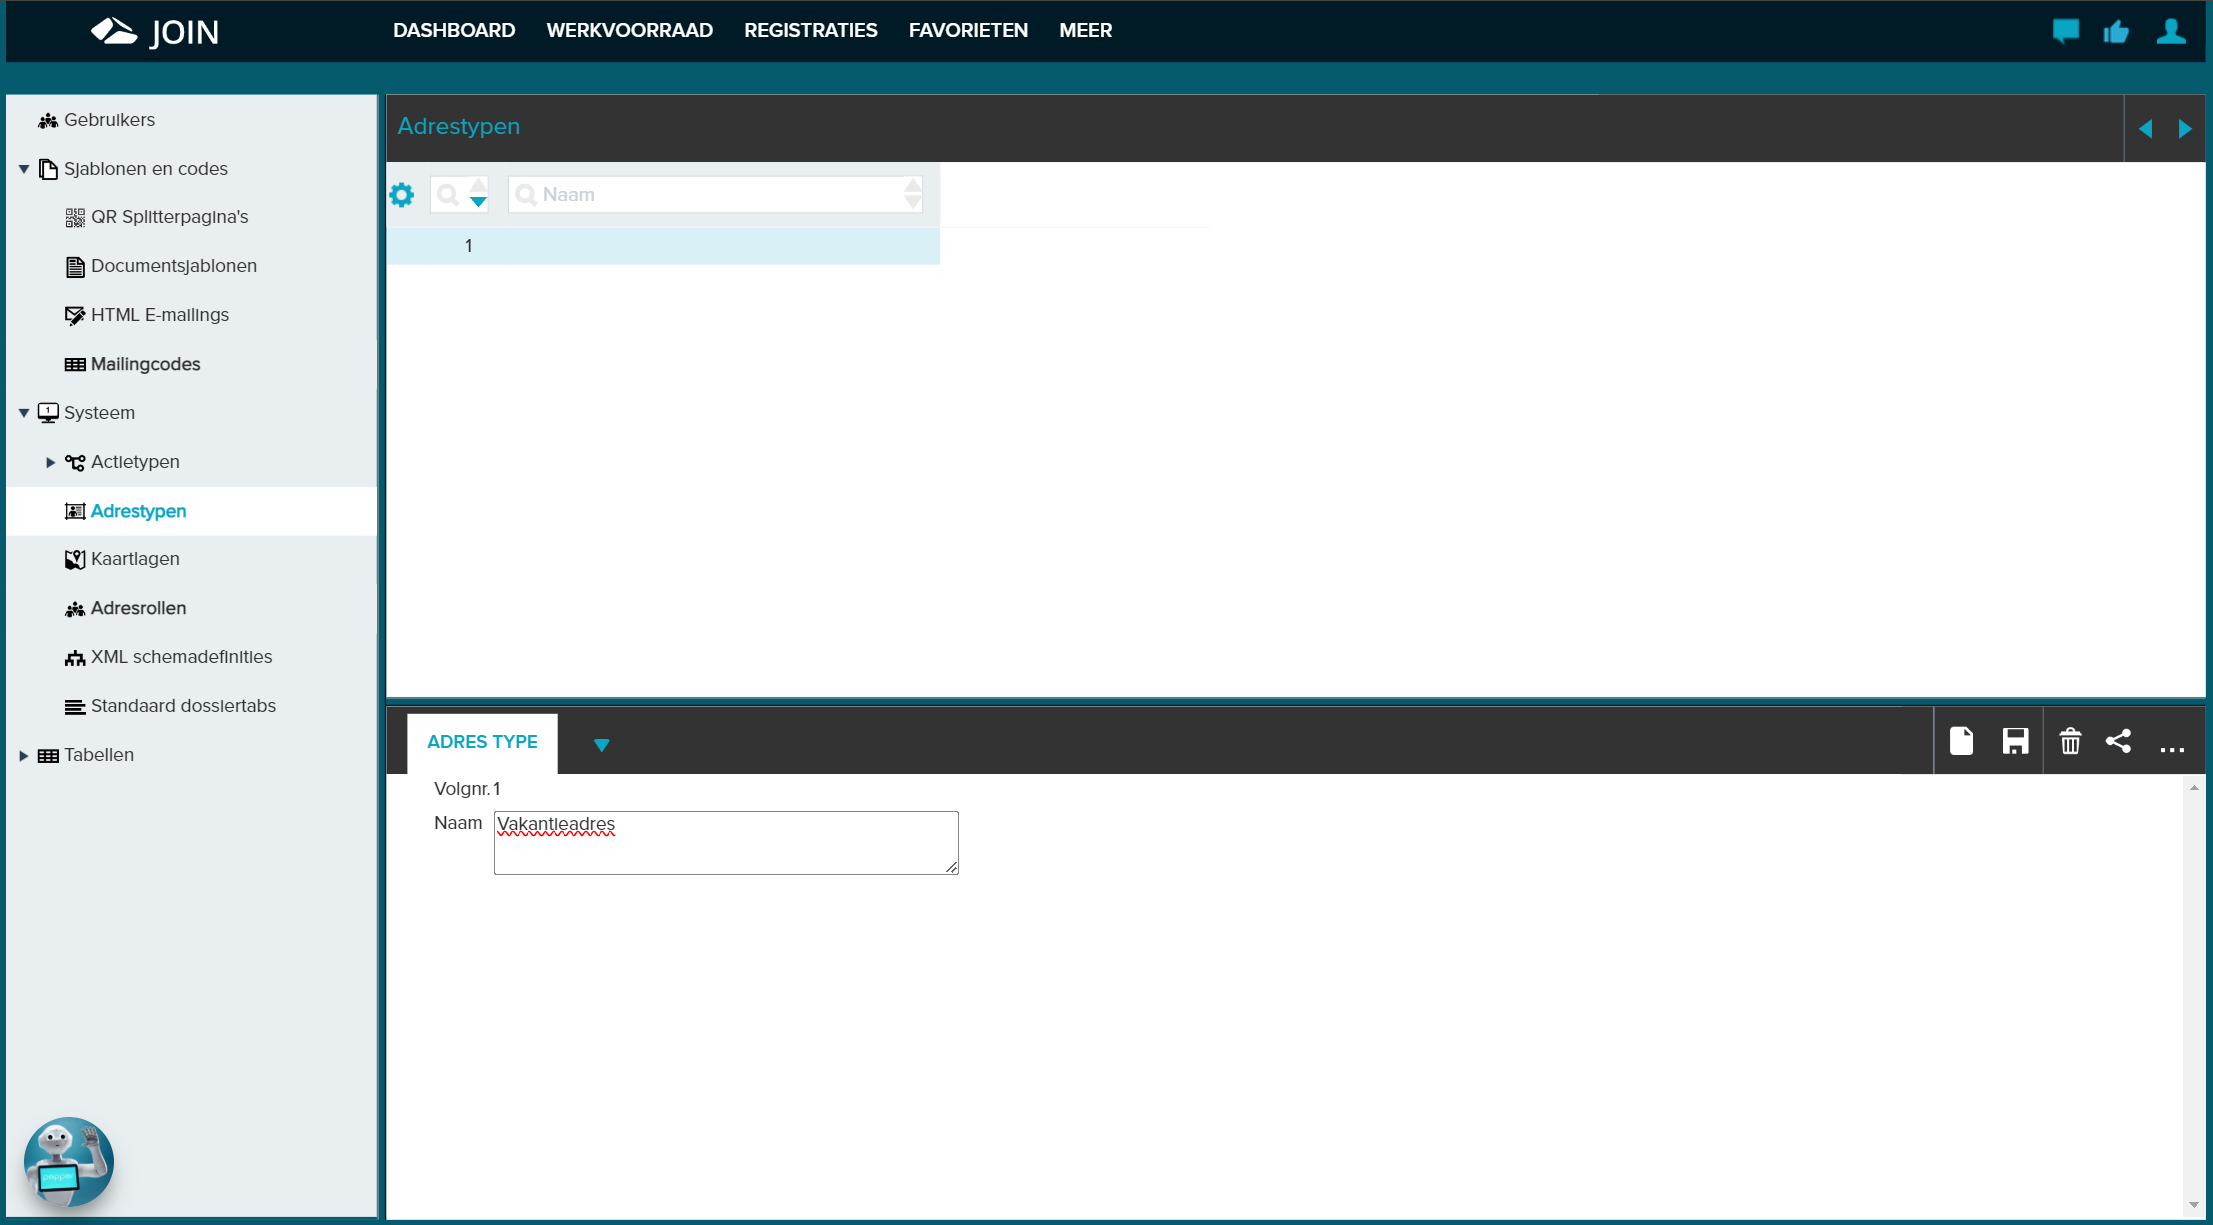
¶ Address types
You can register additional addresses for a contact person. This makes it possible to record a correspondence or holiday address for a contact person in addition to the private address (details of the contact person) and the business address (the address to which the contact person is linked in Decos).
You can create a new address type by clicking on the item ‘address types’ in the book ‘System’ and then clicking on the option new registration in the registration screen.
In this new registration, enter the new address type (eg holiday address) and press ‘save’. This address type will then appear in the Contact Registration screen.
When registering a contact person, you can add address details.
When sending a message, the business address is selected by default. If you choose private for a contact person in the registration screen, and use the drop-down arrow and tick the option ‘Use as default’, then the private data will be the default. You also have the choice to use a created address type as the default. However, if you do not make a choice, the business address will be used as the default. The condition is that you have linked the person to an address book as a contact person. See the chapter Address books for this
¶ Address roles
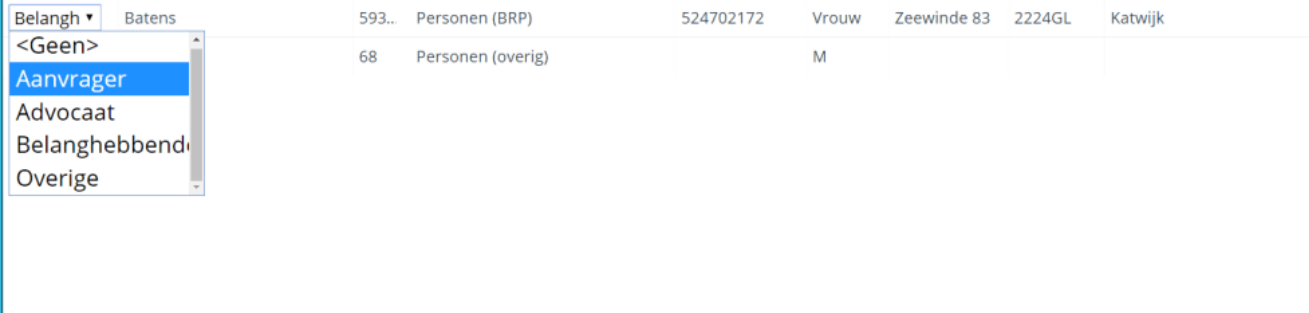
Within dossiers, contact persons occur in different roles. For example, it is possible that someone has submitted a petition in one file and in another file it is precisely the person who objects to a submitted request. In order to ensure that this person receives the correct response (especially if automated receipt confirmations are used), it is important to link the correct role to a person.
The different roles are defined as follows:
- Click on the book ‘System’ and then on the option ‘Address roles’
- Select ‘New registration’ in the Registration screen;
- Enter and save the name of the Address Role.
You can find a person’s address role in the following way:
- In the portal you go to the folder ‘Registrations’
- Then choose a dossier (eg Contracts) from the book ‘Dossier’. However, if you want to link an address role in a document, you must choose a document under a subbook (eg Opinions / decisions) of the book ‘Documents’
- In the registration screen, click on the drop-down arrow next to the ‘Current Files’ function and click on the Addresses function.
- Here you can see the addresses associated with the file.
If no addresses have been linked to the file yet, you can still link addresses to the file by clicking the link icon. After doing this, select the people you want to link and then assign the address roles on the screen.
With the ‘Show address roles’ option you can see the assigned address role of the linked addresses. You can still adjust the address role of a person by clicking the drop-down arrow in front of the address and then selecting and saving the address role. There is also a filter function with which you can filter the address roles by address role.
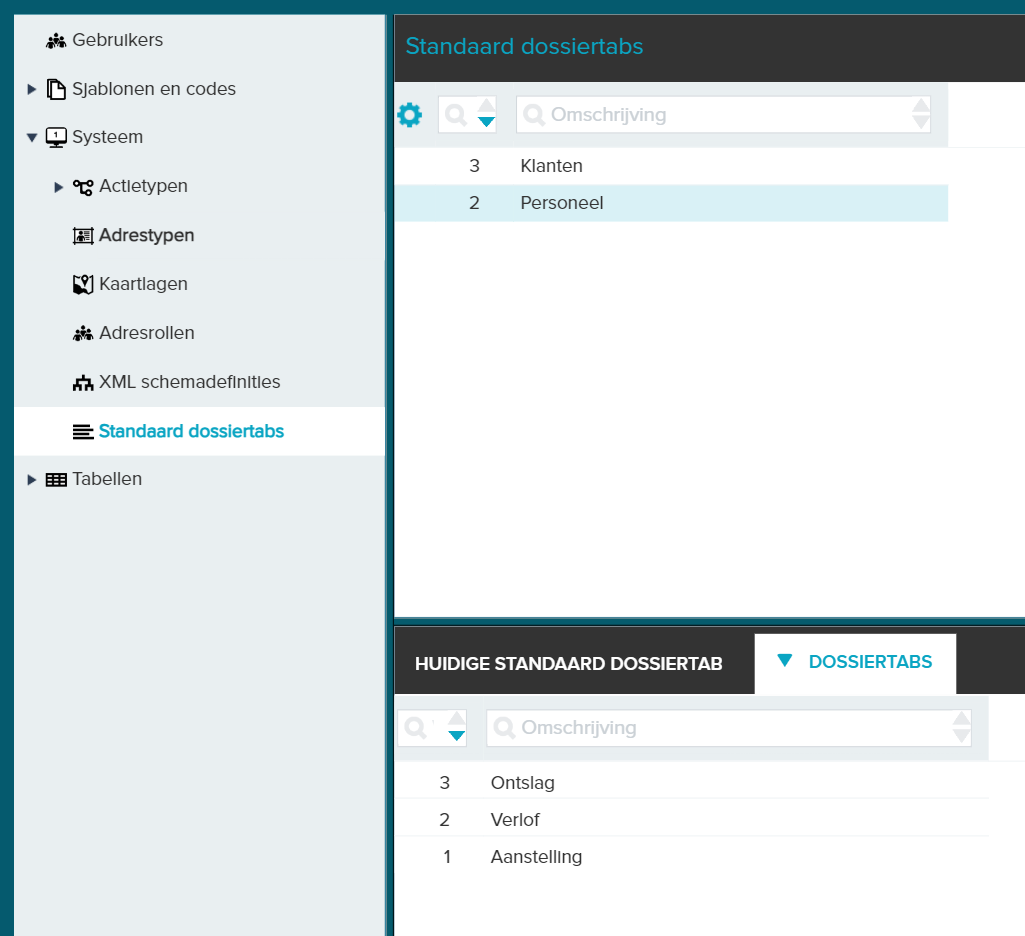
¶ Default file tabs
Within a dossier book the same tabs are regularly added to files. To streamline this process, it is possible to create default dossier tabs. These consist of one or more tabs of your choice. By selecting a default tab, all these tabs are linked to the dossier. You can structure your dossiers using standard tabs.
The creation of standard dossier tabs is done as follows:
- Click on the Administration option in the portal and then select the ‘Default dossier tabs’ section in the ‘System’ book
- Select New in the Registration screen;
- Enter the description for the default tab, for example Personnel dossiers;
- Select the Dossier tab under the drop-down arrow next to the option ‘current default dossier tab’;
- Click on New;
- Enter the name of the dossier tab;
- Click on New again to create a second tab and repeat this until you have entered the entire structure;
You can now use the created dossier tabs to structure the documents within your dossier.
- First click on ‘Registrations’ in the portal and then on the ‘Dossier’ book.
- In this book you click on a dossier folder (eg Contracts) and select a contract dossier from the list (eg Hiring staff).
- Then click on the drop-down arrow next to ‘current dossier’ in the registration screen and click on ‘documents’.
- On the documents page you can add / edit / remove tabs via the gear icon.
- In this case you can select and add the ‘Personnel’ tab by clicking on the add button
- By clicking on the function button ‘show tabs’, the structure of the dossier tab ‘Personnel’ for the documents you have created will appear
You can now select the documents on the tabs you have created (appointment, dismissal, leave) under the dossier tab ‘Personnel’.
- Finally, you can also filter the documents on a created tab (eg dismissal) by clicking on the drop-down arrow next to the filter function button and selecting the corresponding created tab.
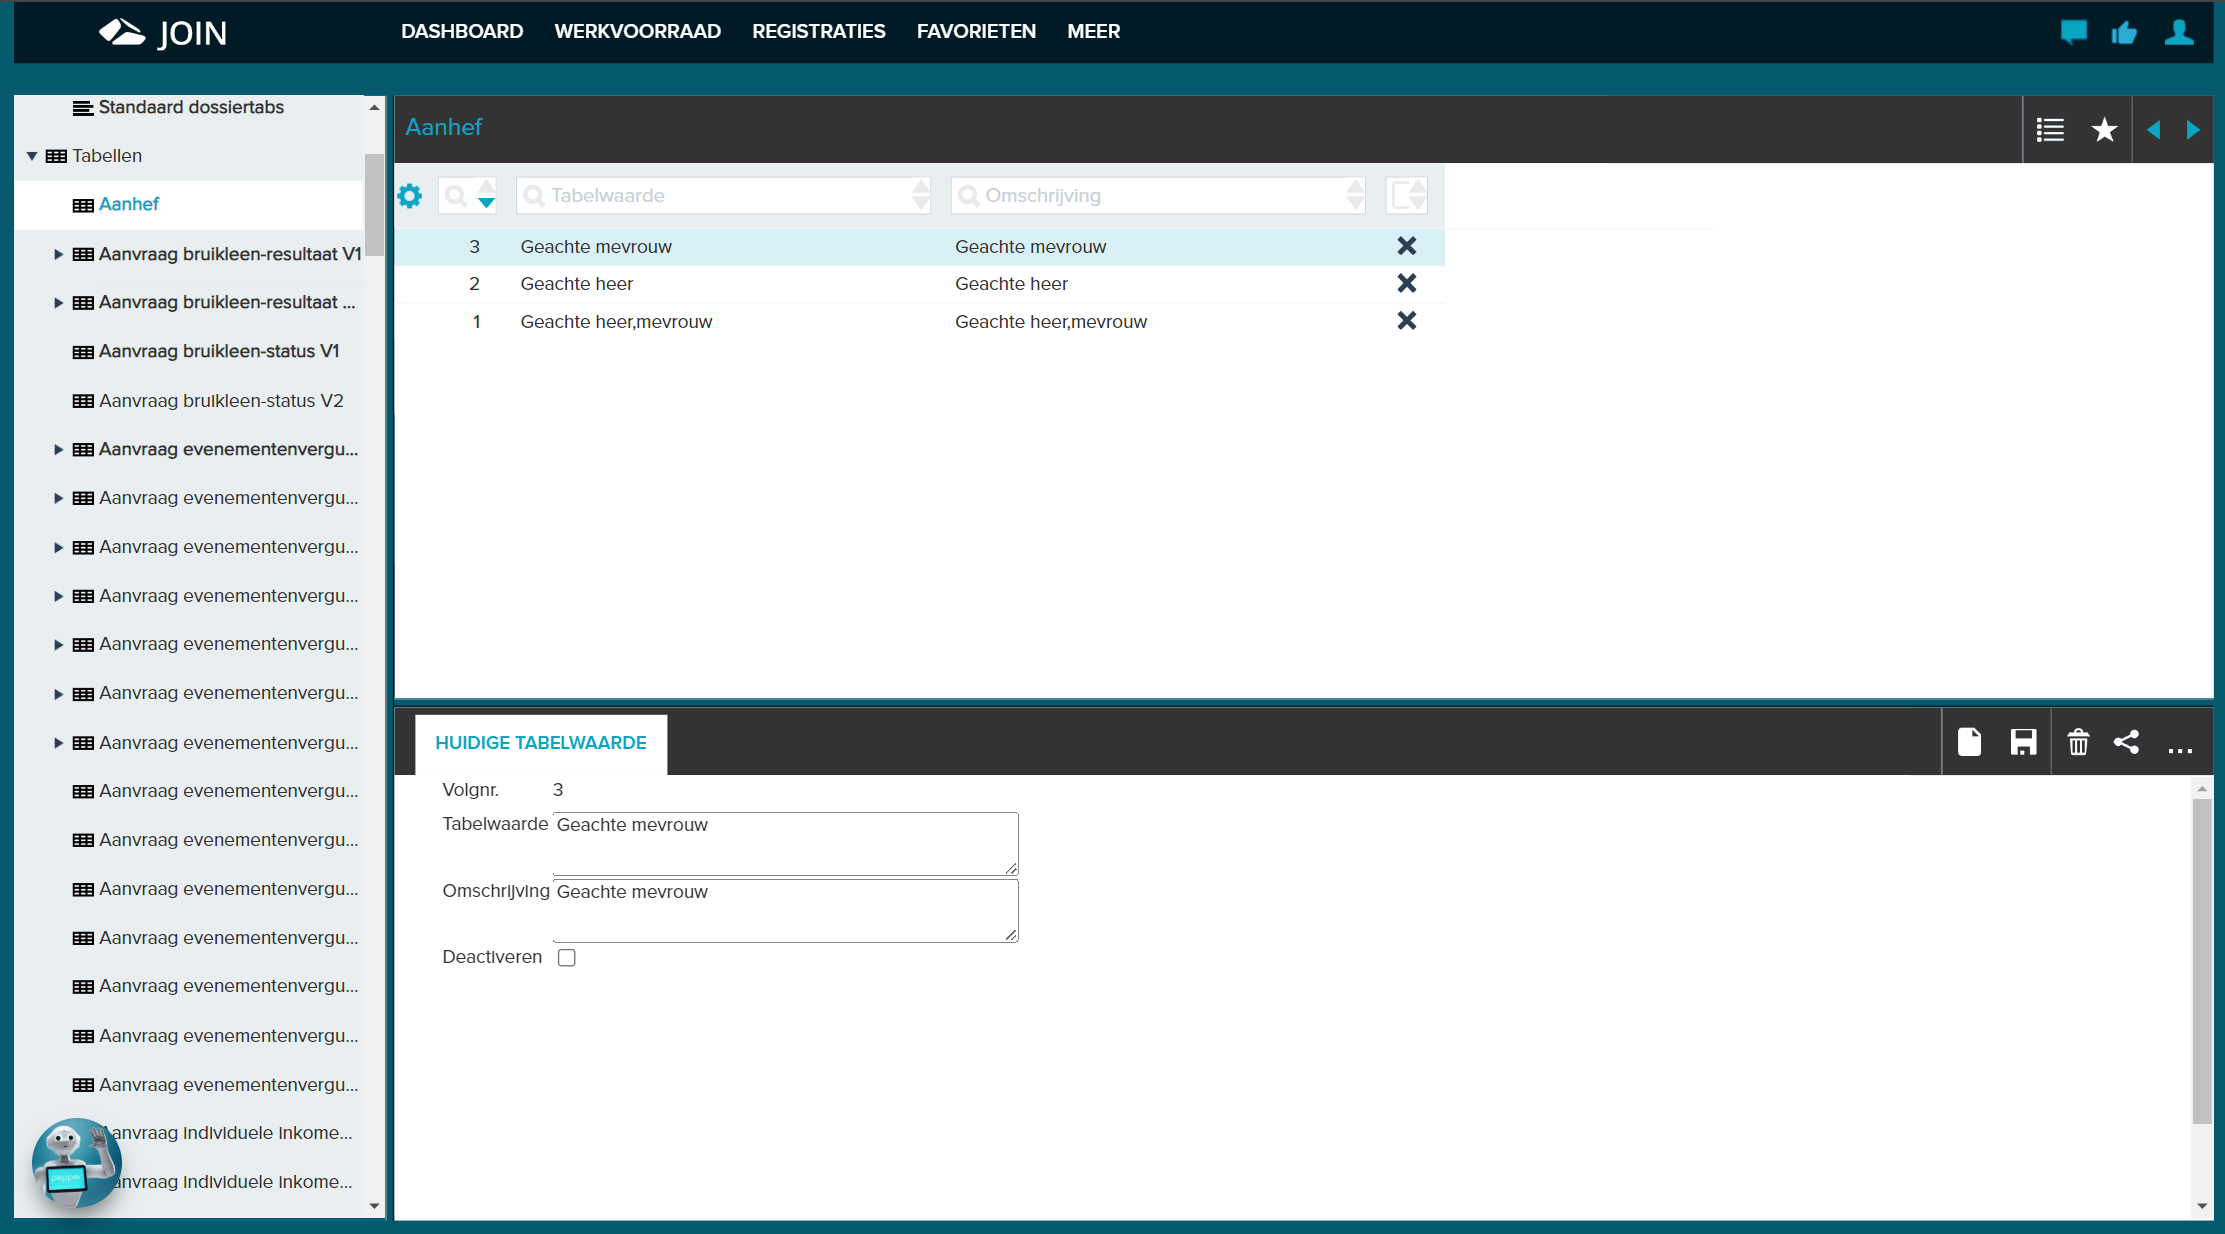
¶ Tables
Frequently used values can be pre-arranged in tables. This saves time and ensures uniformity within your organization.
For a field to which you want to link table values, you first create a table. Then fill the relevant book with the desired values.
¶ Create table
- Open the book ‘Tables’ under the management function. The List shows the contents of this book;
- Click on New registration in the Registration screen;
- Enter the name of the table in the field next to ‘Book’;
- Click on Save;
- The table can now be filled with the desired values.
¶ Enter table values
- In the Menu, click on the drop-down arrow next to the book ‘Tables’ and select the newly created table. You can also select the new table directly from the List;
- Click on New registration in the Registration screen;
- Enter a Table value and add a description;
- Click on Save to add the value to the table;
- Repeat the above steps until you have added all values.
¶ Layered tables
You can create levels in the tables. This allows you to create layered tables where the content of a field determines what the available table values are in the next field.
An example: you create a table ‘Car brands’ with a sub-level ‘type’ and a sub-sub-level ‘engine capacity’ below. When a user selects Volvo via the table Car brands, then in the table linked to field 2, only types of this brand can be selected, after which the field below only shows those engine capacities that are relevant for the selected type.
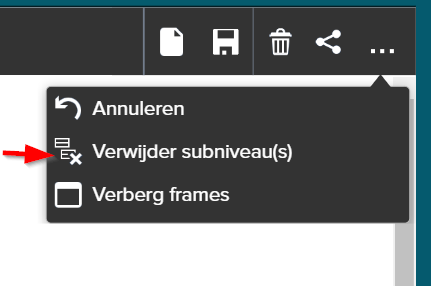
To layer a table, click on the table to which you want to add a sub-level and then on the function button ‘Add a sub-level’ in the registration screen.
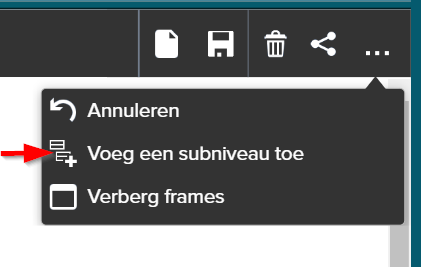
After creating a sub-level you will see that the table in the Menu has a + in front of its name. If you click on the plus you will see the created sub-level. To create even more layers, click on the button ‘Add a sub-level’ in the created sub-level. Then enter the desired table values for each level. However, if you want to delete a sub-level, you can do so by clicking the ‘Delete sub-level’ icon in the level in which you have created the sub-level that you want to delete.