¶ JOIN - Electronic signature
In JOIN Case & Document there are 2 options for digital signing:
JOIN offers its own options for signing on the basis of a certificate (see section electronic signature)
In JOIN it is possible to send signing requests to the signing applications Validsign, Ondertekenen.nl and Zynyo. This is also known as “Decos Signing Service”.
¶ JOIN Signing Service
The digital signature is the digital version of a handwritten signature. Just like with a regular signature, you use it to prove the identity of the signer. In addition, you can also demonstrate with a digital signature when the document has been signed and that it has not been changed since signing.
The signed document is always a PDF. Other file types - such as Word documents - are first converted to PDF before they are signed. If you open a signed PDF in Acrobat Reader, you can see that it is signed with a button on the side:
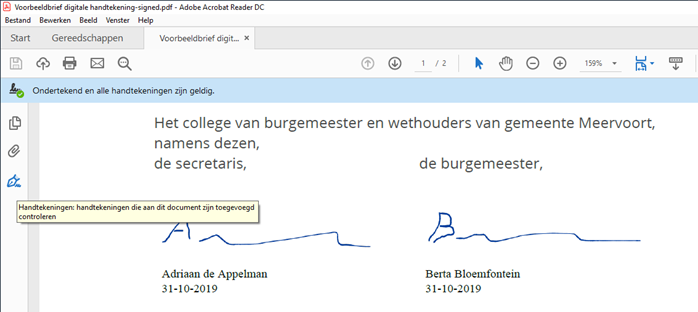
The signatures look like normal signatures when using the Decos Signing Service. The signers can use their mouse or finger (if using a touch screen) to place the signature. In addition, the system sends them an SMS with a verification code to verify their identity.
¶ License and providers
The Decos Signing Service always uses an external provider who provides the digital signatures. JOIN Case & Document can be connected to the Signing Service if you have the Electronic Signature module. In addition, a subscription with the external provider is also required. From October 2019 you can be connected to Zynyo. From January 2020 you can also choose ValidSign or sign.nl. Only one provider can be used at a time within JOIN.
¶ Use of the Decos Signing Service within JOIN
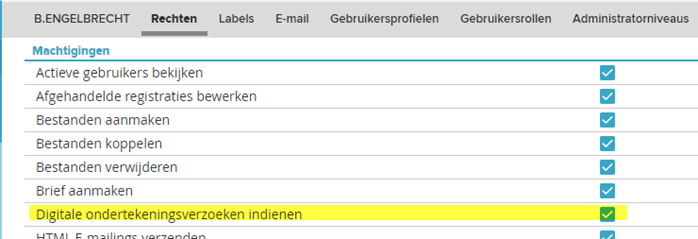
If you are connected to the Decos Signing Service, a button for sending a signing request will be added to JOIN Case & Document. Only users who have the “Submit Digital Signing Requests” permission will see the button, and only for cases or document registrations that contain files that can be signed, such as Word documents or PDFs.
You enable the authorization in JOIN Admin, under the Rights tab of a user:
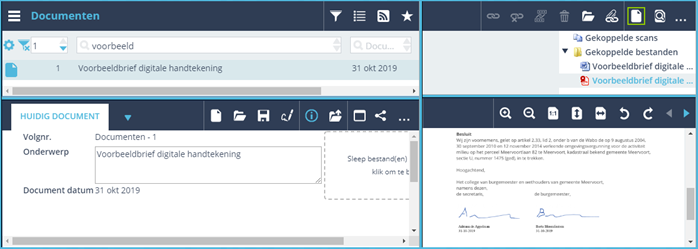
The user will then see the button “Sign” in JOIN for registrations for which signing is possible:

If you click on the button, you will get a screen where you can choose which files from the registration should be signed and to whom a signing request should be sent. You can also choose to sign yourself, then you will also receive a signing request:
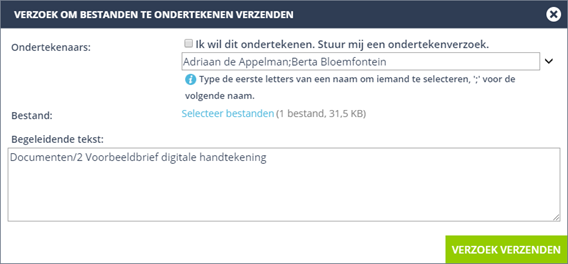
The signing request is always sent by the provider (Zynyo, ValidSign, or sign.nl). Later in this document you can see what that mail looks like for the supported providers. The accompanying text that you enter in this screen is returned in the mail from the provider. By default JOIN fills in the serial number and subject of the registration for you.
¶ Who can sign?
JOIN must send the singing provider the email address and a mobile number for each signer. The mobile number is required by the provider to be able to send the SMS with verification code. The administrator can enter mobile numbers for JOIN users who must be able to sign. In addition, a contact book with names, e-mail addresses and mobile numbers of external signers can be used:

In the screen “Send request to sign files” you can only select users or persons from the contact book for whom both an e-mail address and a mobile number are known within JOIN.
¶ Processing the signing request
The provider sends all selected signers an email invitation to sign the files. Zynyo sends an email to the first signer and the next one once the first person has signed. You will also receive a separate email from Zynyo for each file. With ValidSign and sign.nl, all signers receive one e-mail for all files together.
After the signing request has been sent you will get a blue 🛈 button at registration, with which you can follow the progress of the signing process:
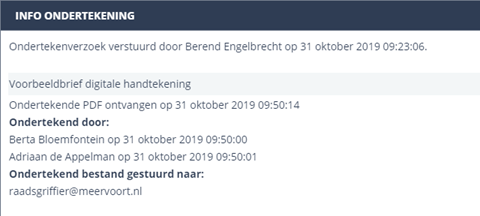
When all invited signers have signed the file, JOIN will retrieve the signed PDF and save it next to the original file:
¶ Details for Zynyo
By default, Zynyo adds an additional page of signing process information to the signed PDF. You can turn this on or off with an extra button in the screen “Send request to sign files”. The “deed of signature” is then stored separately. In addition, Zynyo provides the option to send a copy of the signed file by e-mail to selected persons. In the “Copy to” field you can manually enter e-mail addresses, or select addresses from JOIN’s standard e-mail address book.
¶ Zynyo Authentication methods
Zynyo uses authentication methods to identify a signer and to determine how and where a signature appears in a signed document.
You can configure this in the Authentication methods provider setting for Zynyo:

JOIN supports these methods:
| csc | identification | Personal cloud-based certificate |
| checkedid | identification | CheckedID app and passport or other ID |
| digid | identification | DigiD |
| smstan | identification | SMS to known mobile phone number |
| sso | identification | SSO login |
| mouse | signature | Mouse-drawn signature |
| anchor | signature | Allows to set a specific location for the signature |
In JOIN, only one identification method can be configured, but both signature methods can be combined with it. Zynyo must enable each identification method you want to use in your account. SSO and DigiD require additional configuration to work in your Zynyo environment.
¶ Details for ValidSign
With ValidSign you cannot indicate that signed files should be emailed to specific people. The files are only automatically saved in JOIN.
¶ Details for sign.nl
Just like Zynyo, Ondertekenen.nl offers the possibility to email a copy of the signed files. An audit log of the signing transaction is always created in a separate PDF. This log will be stored in JOIN alongside the first signed file once the transaction is complete.
¶ JOIN Electronic signature
You can convert a Word document to a PDF file via the Decos system and sign it digitally. The Decos electronic signature, in combination with a certificate from an independent organization for identifying persons and organizations on the Internet, is a legally valid signature.
Signing Word documents is a right, which can be enabled or disabled for each user by your application manager. In order to be able to sign documents electronically, you must not only have the correct rights in Decos, but also a certificate that is linked to your name and / or position. In addition, you must have a smart card or USB stick with a personal pin code. And finally, you need an internet connection for the validation of a signature by the aforementioned independent organization.
To sign a document, insert the smart card into your PC’s card reader and enter the PIN. Select the correct document registration in Decos and then select the Files tab, select the file you want to sign and then click on the ‘Sign’ function button.

You will see a preview of the file you are about to sign. This file has already been converted to PDF/A.
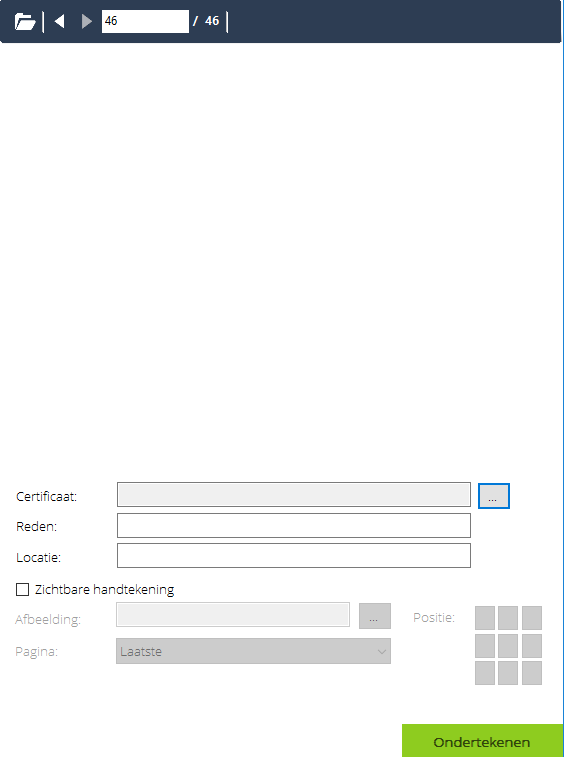
Before signing, you can indicate the following:
- Reason for signing, for example Approved;
- Location, for example Noordwijk;
- If you want the signature to be visible on the final PDF, please tick the appropriate field;
- The location of the signature can be indicated by selecting one of the boxes marked Position at the bottom right. You can also select a rectangle at the right place by holding down the left mouse button;
- If you want to add an image of your “manual” signature in addition to the electronic signature, click on the button with the three dots next to the Image option and select the correct file;
- Indicate whether the electronic signature should only be displayed on the first or on all pages by clicking the drop-down arrow next to the ‘page’ option
- If you agree with the content of the document, click the Sign button. The electronic signature is then placed on the PDF.
After the file has been signed, it is saved as a PDF in JOIN. All of the encrypted electronic data forming the signature is then added to the document. The name of the original file is completely copied with the addition of “.pdf”, for example “manual.doc.pdf”.
A file can be signed by several people. The different signatures are then displayed one below the other on the PDF version.
If you need to sign multiple documents electronically, you can sign all selected documents at once using a bulk action. You only have to enter your PIN once. You then create an overview of all documents to be signed and then choose the bulk action ‘Digital signing’. Then click on the Run button. In the screen that appears, you can tick the files on the left that you want to view. You can view and check the files on the right side of the screen. If you do not want to sign the file, remove the check mark in front of the file name.
¶ Network
From the JOIN server to following URL’s and sub-URL’s need to be accessible:
Signing Service API
https://signingservice.decos.nl
Azure storage queue
https://decossigningpublicqueues.queue.core.windows.net
Using: HTTPS (port 443).