¶ Bulk scanning
If you have bulk scan rights, you will have extra functionalities in addition to the regular JOIN functionalities that are aimed at efficiently processing large quantities of scans.
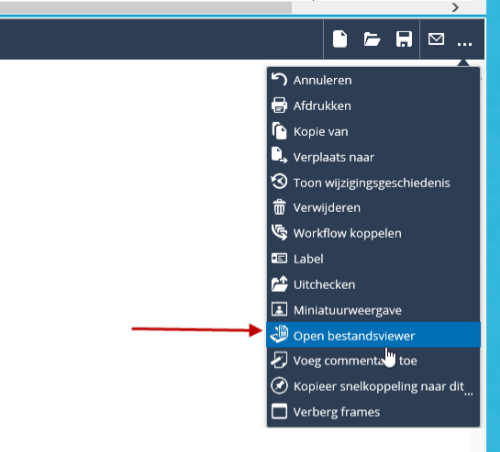
You can use the JOIN bulk scan function in 2 ways: on a widescreen display (the so-called 4-frame) or on 2 screens. To open the scan and file viewer on a second screen, select the “Open file viewer” button in a document register. You can then drag the screen that opens (the file viewer) to the second screen.
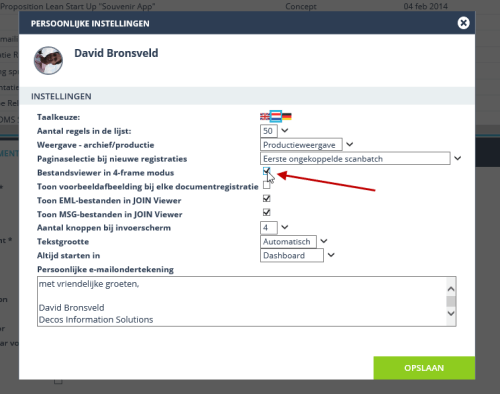
If you are using a wide screen, we recommend that you activate the 4-frame mode. To do this, go to your personal settings and choose the option “file viewer in 4-frame mode”
If you have full user rights but not bulk scan rights, you also have the option to choose to display 4 frames. However, you do not have rights that specifically apply to bulk scanning.
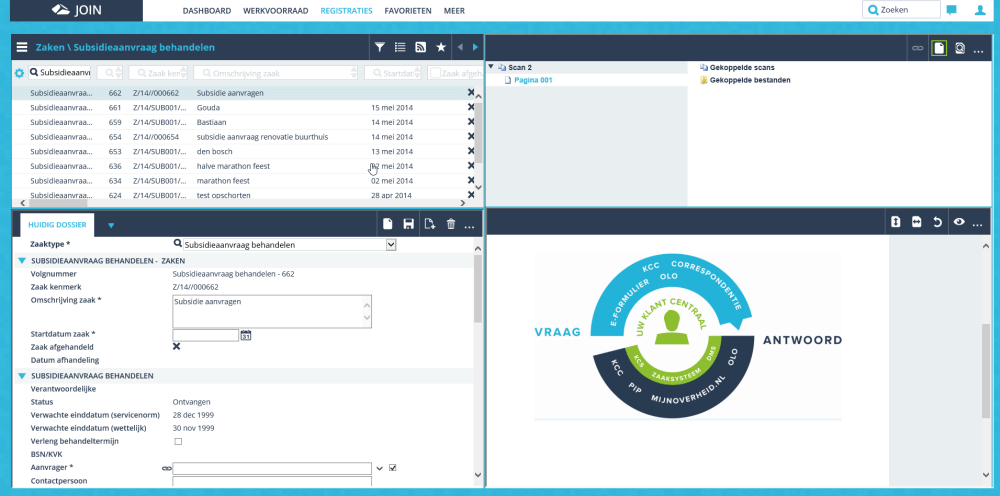
The screen display in 4-frame consists of the following parts:
- The List (top left)
- The Registration screen (bottom left)
- The File List (top right)
- The File Preview (bottom right)
The File List and File Preview together offer the same functionalities as the 2 screen file viewer.
You can make any part of the application screen as large as you want. You can do this by moving the mouse exactly to the separation between two parts. The arrow of the mouse then changes into double arrows and by holding down the left mouse button you can drag the separation in the desired direction.
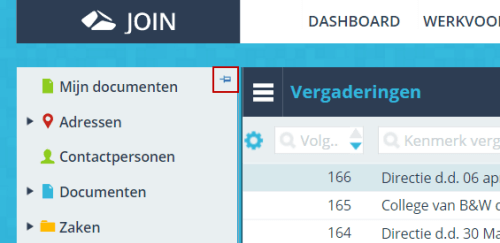
At the top left of the List there is an extra button in the toolbar ![]() , Show / hide Menu. Clicking this button opens the Menu on the left side of the screen. You can then navigate to the desired book and by clicking on this book, the contents of the book will be displayed in the List. The Menu will then close automatically. JOIN remembers the place where you last worked, so when you start the application, it is automatically opened in the book where you were last working and you can pick up where you left off. If you want the Menu to always remain visible, click on the pin at the top right of the Menu. To automatically hide the Menu again, click on this pin again.
, Show / hide Menu. Clicking this button opens the Menu on the left side of the screen. You can then navigate to the desired book and by clicking on this book, the contents of the book will be displayed in the List. The Menu will then close automatically. JOIN remembers the place where you last worked, so when you start the application, it is automatically opened in the book where you were last working and you can pick up where you left off. If you want the Menu to always remain visible, click on the pin at the top right of the Menu. To automatically hide the Menu again, click on this pin again.
The operation of the List and the Registration screen are described elsewhere in this wiki.
¶ The File List
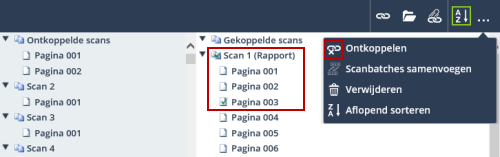
At the top right of the 4-frame are the lists of scans. Two tree structures are displayed:
- on the left a tree with disconnected and not yet connected scans;
- on the right a tree with already linked scans and linked files.

The File List has a toolbar. If buttons are gray, it means that you cannot use the function at the moment. For example, you cannot use the Unlink button until something has already been linked.
| Button | Name | Function | Hotkey |
|---|---|---|---|
| Link scans | Link the pages not yet linked to the current registration | Alt + R | |
| Unlink scans | Unlink the checked pages from the current registrations. | Alt + U | |
| Merge scan batches | Merge the checked scans into one scan. | Alt + M | |
| Delete scans | Remove all checked pages. | ||
| Link file | Link a file that you have saved locally or on a network drive. | ||
| Open file | The selected file is opened. | ||
| Single | The selected file is regularly displayed in the File preview | ||
| Deepzoom | The selected file can be viewed through deep zoom in the File preview. | ||
| Sort ascending | Sort the linked files from A to Z. | ||
| Sort descending | Sort the linked files from Z to A. |
¶ Left tree
In the left tree, unlinked and new scans are available. Unlinked scans are scans that have previously been linked and have been unlinked later. New scans are the scans that are still in the queue to be processed. Regardless of which registration you have selected, you will always see the scans still to be linked. And when you create a new registration in Decos, the first scan that has not yet been linked is automatically selected.
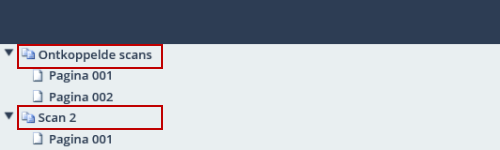
A distinction is made between scans and pages. A scan is a set of pages. Scans are the first level in the tree (with plus / minus sign in front), pages are below on the sub level.
You can link both scans and pages to the current registration. This can be done by checking them. If you click on the image for the scan with the mouse (or space bar), the page will be checked. If you check a scan at the root level, all underlying pages will be checked at the same time.
If you then click on the Link button in the toolbar, the checked scan or pages will be linked to the current registration. Linking is only possible with document registrations to which you have sufficient rights.
¶ Linked scans
On the right side of the File List is the tree with scans and pages that are already linked to a registration. Other linked files such as Word, Excel, photos, etc. are also displayed in this tree structure.
JOIN users who do not have bulk scan rights can also view the scans already linked. Pages marked as attachments (using the Sub Splitter Page) are only available to users with bulk scan rights.
Both scans and pages can be disconnected from the registration. This can be done by clicking on the image for the scan or page with the mouse. Clicking on a scan at the root level automatically selects all child pages as well. Then click the Unlink button in the toolbar and the checked scans or pages will be unlinked and placed back in the left tree with unlinked scans and pages.
If you have linked a fax to the current registration, the fax in the linked scan tree will no longer be named as a fax, but as a scan.
¶ Dragging
Drag is a useful feature to move your scans and pages to reorder, link or unlink them. You drag a page or scan by clicking with the left mouse button and holding down the button. Move to another place while holding down the mouse button and release the mouse button. This way, you can move a page to another scan, unlink a page or scan, or link a page or scan.
If you do not have rights to edit the registration, dragging is not possible.
Reordering scans and pages can be done with dragging if you drop the scan or page in the same tree as where you “picked up” the page or scan.
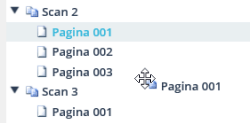
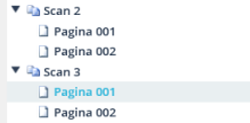
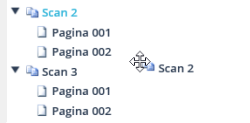
In the example above, page 1 of Scan 2 is dragged to page 1 of Scan 3. As soon as the mouse button is released, the dragged page will be placed under page 001 and page number 002 will be automatically renumbered.
 !
!
In the example above, Scan 1 (including underlying pages) is dragged to Scan 2. Scan 1, including the underlying pages, will hang directly below Scan 2 and become Scan 3. The existing Scan 3 moves with all its pages to Scan 4.
When you drag a scan, you automatically drag all pages of the scan as well. For reordering scans, it does not matter whether you drop the scan on another scan or on another page: the scan always ends up directly under that scan.
If you have dragged a page, it will always be placed directly below the page where you dropped the dragged page. If you drop a page on a scan, the dragged page will always be “Page 001”.
If you drop a scan on “Detached Scans”, that scan will always be “Scan 001”.
You can also drop scans and pages on the white spaces within the tree. The scan or page you are dragging is then highlighted in blue. A page will then form a new scan. A scan will then be moved to the very last scan of that tree.
If you are rearranging pages in the linked tree, you can also drop a page on the header “Linked scans” at the top of the tree. The page then becomes a new scan. In a way, you’ve now split a scan into two scans.
If other scans or pages within that tree are checked at the time of linking or unlinking, the checked pages will also be linked or unlinked. They end up in the same place where you dropped the scan or page.
You can directly organize the scans and pages by dragging and dropping. This is not possible via the toolbar. If you link via the toolbar, all checked pages together form a new scan. That new scan will always be the last in the tree. If you unlink via the toolbar, all checked pages will be added to the “unlinked scans” section of the left tree.
Tip: If you press the “Control” key while dragging / unlinking, the linked scan will be kept and Decos will place a copy in the unlinked scan tree.
¶ Merge scans
If you want to merge scans directly, you can select two or more different scans within the same tree. The button ‘Merge scans’ then becomes usable. Clicking this button will move the bottom checked scan(s) to the top checked scan. This works for both the unlinked scans and the linked scans.
¶ Splitter pages
In practice, mail items or other documents are often placed on the scanner in one go. To ensure that it is clear in Decos which pages exactly belong together and together form a scan, you can use the Decos Splitter pages. Before scanning the paper documents, place a Splitter page after each set. These pages are provided with a barcode that is recognized by Decos. It is then signaled that the pages that follow form a new scan.
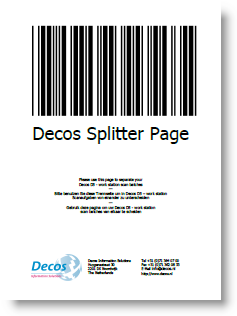

For example: You create a stack of five pages, with a Splitter Page as the fourth page. The result is two scans. The first consists of pages one to three and the second consists of page five. This allows you to organize your unlinked scans before they are scanned and then scan in one session.
If you have attachments in your scans, use the Sub Splitter Page. This does not make a new scan, but marks the page after the Sub Splitter Page as an “attachment”. This makes large scanning sessions particularly clear.
You can use an unlimited number of Splitter pages during scanning.
The Splitter pages can be downloaded from the customer area on the Decos website: https://decos.freshdesk.com/a/solutions/articles/17000055317?lang=nl
If your organization has the barcode module, it is also possible to use a QR code as a splitter page. The QR code contains a key that is linked to data in Decos. A scan with a QR code is immediately saved as a new registration in Decos and the associated workflow is started automatically.
¶ Files not yet linked
Since version 6.0.6 it is possible to add files not yet linked from the windows explorer to JOIN. The left panel in file view mode is used for this. The function, unlike processing scans, is available to all users. So not only for users with bulk scan rights.
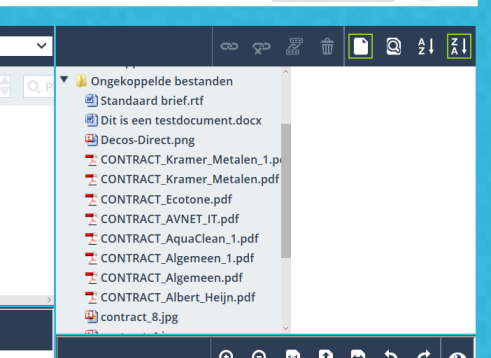
The technical administrator can add a shortcut to each user’s explorer that points to the Queue folder in the scan source folder (on the JOIN fileserver). For questions about configuration, please contact one of our technical specialists.
¶ The File Preview
The File Preview is located in the lower right corner of the application and displays the page selected in the File List. If not a page but a scan is selected, the first page of that particular scan is displayed.
¶ The toolbar
You can edit a scan using the toolbar above the File Preview. The following operations are possible:
| Button | Name | Function |
|---|---|---|
| Increases | Zoom in on the page | |
| Reduce | Zoom out on the page | |
| True size | To undo zooming in or out | |
| Full page | Zoom in or out far enough so that the whole page is in view | |
| Full width | Zoom in or out far enough so that the entire width of the page is visible | |
| Quarter turn left | Rotate the page counterclockwise 90 degrees | |
| Quarter turn right | Rotate the page 90 degrees clockwise | |
| Show note | Display the notes added to the page | |
| New note | Add a note | |
| Show markers | Display the marks made on the page | |
| New marking | Specify a new mark | |
| Remove marking | Remove the mark | |
| OCR selection | Button to transfer text from scan to registration |
If you have viewed a file other than a scan, some buttons are not available.
If you have selected Deepzoom in the toolbar of the File list, you will have a number of extra buttons at the bottom right of your screen:
| Button | Name | Function |
|---|---|---|
| Increases | Zoom in on the page | |
| Reduce | Zoom out on the page | |
| True size | To undo zooming in or out | |
| Full screen | Zoom in or out far enough to fill the entire screen |
If you have chosen Deep Zoom, you can hold down the left mouse button on the File Preview. You can then grab and drag the scan or file until you have the correct part of the scan on your screen.