¶ JOIN Admin Users
The Users folder in the Navigation of JOIN Admin contains the users of JOIN. You can add new users, or change or delete existing users.
If you are adding a new user from JOIN in JOIN Admin, you must complete the following tabs:
- Users tab
- Rights tab
- Labels tab
- E-mail tab
- User Profiles tab
- Administrator Levels tab
Users themselves do not have access to JOIN Admin. Only administrators can edit the user data in JOIN Admin.
¶ User toolbar
| Button | Description | Key combination |
|---|---|---|
| Show full list | Alt A. | |
| New user | Alt N. | |
| New group for users | Alt G. | |
| Print rights | Alt P. | |
| Link user to group | ||
| Save | Alt S. | |
| Cancel | Alt C. | |
| Delete User | Alt R. |
¶ Add users
In the Navigation click on User management -> Users. The list of existing users appears in the Center.
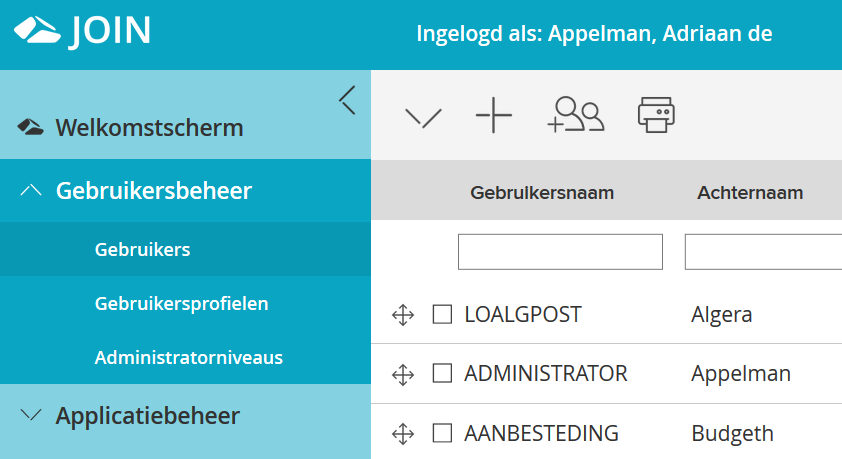
- Click the New button. You can now enter the information for the new user on the various tabs.
¶ New User tab
On the New user tab, enter the personal details of the new user.
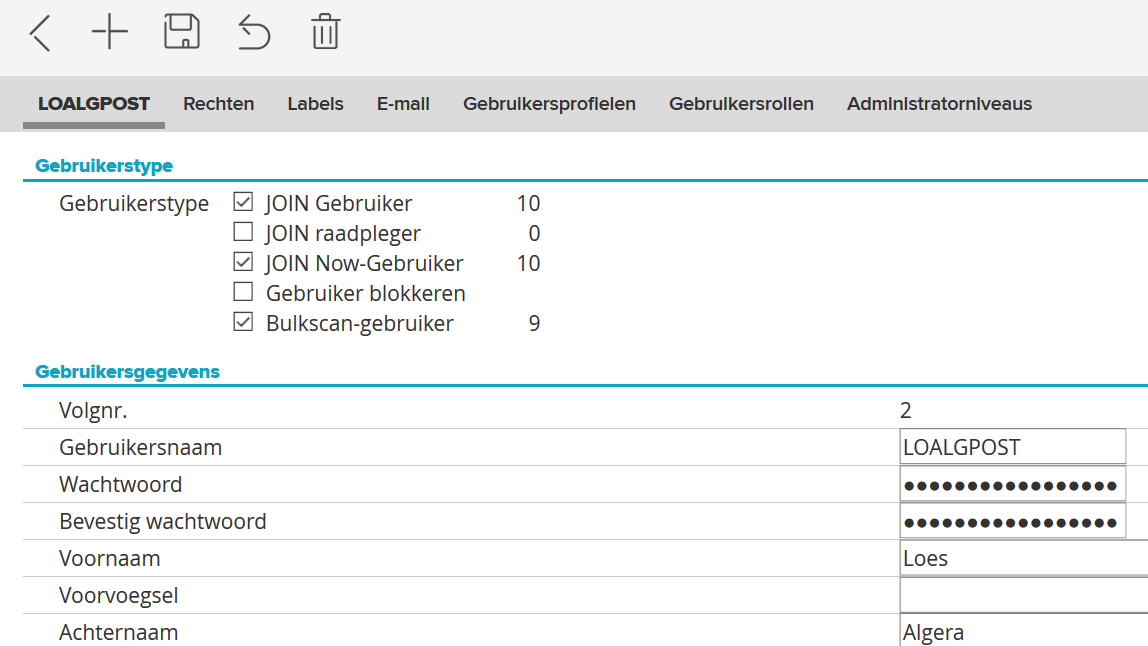
- At User type you can check what the user options are for the new user. You can choose from: standard, consultation, bulk scan, Decos Direct and a DSP user. The available types depend on the license that your organization has acquired.
- Fill in the Username and Password fields and confirm the password.
- Under Actions delegated to, enter the username of one or more Decos users who are allowed to handle activities of the new User, and also to be allowed to check in checked-out files.
- Enter the personal details of the user such as first name, prefix and last name if necessary.
- Click on Save in the toolbar.
The Block user option means that the user cannot log in to JOIN and that he is not counted as a user for the number of JOIN licenses. If a user is no longer active, we recommend that you check the Block user option and not select Delete. This way you keep the work queue history of this user and with the Delete button you delete the user including work queue.
¶ Permissions tab
On the Rights tab you assign rights to the user in JOIN.
The Rights tab consists of a number of parts:
- Special rights
- Access to management menus
- Bulk actions allowed for this user
- Activity rights
- Permissions
Special rights

A user automatically receives standard rights within JOIN. With Special rights you can extend or limit the rights of a user. The options are:
- Administrator: a (super) administrator has extra rights with respect to other users of JOIN:
- Only administrators have access to JOIN Admin.
- Administrators are allowed to change passwords of other users (standard users can only change their own password).
- Only administrators can add or remove users.
- Administrators can change the folder where linked files are stored. This name is also the name of the scan file (.dsc), in which the scanned documents are stored.
- An administrator can handle actions of another user.
- An administrator can grant rights to practitioners to set and manage actions in JOIN (in the menu Administration> System> Action types)
- Limited user: with this option the user will see a limited input screen in JOIN. Item profiles define which fields are visible.
- View Change History: This option allows a user to view the history of registrations.
Access to management menus

With the Access to management menus option, you determine whether a user has access to the Administration folder in the JOIN Menu or to a part of this folder.
¶ Bulk actions allowed for this user
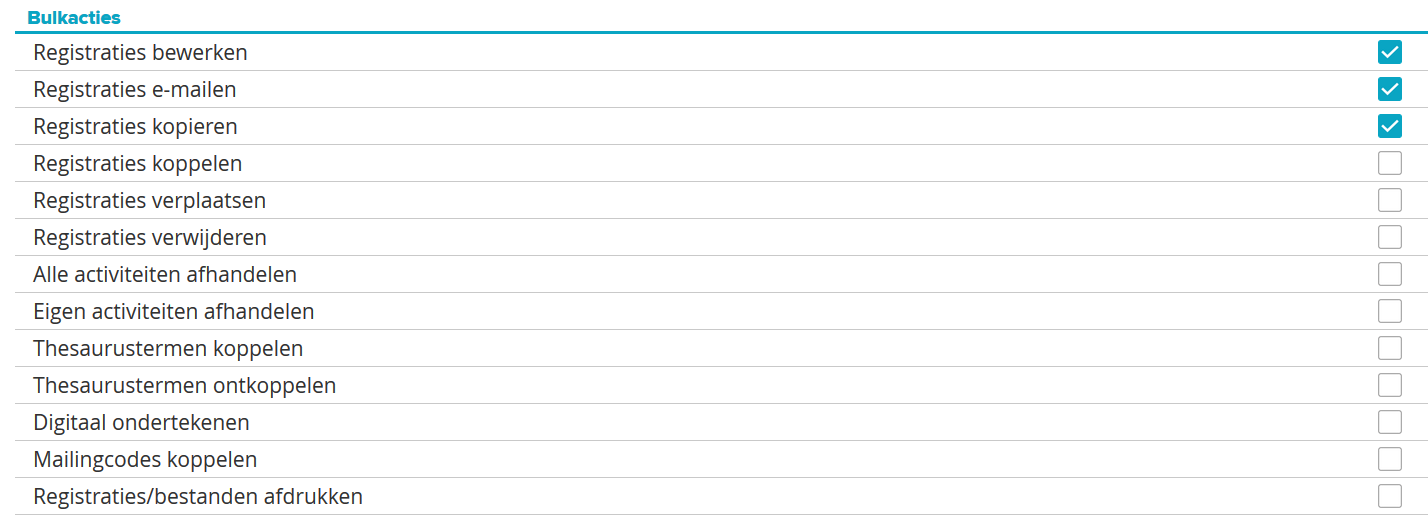
You can give a user the right to perform bulk actions in JOIN. In addition, you can check that a user may have more than one registration at a time:
- modify
- move
- remove
- to copy
- to link
- assign actions
You can also set per user whether they can only handle their own activities or the activities of others in bulk.
If you use the electronic signature, you can give the user the right to electronically sign documents in bulk. An electronic signature is a legally valid signature, so this right must be handled with the utmost care.
If you are using a thesaurus, the options Link thesaurus terms or Unlink thesaurus terms allow you to perform bulk actions on thesaurus terms.
Since version 6.22 the bulk right “create files from case overview” has been added. This is available to users of the business system. Users with this right may use this bulk merge function from a business overview.
¶ Activity rights

Under Activity rights you give a user the right to change the operator of an action. This makes it possible for the user to forward actions to others. If you are using the workflow module, you can set here per user whether they can add, change or delete activities.
Permissions
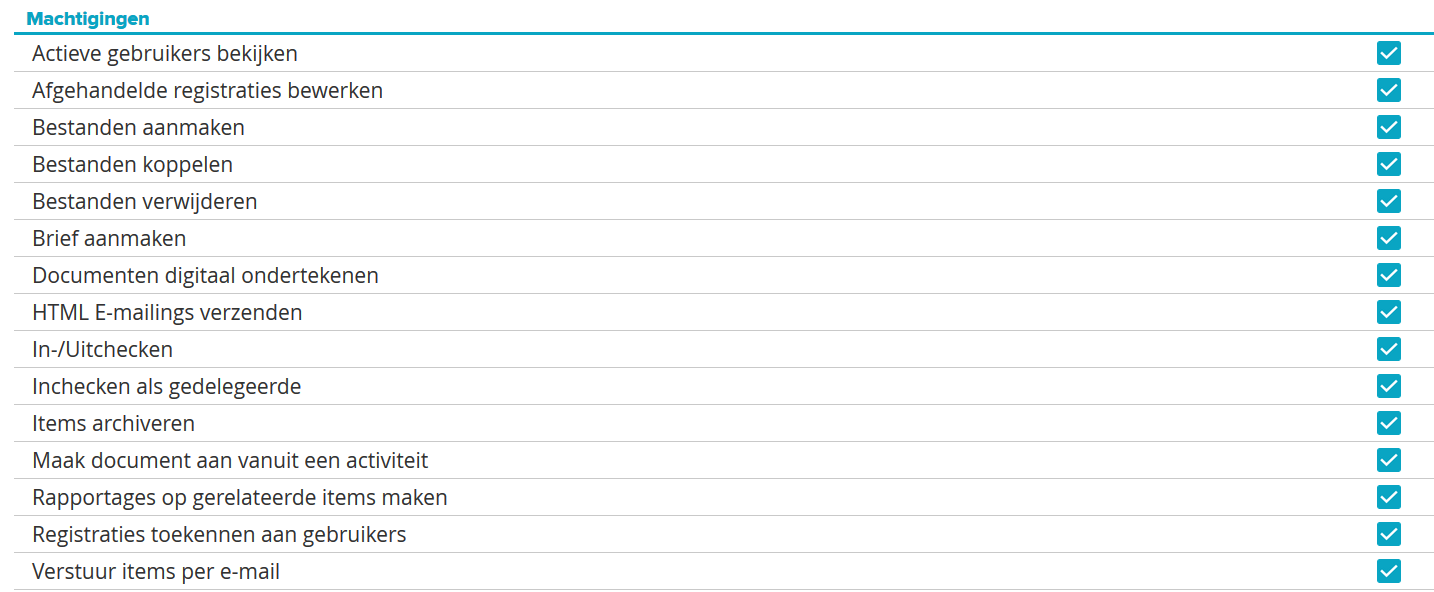
Under Permissions you can set a number of JOIN functions for the user. These are generic rights to functions that apply to the user throughout the application. For example, you determine who in your organization has the right to create, save (link), delete or send registrations within JOIN via the e-mail link. You can indicate whether a user has the right to create responses from an activity or letters.
You can give a user the right to assign registrations to users. With this function a user can determine per registration which other user or user group is allowed to see the relevant registration. For this, the user must have reading rights to the book in which the registration is located. The user with this right will see an extra field under each registration in JOIN.

In the drop-down list at “Only visible to” you will find all user names and user groups; any selected can see the registration. The option Assign registrations to users allows you to make certain registrations in a book invisible to users who can make full use of the rest of the book.
Please note: this function is not intended to create a complete rights structure.
Edit completed registrations: gives a user the right to add documents to a file that has already been completed. This function can be used for example with meeting files. Until the time of the meeting, users can add data to this file. After the meeting, the file is dealt with, but the secretary reserves the right to add the minutes at a later time.
Send HTML Emailings: Allows the user to create and send an emailing from JOIN to a group of recipients.
You can also indicate here whether a user has the right to check in and out registrations and to check in registrations as a delegate.
Archive items: This option allows a user to archive the records. Archived registrations are placed in an archive environment, so that they are no longer visible in the production environment.
If you have specified in Special rights that the user is a limited user, the option Archive items is not available.
Finally, save the data entered for this user by clicking on Save.
¶ Labels tab
On the Labels tab, set the templates to be used when the user clicks the Label button in JOIN.

You can choose a template per type of registration for:
- the contact book;
- a document book;
- an address book;
- a file book.
- another item type in use within your organization.
If you do not set anything in one of these categories, the Label button will not be active for that book type.
You can save the entered data by pressing Save.
¶ E-mail tab
On the E-mail tab you must enter the following information:
Enter the e-mail address of the user at E-mail address.
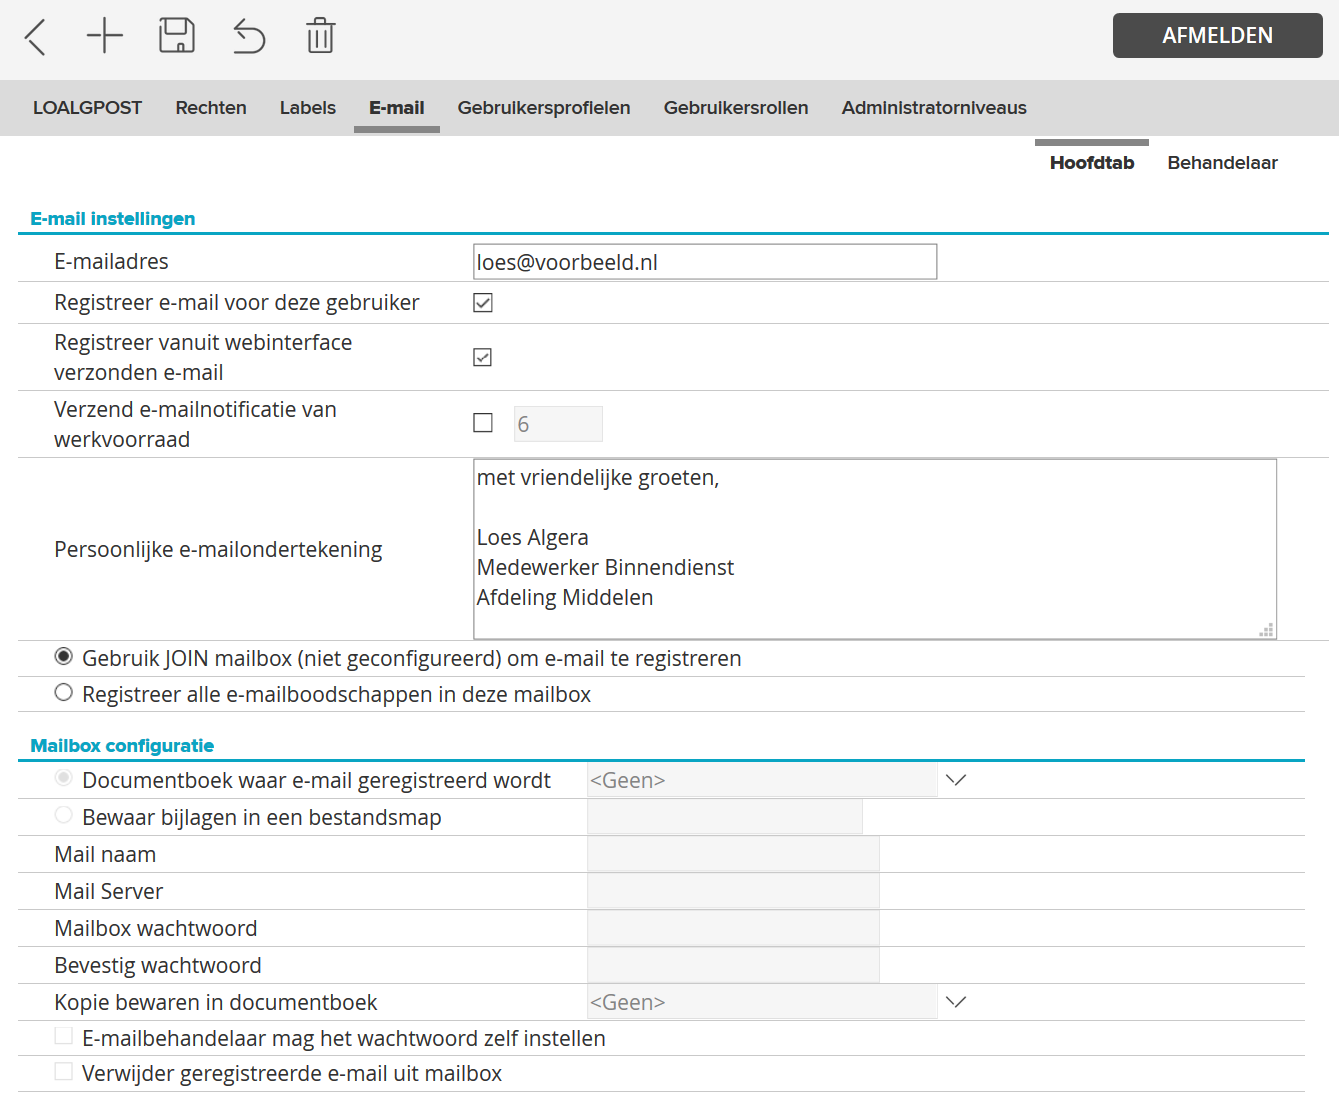
- Register e-mail for this user tick if you want the e-mail of the user to be registered within JOIN.
- Register e-mail sent from web interface tick if the e-mails sent by the user from JOIN should be registered.
- If you tick Send e-mail notification of open parts, JOIN sends an e-mail to the user when a new action is added to the open parts list. You can enter a number of hours for this function, after which a notification will always be sent. We recommend that you only use this function if there are few open documents. Otherwise it is better to send the user an overview of open documents on a regular basis. You will find more information about this in the Overviews chapter.
- In the field behind Personal e-mail signature you can enter a text that will be placed under messages that the user sends from JOIN.
- By checking the box Register all e-mail messages in this mailbox, you can fill in the fields mentioned under Mailbox configuration.
- Select the document book in which you want to save the e-mail messages using the drop-down arrow.
- Save attachments in a file folder: If you choose this, you will save the attachments in a file folder. You can enter the name of the file folder in the text field next to it. This allows you to automatically place files on the Decos server and prepare them for further import procedures (for example, information requests from a website).
- Mail name and Mail server: enter the name of the mailbox and mailbox server here.
- Mailbox password and Confirm password: enter the password for the mailbox here or let the user set a password himself. In that case, check the option Email handler may set the password itself.
- If you want to keep a copy of the e-mail, you can indicate this at Save copy in document book. Select the correct book using the drop-down arrow.
- If you want registered e-mail to be deleted, you can indicate this by checking this option.
- Click on Save in the toolbar.
- There are two subtabs on the right side of the Email tab:
By default you work on the main tab. If you choose the Handler subtab, you can indicate here who will have rights to the E-mail pane in JOIN
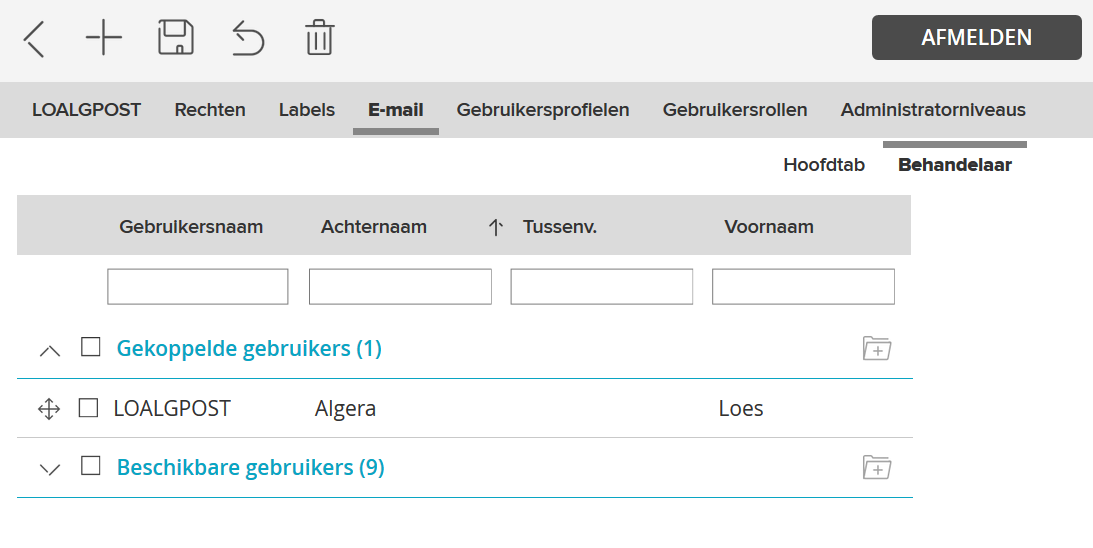
To link a user:
- Click Available Users.
- Check one or more users. The line a user is on will change color as soon as it is checked.
- Click the link button next to Linked users.
- Click the Save button to save the entered data.
To unlink a user:
- Click Associated Users.
- Check the user you want to unlink. The line containing the name changes color.
- Click the Unlink Items button next to Available Users.
- Click the Save button to save the entered data.
You can also link or unlink users by dragging:
- Click the plus sign for Available users.
- Hold down the left mouse button. The line containing the name changes color.
- Now drag the available user to the Linked user line. A logo will appear as soon as you perform the action.
- As soon as you release the left mouse button, the user is linked.
- To unlink a user, drag it back to the Available users.
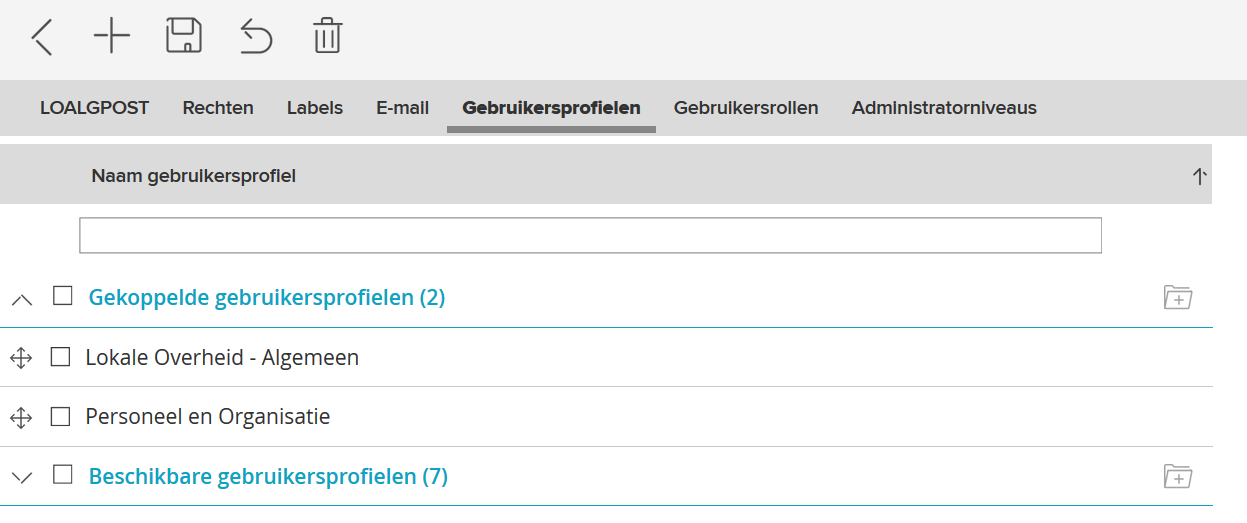
¶ User Profiles tab
A user profile bundles individual users into a group of users who have the same rights. This speeds up and simplifies the granting of rights.
On the User profiles tab, choose the profile to which you want to associate the user. Two hyperlinks are visible on the tab: linked user profiles and available user profiles. Behind these hyperlinks is a number in brackets, indicating how many user profiles are already linked and how many user profiles are available in total. By clicking on a hyperlink, or by clicking on the arrow icon in front of the link, all user profiles from the relevant category will be visible.
Please note: you can of course only link user profiles if they have already been created.
To link a user profile:
- Click Available User Profiles.
- Check one or more profiles for the user (maximum seven). The line containing a profile changes color as soon as it is checked.
- Click the link button next to Linked User Profiles.
- Click the Save button to save the entered data.
To unlink a user profile:
- Click Associated User Profiles.
- Check the user profile you want to unlink. The line containing the name changes color.
- Click the Unlink Items button next to Available User Profiles.
- Click the Save button to save the entered data.
You can also link or unlink user profiles by dragging:
- Click the plus sign for Available User Profiles.
- Hold down the left mouse button. The line containing the name changes color.
- Now drag the available user profile to the Linked user profiles line. A logo will appear as soon as you perform the action.
- As soon as you release the left mouse button, the user profile is linked.
- To unlink a user profile, drag it back to the Available User Profiles.
To search for a user profile:
- Enter the name of a user profile in the filter bar.
- Hit Enter.
A user can be associated with up to seven user profiles at the same time. In most cases, one profile per user is recommended, this makes setting rights the easiest.
¶ Administrator Levels tab
If you want to give Administrator rights to manage a user, you can indicate this on the Administrator levels tab. Two hyperlinks are visible on the tab: Linked administrator levels and Available administrator levels. Behind these hyperlinks is a number in brackets, which indicates how many administrator levels have rights to manage the user and how many levels do not (yet) have this. By clicking on a hyperlink, or by clicking on the arrow icon in front of the link, all Administrator levels from the relevant category are visible.
To link administrator levels:
- Click Available Administrator Levels.
- Check one or more levels. The line containing the name of the level changes color.
- Click the link button next to Linked administrator levels.
- Click the Save button to save the entered data.
To unlink an Administrator level:
- Click Associated Administrator Levels.
- Tick the level you want to disconnect. The line containing the name changes color.
- Click Unlink items next to Available administrator levels.
- Click the Save button to save the entered data.
You can also link or unlink administrator levels by dragging:
- Click the plus sign for Available administrator levels.
- Hold down the left mouse button. The line containing the name of the level changes color.
- Now drag the available administrator level to the Linked administrator levels line. A logo will appear as soon as you perform the action.
- As soon as you release the left mouse button, the administrator level is linked.
- To unlink an administrator level, drag it back to the Available administrator levels.
To search for an Administrator level:
- Enter the name of an Administrator level in the filter bar.
- Hit Enter.
¶ Change users
- To change the details of a user, click on User management -> Users in the Navigation. The complete list of available users appears in the Center.
- In the filter bar (below the button bar in the Center) you enter search data, for example the last name of the user. Then press Enter.
- In the Center, click on the name of the user whose details you want to change.
- Change the data.
- Click the Save button.
¶ Delete users
- To delete the data of a user, click on User management -> Users in the Navigation.
- Then click in the Center on the name of the user you want to delete.
- Click Delete user in the toolbar.
¶ Organize users
The list of available users may be very long. To keep it clear, you can organize it in groups.
- In the Navigation, select User management -> Users. The list of available users appears in the Center.
- In the toolbar of the Center, click New group for user.
- In the screen that appears you can enter a name for the new group. Click OK.
- In addition to the newly created group, you will now also see the Not classified group.
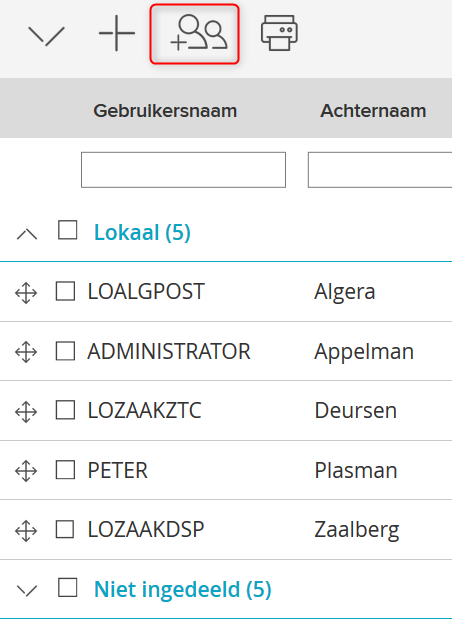
Next, you will group users by dragging:
- Click on the group Not classified. The list of uncategorized users opens.
- Click the plus sign in front of the name of the user you want to place in the new group. Hold down the left mouse button.
- Now drag the user to the new group you created. A logo will appear when you perform the action.
- As soon as you release the left mouse button, the user is placed in the new group.
- To remove the user from the group, drag them back to the Unassigned group.