¶ Workflows
JOIN has an extensive workflow module. You can use it to define advanced routes along which addresses, documents or cases are handled. You can also add decision moments to the workflows. This affects a registration. Workflows are managed in JOIN Admin. If you do not have the workflow module, you can use the activities option.
In JOIN Admin, you will see three standard workflows in the Process Management folder: address, document and case workflows. Here you can add new workflows and modify existing workflows. In addition, User roles can be defined and checklists can be created.
¶ Workflow toolbar
| Button | Description | Key combination |
|---|---|---|
| Show full list | Alt A. | |
| New | Alt N. | |
 |
To copy | |
| Import workflow | Alt I. | |
 |
Export workflow | Alt E. |
| New group for workflows | Alt G. | |
| Save | Alt S. | |
| Cancel | Alt C. | |
| Delete workflow | Alt R. |
¶ Steps in creating a workflow
When creating a workflow, the steps below are included:
- Handling links: These indicate which activity is being handled by a user or group of users.
- Decision links: These influence the route of treatment links. This is done automatically based on fields from the registration, or manually by choices made by a user or group of users.
- Connecting treatment and decision links by means of lines to establish a route.
- Indicate turnaround times for treatment, decision and the entire workflow.
Note: when creating a workflow, do not forget to save it!
¶ Create new workflow
- Click on the plus sign for Process management in the Navigation.
- Choose the right type of workflow: address, document or file.
- Click the New button in the toolbar of the Center. The workflow designer appears on the screen with the data relevant to the relevant workflow on the right of the screen.
- You will first enter the data on the right. Enter the name of the new workflow in the first field. As soon as you save the workflow, the start link of the workflow will be given this name.
- You can link a value from a status table to the workflow. As a result, after completion of a treatment step in the workflow, the status of a document, file or address is changed to the preselected value. At a later time an overview can be made of individual registrations. Suppose you select the value Approve here and then link the workflow to the Invoices document book. This workflow is linked to every registration in the Invoices book and an overview can be made of all invoices that need to be approved.
- Workflows can be started synchronously or asynchronously. If you choose synchronous, this means that a trigger is built in when a workflow can start. If a workflow is automatically started after registration, the first step of which is, for example, the automatic sending of a confirmation of receipt, then it will take some time for this process to be processed in the background and visible to the end user. While this process is running, the user cannot start the next activity yet.
- If you choose asynchronous, this means that the user can get started with the next activity while the first process is running in the background.
- Enter the maximum lead time that you want to use for this workflow. You can indicate days and hours and optionally check that only working days should be counted. When creating the workflow, you will receive a warning if the lead time exceeds the term entered here. This is especially useful for larger, more complex workflows.
- Select the option Allow other workflows in parallel to this one to start multiple workflows on one registration. The previous workflow must allow this. For example, a ‘callback’ workflow can be started several times on an address registration, while the handling of a case no longer allows this. After the last workflow has been completed, the registration is also processed.
- If you choose the option “suspend”, you enable the handlers of actions within the workflow to suspend actions. This means that the suspension period is added to the total lead time of the workflow and is not at the expense of the handling time of the action and workflow.
- If you opt for a standard suspension period, this period is calculated by default when a practitioner starts using this function.
- Click on Save in the toolbar.
¶ Shaping the new workflow
After creating a new workflow, you start designing the new workflow. There are several images on the left side of the Center. These are the different types of links that can be used within a workflow.
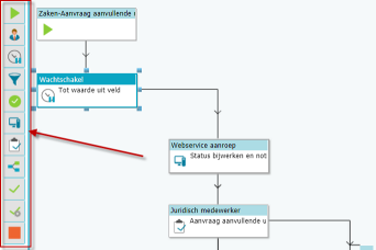
The different links that can be used within a workflow are:
1: starting point 2: handling 3: waiting point 4: assembly point 5: move to completed 6: computer action 7: checklist 8: subworkflow 9: manual decision 10: automatic decision 11: end point
Adding a link can be done in two ways:
- Click with the left mouse button on the link and keep the mouse button pressed. Drag the link in the workflow.
- Click on a link and the possible actions will appear below the link. If you click on adding a link, you will immediately see all possible links that you can select. Click on one of the options and the link is added.
The following applies to each link:
- If you click on a link, a number of possible actions will appear below this link. Click on one of these actions to perform it.
- You will also see blocks around this link. Place the mouse on a block and with the left mouse button pressed, a connection can be drawn to another link.
- If you click on a link, you can configure properties for that link on the right side of the screen.
If a warning sign is displayed at the top right of the link, it means that this link has not yet been configured. If you move the mouse over this warning sign, you will see which action still needs to be taken.
The following sections explain how to provide the various links with the correct characteristics.
Switch on Start point
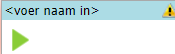
A starting point is automatically inserted when starting a new workflow. If you accidentally delete this, you can add the starting point again with this switch.
Switch: Practitioner
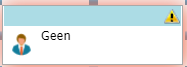
- Place the link in the workflow and enter the details for this practitioner in the screen on the right.
- Use the drop-down arrow to select a type of practitioner in the field behind Clinician type.
You have the following options:
| Options | Description |
|---|---|
| User as practitioner | Select a user from the drop-down list. |
| Practitioner as main registry | The practitioner is searched for in the registration to which the workflow in JOIN is linked. The practitioner is found in the first field in which the user table is displayed. |
| User role as practitioner | Choose one of the roles as you have defined it in User Roles. |
| Practitioner of previous action | Choose this option if you want the same practitioner as in the previous workflow step. |
| User role from registration | The practitioner is searched for in the registration to which the workflow in JOIN is linked. The practitioner is looked up in the first field in which the user table is displayed and in this case is not a person but a user role. |
- If you choose User as practitioner, select the correct person in the Practitioner field.
- If you choose Profile, you select the item profile where a user or user role table is used. Then at field choose the field where the user table or user role table will be linked. In this way you can select multiple user tables and user role tables in the registration
- If you choose User Role or User Role from Registration, you must also choose a Distribution Method. You can choose from:
| Options | Description |
|---|---|
| Alternately | The users take turns getting an action. |
| Emptyest queue | The user with the smallest work queue gets the action |
| Practitioner of previous action | Reuses the result of the previous distribution algorithm for this role. If the first action is placed on person A with ‘Take turns’, with ‘Previous practitioner’ the next action can also be placed on person A. |
| Manual distribution | Everyone in the role gets an action. As soon as someone handles the action, the action disappears from the others’ list. |
| Everyone in the role | Everyone in this user role will receive an individual promotion. This way, multiple actions can be set up at the same time and you don’t have to wait for each other. The handler of such an action cannot be changed from the work stock. |
| Assign directly to the role | The action is assigned to a common work queue for all members of the user role, so that it is clear which work queue a team has. A member of the role can pick up and handle the action, but can still pass the action on to another team member. |
- Enter an action description manually or choose an action type from the table.
- Indicate whether the main registration may be edited.
- Indicate whether actions may be forwarded.
- You can then indicate the term within which the action must be completed. You can also indicate that only working days are counted.
- When you have entered all the information, click in the Center to continue building the workflow.
¶ Switch: Waiting point
With a waiting point, ui ensures that the workflow is temporarily stopped. Examples of use cases:
- You want to start an action within the workflow on the first Monday of the month.
- You want to notify a user on a fixed date that a destruction list must be created.
- You add the watch link to the workflow.
- On the right side a screen will appear in which you can enter the details of this link.
- Click on the button behind Watch switch properties.
- In the screen that appears, you have the following options:
| Options | Gives |
|---|---|
| Until | Using the calendar, you can select a date to indicate until when the workflow should stop. |
| Day / hour / min | Enter the number of days, hours and minutes. If necessary, indicate that it concerns working days. |
| Till next | Select the day of the week on which the workflow should resume. |
| Until day number | Indicates the day number. |
| Till next …. Of the month | Here you can select a special day of the month, for example the second Saturday. |
| Until date of registration | Here you can have the watch link look at a date in the registration. |
- Click OK.
Switch: Rally point
![]()
You can merge several roads with a multi-point link. The workflow only continues after the collection point when all ‘incoming’ links have been processed. For example, you can determine that a number of tasks for the collection point are first handled in parallel and an action after the collection point is only started when all the preliminary work has been done. You can optionally indicate for this link what the status of this step in the workflow should be after collection.
Switch: Set to Completed
![]()
If the latest actions in a process are informative, then you can use the Set to Completed switch to finish the process earlier. Add this to the workflow.
The ‘date completed’ is then already entered before the last actions have been completed. The other steps are then informative.
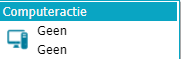
Switch: Computer Action
![]()
With a Computer actions link you can have automated actions performed from the workflow. For example, it is possible to automatically create files, send mailings, create and change registrations. It is also possible to have actions carried out by an application that is linked to Decos.
- Add the computer action link to the workflow and then click the new link.
- On the right side a screen will appear in which you can enter the details of this link.
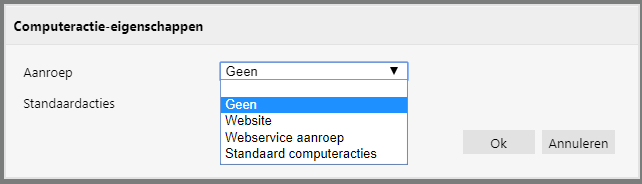
- Click on the button behind Properties. You can choose from different types of computer actions: WebService or Website. In addition, Decos has developed a number of Standard actions that can be called up.
- Website: by accessing a website from the workflow, for example, a web application can be called or a web form can be submitted. After choosing Website, a URL and parameters must be entered that must be called. Calling a website is a tailor-made solution and this computer action is set up by a technical consultant from Decos.
- WebService call: with this it is possible to request or change data in an application in a standardized way. The called web service can be a service within Decos as well as a service from another application. Linking with an external application is a custom solution and the setting up of this computer action is done by a technical consultant from Decos.
- Standard computer actions: by choosing Standard action, functionalities from Decos can be called from the workflow. Standard actions can be set up by the application manager. The following standard actions are available:
- Create a new file
Automatically merges registration information with a template and associates the result with a registration. For example, a confirmation of receipt can be created automatically. In a document workflow you can indicate whether the file should be created as a new registration. If you tick this option, you can then select the document book in which the new registration should be (automatically) registered. If you do not check this option, the file will be linked to the file tab of the document on which the workflow was started. You choose a template with which to merge the registration data. And finally, you can choose an address role that is relevant to the particular computer action.
- Create an HTML e-mailing
By selecting this option an email can be sent automatically based on an email template. An email is then created and sent to recipients associated with the registration on which the workflow is based. For example, a confirmation of receipt can be sent automatically in the form of an e-mail.
In a document workflow you can indicate whether the HTML mailing should be created as a new registration. If you tick this option, you can then select the document book in which the new registration should be (automatically) registered. If you do not check this option, the mail will be linked to the file tab of the document on which the workflow was started. If you choose to link to an existing registration, you can also automatically add files to the mailing. To do so, place a check mark next to Attach files.
In the Display name field you can indicate which name the sender will see, for example Decos Customer Support. In the Reply to field you can enter the e-mail address that should be used to send any responses to, for example customersupport@decos.com. You can also indicate the subject that will be displayed in the final mailing. You choose an HTML template to be used in this action. And finally, you can indicate whether the mailing should be sent to an Address Role.
Change field value: With this standard action any field in a registration can be changed from the workflow. For example, a practitioner can be changed, the retention period, turnaround times or the expected end date.
Behind the Profile field, select the item profile containing the field value to be changed. Then choose the field that needs to be adjusted. If you want a macro to be applied, check this option. For example, with a macro it is possible to make the change take place based on a calculated value such as shifting an end date. After checking this option, enter the macro in the Field value field. If you do not choose a macro, enter a value from a table behind the field value.
- Create registration and start workflow:
By selecting this default action, the registration itself can be automated. The workflow can therefore create a registration in a chosen book and start a new workflow. Application options for this standard action include starting a new workflow from a document workflow with a notice of objection or to create another file from a file via a workflow. For example, complex cases can be divided or complaints that are expressed during a treatment can be handled as separate reports parallel to the main case.
Select the Book in which the registration should be created. You can create the registration in an Address book, a document book or a file book. Then choose the workflow to be started.
Regardless of the outcome of a standard action or availability of the other application, a computer action is always handled immediately.
Switch: Checklist
![]()
As a link, you can insert a checklist that allows a practitioner to get an overview of several actions on the screen in JOIN and to complete them in one go by placing check marks. Before you can use the switch Checklist, you must first have made a checklist. How to do this is described elsewhere in this manual.
- Add the link to the workflow. You can enter the details on the right side of the screen.
- Use the drop-down arrow to select a type of practitioner in the field behind Clinician type. You have the following options:
Practitioner from the main registry || The practitioner is searched for in the registration to which the workflow in JOIN is linked. The practitioner is found in the first field in which the user table is displayed
| Options | Description |
|---|---|
| User as practitioner | Select a user from the drop-down list |
| User role as practitioner | Choose one of the roles as you have defined it in User Roles. |
| Practitioner of previous action | Choose this option if you want the same practitioner as in the previous workflow step. |
| User role from registration | The practitioner is searched for in the registration to which the workflow in JOIN is linked. The practitioner is looked up in the first field in which the user table is displayed and in this case is not a person but a user role. |
- If you choose User as practitioner, select the correct person in the Practitioner field.
- If you choose User Role or User Role from Registration, you must also choose a Distribution Method. You can choose from:
| Options | Description |
|---|---|
| Alternately | The users take turns getting an action. |
| Emptyest queue | The user with the smallest work queue gets the action. |
| Practitioner of previous action | Reuses the result of the previous distribution algorithm for this role. If the first action is placed on person A with ‘Take turns’, with ‘Previous practitioner’ the next action can also be placed on person A. |
| Manual distribution | Everyone in the role gets an action. As soon as someone handles the action, the action disappears from the others’ list. |
| Everyone in the role | Everyone in this user role will receive an individual promotion. This way, multiple actions can be set up at the same time and you don’t have to wait for each other. The handler of such an action cannot be changed from the work stock. |
| Assign directly to the role | The action is assigned to a common work queue for all members of the user role, so that it is clear which work queue a team has. A member of the role can pick up and handle the action, but can still pass the action on to another team member. |
Behind the Checklist field, you can select the desired checklist using a drop-down arrow.
Indicate what the status is once this checklist has been completed.
Choose an action description or action type (only one of these is possible).
If the main registration may be edited, place a check mark behind this field /
Indicate whether actions may be forwarded.
You can then indicate the term within which the action must be completed. You can also indicate that only working days are counted.
When you have entered all the information, click in the Center to continue building the workflow.
Switch: Subworkflow
![]()
You can add a subworkflow to a workflow, which will start a new process depending on a chosen decision.
- Add a subworkflow link to the workflow. As soon as you click on the link, you will immediately see the text “Register and start” above the link.
You can enter these details on the right side of the screen.
- Select the book to which the subworkflow should be linked. You can use the drop-down arrow behind the field for this.
- Select the workflow of which this subworkflow should be a part. You can only select a workflow if you selected a book with a workflow associated with it in the previous step.
Switch: Manual decision
![]()
A manual decision is made by a user (can also be divided by user role) on the basis of values from a table defined in Decos. The purpose of this step is to indicate the status of the step in the workflow when it has been completed, for example Completed, On order, Received.
- Add the link to the workflow
- Click the new Manual decision link. On the right side a screen will appear in which details for this link can be entered.
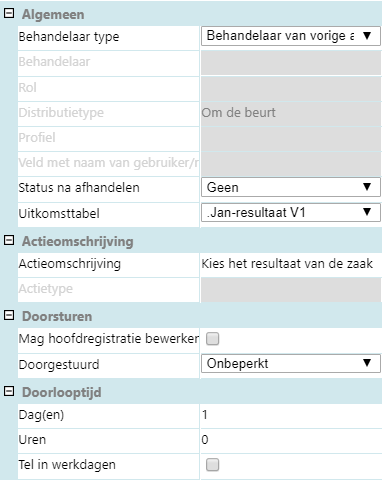
In the field behind Attendant type you can make the following choice:
- user as practitioner
- user from registration
- user role as practitioner
- user role from registration
Click on the button behind Clinician. A screen appears where you can select a Clinician. You have the following options:
| Options | Description |
|---|---|
| Practitioner from the main registry | The practitioner is searched for in the registration to which the workflow in JOIN is linked. The practitioner is found in the first field in which the user table is displayed |
| User role as practitioner | Choose one of the roles as you have defined it in User Roles. |
| Practitioner of previous action | Choose this option if you want the same practitioner as in the previous workflow step. |
| User role from registration | The practitioner is searched for in the registration to which the workflow in JOIN is linked. The practitioner is looked up in the first field in which the user table is displayed and in this case is not a person but a user role. |
- Select the correct person in the Clinician field.
- If you have chosen User role, you must also choose a Distribution method. You have the following options:
| Options | Description |
|---|---|
| Alternately | The users take turns getting an action. |
| Emptyest queue | The user with the smallest work queue gets the action. |
| Practitioner of previous action | Reuses the result of the previous distribution algorithm for this role. If the first action is placed on person A with ‘Take turns’, with ‘Previous practitioner’ the next action can also be placed on person A. |
| Manual distribution | Everyone in the role gets an action. As soon as someone handles the action, the action disappears from the others’ list. |
| Everyone in the role | Everyone in the role gets an action. As soon as someone handles the action, the action disappears from the others’ list. |
| Assign directly to the role | The action is assigned to a common work queue for all members of the user role, so that it is clear which work queue a team has. A member of the role can pick up and handle the action, but can still pass the action on to another team member. |
- Then select the possible outcome of this decision from a table
- Then click on the button behind the Description field
- You can manually add a description in the action description field
- You can also opt for a standard text. To do this, check Action type and then choose a text from the drop-down list.
- Indicate whether the clinician is allowed to edit the master registration.
- Indicate whether actions may be forwarded.
- You can then indicate the term within which the action must be completed. You can also indicate that you must calculate in working days.
- When you have entered all the information, click in the Center to continue building the workflow.
¶ Switch: Automatic decision
File: Icon Automatic Decision.png
An automatic decision is made by JOIN on the basis of conditions entered by you for field values of the document, file or address to which this workflow is linked.
File: Automatic Decision.png
- Choose a filter type on which to base the decision. You can choose from an XSD scheme and an (item) profile.
- If you choose XSD scheme, you can use the button behind Decision to fill in which condition name you want to use, what the XSD scheme is to which the condition applies (for example ZTC-Gemma or DSP-VHIC). After that, additional item data can be defined. You can enter a so-called XPath value or a complete query so that specific information can be retrieved from XML documents, such as the information of the tree structure or its sub-paths.
- If you choose Profile as Filter type, then choose the item profile to which the decision applies.
- Click on the button behind Decision. A window will appear in which you can choose the conditions for this link.
File: Conditions.png
- Choose the field to which the decision applies.
- In the Operator field, choose the equation you want to make. You can choose from: Equal To - Not Equal To - Looks Like - Is Empty - Is Not Empty - Greater Than - Greater Than Or Equal To - Less Than - Less Than Or Equal To.
- Optionally, add a value to compare with.
- In the Opposite column, choose the condition ‘and’ or ‘or’.
- Click the green plus sign behind the row. The condition is then added to the list.
- If you want to remove a condition from the list, click on the red cross sign behind the condition.
- When you have added all the conditions, click OK.
- You are now returned to the workflow.
Note: if you selected ‘Similar’ as the comparison type in step 6, you can use the percent sign (%) as ‘wildcard’. ‘Place’ resembles ‘Amst%’ means that both Amsterdam and Amstelveen, as visiting residence, return the condition as ‘true’.
Switch: End point
An endpoint link indicates that the workflow has been completed in its entirety. An end point cannot be set further. You place an endpoint in the workflow by dragging the endpoint icon into the design sheet. There can be multiple endpoints in a workflow.
Connecting with links in the workflow
Click on a link where the connection should start
File: Connect With Links in the Workflow.png
- Click on one of the blue blocks that are visible around the link. Keep the left mouse button pressed and move to the link with which the connection is to be established.
- The connection is established as soon as the mouse button is released
Delete connections
You can remove connections between links in two ways:
- you can delete all connections to one object;
- you can delete one specific connection.
Delete all connections to one object
- Click with the mouse on the link from which you want to remove all connections to other objects.
- Below the link, click on “Remove all connections” and all connections are closed.
Delete specific connection
- Click with the mouse on the link from which you want to remove the connection to another object.
- Below the link click on “Remove connection to”
- Click on the link to which the connection to be deleted goes. The connection has been deleted.
¶ Change links
Click on the link you want to change. The screen in which you have entered the details of this link appears on the right. You can enter the new values. Changing a decision link invalidates the connections leading to that decision.
¶ Copy links
You can also copy links. For example, to create a second treatment link with the same action code and lead time, but with a different practitioner.
- Click with the mouse on the link you want to copy.
- Click on “Copy object” below the link. A new link appears in the workflow.
- Click on this new link. The screen on the right will show the details of the original link.
- You can adjust the values as desired.
- Finally, make the desired connections with other links.
Remove links
- Click on a link with the mouse.
- Click on “Delete object” below the link. The link is removed in its entirety, including the connection.
Export and import workflow
The export function is useful if you want to move a workflow from a test to a production environment. Even if you want to make a drastic change to a workflow that is already in use, it is recommended that you make a backup.
To export a workflow, proceed as follows:
- Select the workflow you want to export.
- Click Export workflow in the toolbar:

The Export Workflow window appears.
- Enter a file name.
- Select a file location. The workflow is then written in XML format.
To import a workflow, proceed as follows:
- Click on Process management in the Navigation.
- Choose the right type of workflow: address, document or file.
- Click New in the toolbar.
- Click Import workflow in the toolbar.

- In the window that appears, press Search and select the file to import.
- Click on Close.
¶ Administrator Levels tab
If you want to give Administrator level administrative rights to a workflow, you can indicate this on the Administrator levels tab. Two hyperlinks are visible on the tab: Linked administrator levels and Available administrator levels. Behind these hyperlinks is a number in brackets, which indicates how many levels are already linked and therefore have management rights and how many levels in total are available but do not yet have management rights. By clicking on a hyperlink, or by clicking on the arrow icon in front of the link, all Administrator levels from the relevant category are visible.
To link administrator levels:
- Click Available Administrator Levels.
- Check one or more levels.
- Click the Link items button next to Linked administrator levels.
- Click on Save in the toolbar.
To unlink an Administrator level:
- Click Associated Administrator Levels.
- Check the level you want to disconnect. The line containing the name changes color.
- Click the Unlink items button next to Available administrator levels.
- Click on Save in the toolbar.
You can also establish a link by dragging an available administrator level to the linked levels. And by dragging a linked level to the available levels, you will unlink it.
¶ Organize workflows
The list of available workflows may be very long. To keep it clear, you can organize it in groups.
- In the Navigation, select Process management -> Type of workflow you want to organize. The list of available workflows appears in the Center.
- In the Center toolbar, click New Group for Workflows.
- In the screen that appears you can enter a name for the new group. Click OK.
- In addition to the newly created group, you will now also see the Not classified group.
Next, you will group workflows by dragging:
- Click the Unassigned group. The workflows list opens.
- Click the plus sign in front of the name of the workflow that you want to place in the new group. Hold down the left mouse button.
- Now drag the workflow to the new group you created. A logo will appear when you perform the action.
- As soon as you release the left mouse button, the workflow is placed in the new group.
- To remove the workflow from the group, drag it back to the Unassigned group.
¶ ser roles
User roles are roles of groups of users that you can assign an action as a group in the workflow module.
Toolbar for user roles
| Button | Description | Key combination |
|---|---|---|
| Show full list | Alt A. | |
| New | Alt N. | |
| New group for user roles | Alt G. | |
| Save | Alt S. | |
| Cancel | Alt C. | |
| Delete user role | Alt R. |
¶ Add new user roles
- In the Navigation, click on Process management -> User roles. The overview of the available user roles appears in the Center.
- Click on New in the toolbar and enter the name of the user role. As soon as you press Save in the toolbar, this name will also become the name of the first tab.
- Select the Users tab.
- Two hyperlinks are visible on the tab: Linked users and Available users. Behind these hyperlinks is a number in brackets, indicating how many users are already linked and how many users are available in total. By clicking on a hyperlink, or by clicking on the arrow icon in front of the link, all users from that category will be visible.
- Click Available Users.
- Check one or more users.
- Click the Link items button behind the Linked users hyperlink to establish the link.
File: New User Roles.png
To unlink a User:
- Click Associated Users.
- Check the user you want to disconnect. The line containing the name changes color.
- Click Unlink items.
- Click the Save button to save the entered data.
Search for a User
- Enter the name of the user in the filter bar.
- Hit Enter.
¶ Organize user roles
The list of available user roles may be very long. To keep it clear, you can organize it in groups.
- Select Process management -> User roles in the Navigation. The list of available user roles appears in the Center.
- In the Center toolbar, click New User Roles Group.
- In the screen that appears you can enter a name for the new group. Click OK.
- In addition to the newly created group, you will now also see the Not classified group.
Next, you will group user roles by dragging:
- Click the Unassigned group. The list of user roles opens.
- Click the plus sign in front of the name of the user role that you want to place in the new group. Hold down the left mouse button.
- Now drag the user role to the new group you created. A logo will appear when you perform the action.
- As soon as you release the left mouse button, the user role is placed in the new group.
- To remove the user role from the group, drag it back to the Unassigned group.
¶ Checklists
| Button | Description | Key combination |
|---|---|---|
| Show full list | Alt A. | |
| New | Alt N. | |
| New group for checklists | Alt G. | |
| Save | Alt S. | |
| Cancel | Alt C. | |
| Delete checklist | Alt R. |
Making a checklist
Making a checklist is done as follows:
- Click on Process management -> Checklists in the Navigation.
- In the toolbar of the Center, select New Checklist.
- In the Name field, enter the name of the new checklist.
- You can add a detailed description of this checklist in the Description field.
- Click the Save button; the name you have given to the checklist is now also displayed as the name of the first tab.
- Then choose the Controls tab.
- In the field behind the green button you enter an action of the workflow that must be approved. If it is an action that must be approved automatically, place a tick in the Automatic field. Note: at least 1 action must be handled manually!
File: 1.png
- If you have opted for automatic, click on the gray button that appears behind the check mark. In the screen that appears you can define which conditions this checkpoint must meet.
File: 2.png
- You first choose a field. Click on the gray button behind this field and in the screen that appears you indicate whether the check should be based on a field value or on a macro used. If you choose a field value, you can use the drop-down arrows to select an item profile and then a field from this item profile.
File: 3.png
- If you choose macro, enter the description of the macro and its value. Click OK.
File: 4.png
- Choose the equation that the check should be based on, for example, Looks like, Greater than.
- Enter the value.
File: 5.png
- Click OK to define the conditions for the automatic check.