¶ Templates
In JOIN Case & Document you can work with various templates. These templates are created and managed in JOIN Admin. When creating a new template, you can easily place the internal JOIN field names in your template. You can edit MS Word templates using the JOIN Template Editor. You can create and edit templates of a different type, such as OTT and MSG, outside JOIN.
There are several ways to create a template that will eventually be available to end users in JOIN Case & Document:
- Create a template outside of JOIN and link it via the menu “Templates and codes - Document templates” in JOIN Case & Document.
- Create a new template in JOIN Admin and register additional data and rights immediately.
- Create a template outside of JOIN Admin and save it in the templates folder of the JOIN server and then enter data and rights in JOIN Admin.
In addition to the standard templates, JOIN also has registration templates. These offer the end user the possibility to record data in a template that is automatically registered in JOIN. If a field value in this template is modified, it will also be modified in JOIN without user interaction. Conversely, if a field value is changed in the registration, this will also be changed immediately when this template is opened. An end user can also choose New file from a registration template from their work list, with which a file can be quickly added to, for example, a case. You must have Office 2007 or higher to use registration templates.
¶ Template toolbar
| Button | Description | Key combination |
|---|---|---|
| Show full list | Alt A. | |
| New user | Alt N. | |
| New group for users | Alt G. | |
| Save | Alt S. | |
| Cancel | Alt C. | |
| Delete User | Alt R. | |
| Remove Sub-level | Alt L | |
| Import table values from file | Alt I |
¶ Different types of templates
You can use different types of templates within JOIN. The most commonly used types are RTF, DOT and DOTX templates, which can be created in JOIN Admin. Templates of a different type, such as OTT and MSG, are created outside of JOIN Admin.
The choice between RTF, DOT or DOTX depends on what you want to use the template for. The main differences between these are:
| RTF | DOT | DOTX |
|---|---|---|
| Faster | Slower | Slower |
| Handling on server | Local handling | Local handling |
| Difficult to make list templates | Easy to create list templates | Easy to create list templates |
| Not suitable for making label templates | Suitable for making label templates | Suitable for making label templates |
| Use of bookmarks possible | Cannot use bookmarks | Cannot use bookmarks |
| Protection of text parts possible | Protection of text parts not possible | Protection of text parts not possible |
¶ Record data in new template
This method assumes that you have placed a template in the template directory on the server (third option in the introduction to this chapter).
- In the Navigation, select Application management -> Templates. The overview of available templates appears in the Center.
- Click New in the toolbar of the Center. Then a screen appears consisting of a number of tabs.
- The first tab is . The following data is recorded here:
The Sequence Number is entered automatically. Description: enter the name of the template here. This is the name that users will see in JOIN Case & Document.
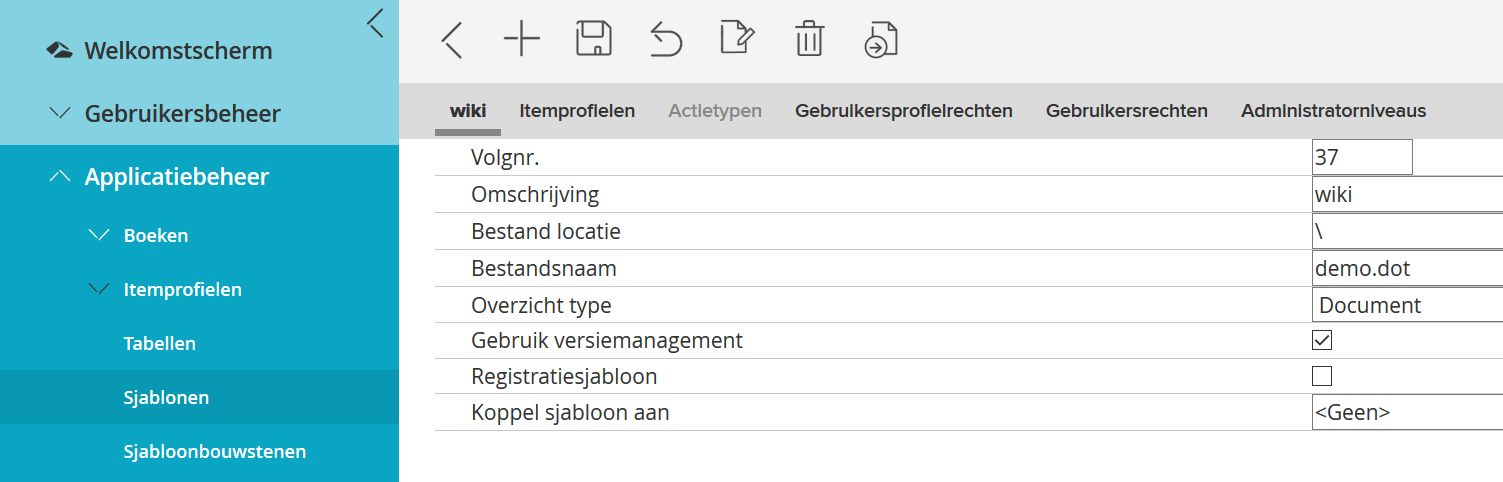
File location: by default the files are saved in the “DOT” folder on the server, you enter . However, if your template is stored in a different location or subfolder, enter the correct path to this template here. File name: the actual name of the template file is entered here, ie the name used to save the template, for example Minutes.dot or Barcode address.rtf. A registration template should always have the extension .dotx. Overview type: templates of a certain type are only shown in that type of book. For example, templates of the type “document” are only shown in document books, files only in file books, etc. Select the correct type using the drop-down arrow behind the field. Use version management: tick if version management should be applied for this template. If it is a registration template, please put a check mark in this field. Link Template: This field only applies to registration templates. Select here the book in which a document registration must be made if an end user from a file chooses “Create file from registration template”.
-
On the Item profiles tab you can indicate to which profile the template should be linked. Check one or more profiles of your choice. You can also check All item profiles.
-
If it concerns a registration template, you can link Document, Address or dossier actions on the Action types tab. This tab Action types is identical to the tab of the same name that is described in this manual at Item Profiles -> Workflow Profiles. For its operation, please refer to this _Admin_Item Profiles chapter. Its application to a registration template ensures that a number of steps do not have to be performed manually when using the answer button in JOIN Case & Document.
-
On the User profile rights tab you set the rights for each user profile. Determines what rights a user profile has when using a template. The names of all available user profiles are displayed. When you create a new template, each user profile has a check mark in the Default column. To adjust the rights:
- Click on the name of the user profile whose rights you want to change. An arrow appears in front of the name. - Click on the check mark in the standard column. This allows a different check box to be selected. - Place a tick in the column with the rights you want to assign to this user profile. You can choose between the options No access and Available. - Click on the Save button to save the rights.
-
On the User rights tab you can set the rights for the template for each individual user. When creating a new template, each user has a check mark in the Use profile column. To adjust permissions:
-
Click on the name of the user whose rights you want to change. An arrow appears in front of the name. - Click on the check mark in the standard column. This allows a different check box to be selected. - Place a tick in the column with the rights you want to assign to this user profile. You can choose between the options No access and Available. - Click on the Save button to save the rights.
-
If you want to give an Administrator level rights to a template, you can indicate this on the Administrator levels tab. Two hyperlinks are visible on this tab: Linked administrator levels and Available administrator levels. Behind these hyperlinks is a number in brackets, which indicates how many levels are already linked and therefore have administrative rights to this template and how many levels in total are available that do not have administrative rights. By clicking on a hyperlink, or by clicking the arrow icon in front of the link, all Administrator levels from the relevant category are visible.
To link administrator levels:
- Click Available Administrator Levels.
- Check one or more levels.
- Click the Link items button next to Linked administrator levels.
- Click on Save in the toolbar.
To unlink an Administrator level:
- Click Associated Administrator Levels.
- Tick the level you want to disconnect. The line containing the name changes color.
- Click the Unlink items button next to Available administrator levels.
- Click on Save in the toolbar.
You can also link or unlink administrator levels by dragging:
- Click the plus sign in front of Available administrator levels.
- Hold down the left mouse button. The line containing the name changes color.
- Now drag the available administrator level to the Linked administrator levels line. A logo will appear as soon as you perform the action.
- As soon as you release the left mouse button, the administrator level is linked.
- To unlink an administrator level, drag it back to the Available administrator levels.
- Click Save in the toolbar to save the data for the new template.
¶ Create template
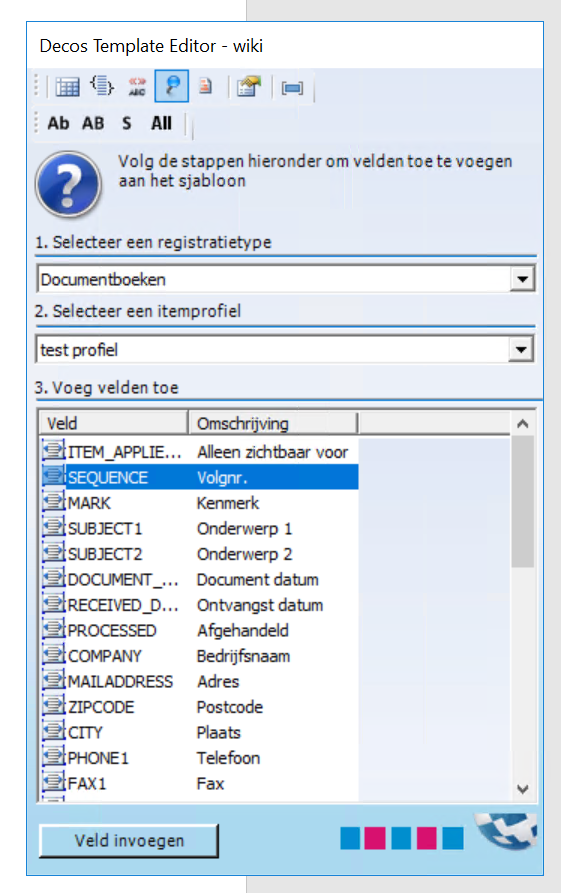
After you have registered the data and rights of this new template, click on Edit template in the Template Editor in the toolbar of the Center. Your new template will open in MS Word. In addition, the JOIN Template Editor is opened as a separate screen (see screenshot).
You follow the steps below:
- You choose the desired registration type;
- You choose the item profile
- You add the internal JOIN fields to this template.
You can now create and design a template. To enter the text, use the standard Word functionalities. For optimal use of this template, use the internal JOIN fields.
To add an internal JOIN field, in the Template Editor, click the desired field in the list of available fields and then click the Insert Field button. You can also double click on a field name so that it will be added immediately. Or you can click on a field name and drag it to the correct place in this template. In this way you can add any field names you want to use in the template.
There is a toolbar at the top of the Template Editor. The following buttons are available:
Button Description 
Change label layout 
Show or hide detailed description 
Show or hide field code 
Always visible 
Update fields 
Display options Add regular field to registration template 
Display first letter with capital letter 
Display all letters in capital letters 
Enter a space between two words 
The values from all (linked) registrations are combined in this field The functions are explained in the following sections.
¶ Space usage
When inserting a contact name, you may experience double spaces. If a contact person does not have a prefix, there will be two spaces between the first and last name. You can avoid this by including «SPACE_PREFIX» instead of «PREFIX» in the template. If «SPACE_PREFIX» is used, JOIN will insert a space after the prefix field when the field is filled.
Example:
«INITIALS» «PREFIX» «SURNAME» Gives the undesired result: J. Jansen (2 spaces between initial and surname)«INITIALS» «SPACE_PREFIX»«SURNAME» Gives the desired result J. Jansen.
If the person’s name has a prefix (e.g., “J. de Vries”), both versions give the same result.
You can achieve the desired result as follows:
- In the Template Editor, choose the internal Initials field (INITIALS) and click Insert Field.
- In the toolbar of the Template Editor, click the Insert space button if field is not empty (SPACE), click Insert (PREFIX) in the list of internal fields and then click the Insert field button.
- In the Template Editor, choose the internal field for Last Name (SURNAME) and click Insert Field. Make sure there is no space between the two merge fields. The space required when the prefix is filled is inserted during the merge.
¶ Capitalization
In templates you can indicate whether a field should be capitalized. You can also indicate whether the field should be shown in all capital letters. So gives
«SALUTATION» «SPACE_FU_PREFIX»«SURNAME» as the result
Dear Mr. De Vries
And returns «AU_CITY»
NOORDWIJK
You can get the result of the field starting with a capital letter as follows:
- In the Template Editor, choose the internal field for Salutation letter (SALUTATION) and click Insert Field.
- In the toolbar of the Template Editor, click the Initial Capital (AB) and Space (S) button. Then click on Insert (PREFIX) in the list of internal fields and then click on the Insert field button.
- In the Template Editor, choose the internal field for Last Name (SURNAME) and click Insert Field.
You can get the result of the field with all capital letters as follows:
- In the toolbar of the Template Editor, click the All in capitals (AB) button.
- In the list of internal fields, click City (CITY)
- Then click the Insert field button.
¶ Add options to templates
Via the Options button you can add extra properties to templates. In rich text templates, you can add a property for using section breaks. Normally, when merging multiple recipients into one document, the different instances of the template are separated by a page break. The section break option places a section break (next page) between the instances of the letter (not a “regular” page break). When the different instances of the letters are separated by section breaks, you can start each instance of the letter on stationery and continue with subsequent paper.
You can achieve this result as follows:
- Open an RTF template in the JOIN Template Editor.
- Click on Options in the JOIN Template Editor toolbar.
- A screen will appear in which you tick the template property Use section break. Then click on Save.
- It is not visible in the template that the properties have been adjusted, but it is visible in the document properties. This can be checked in MS Word 2010 by clicking File at the top left. Then click in the right part of the screen on the drop-down arrow behind Properties -> Advanced properties. On the Custom tab, the JOIN RFT section template property has been added with the value yes. (for MS Word 2007 choose the Office button at the top left, then Prepare -> Properties -> Document Properties -> Advanced Properties).
- End the letter with a section break (next page). This will result in a blank page at the end of the template, but it will be dropped during the merge.
- Finally, click on Save in the MS Word toolbar.
You can add other properties to DOT and DOTX templates. The first option is to add the Merge as list property. If you choose this property, the final result will be displayed in the form of a list instead of one line per page.
A second possibility is to add the property Post merging with multiple recipients. This allows an end user in JOIN Case and Document to merge, for example, a template of a letter with different addressees and then make a textual change in the letter from one addressee. Due to the extra property added to this template, the change is automatically visible in all letters.
You can achieve these results as follows:
- Open a template in the JOIN Template Editor.
- Click on Options in the JOIN Template Editor toolbar.
- A screen will appear where you can tick a template property. Choose the property you want to add. You can choose from Merge as list and Postpone merge for multiple recipients. Then click on Save.
- It is not visible in the template that the properties have been adjusted, but it is visible in the document properties. This can be checked in MS Word 2010 by clicking File at the top left. Then click in the right part of the screen on the drop-down arrow behind Properties -> Advanced properties. On the Custom tab, the JOINCatalogMailmerge template property has been added with the value 1 if you selected Merge from list. And if you had selected Postpone merge for multiple recipients, you will see PostPoneMerge with the value 1. (for MS Word 2007 choose the Office button at the top left, then Prepare -> Properties -> Document Properties -> Advanced Properties).
- You can then assemble the template. For this you can use the standard MS Word functionalities.
- Finally, click on Save in the MS Word toolbar.
¶ Registration template
Data added to the registration screen by an end user is displayed in the new file created from a template. Registration templates offer extra options compared to the regular templates. In the new file you can change a value, and after saving it will be automatically copied into the fields of the Registration screen in JOIN. In addition, a value in the JOIN Registration screen can be changed at a later time and this value is automatically transferred to the file created with this registration template.
Registration templates can only be created in Office 2007 or higher.
To create a registration template, follow the steps described in registering a new template. Some of these steps are important for the registration templates:
- When recording the data, always enter the file name extension .dotx;
- When recording the data, indicate that it is a registration template by placing a check mark in this field;
- Select a book in which a document registration must be made if an end user from a file chooses “Create file from registration template”;
- On the Action types tab, link Document, Address, or dossier actions.
Once you have entered the data, you will open the Template Editor (just like with any other type of template) to edit this template. Again, the method is largely identical to editing another type of template. Specific for registration templates:
Adding an internal JOIN field to a registration template will display a gray text “Click here to enter text.”
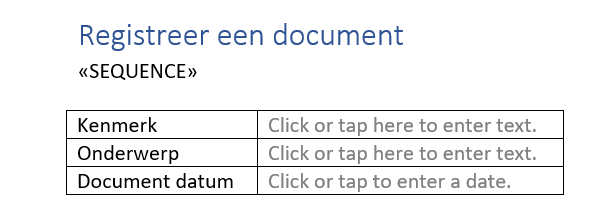
The value displayed here can be entered by the end user in this template as well as in the JOIN Case Document registration screen. If this value is changed in one of the two places, it will also automatically change in the other place. With another type of template, an internal JOIN field is always displayed as in the screenshot above «SEQUENCE» and changing the value can only be done in the JOIN Registration screen. If you want to add such a (static) field to a registration template, click on Add regular field in the toolbar of the Template Editor. You can then add a field in the usual way and the result will be displayed (in the example above «SEQUENCE»).By clicking this button again registration template fields can be added.
To remove an internal JOIN field from a registration template, right-click on the relevant field. Then choose Delete control for value.
It may be that a field value must always be entered and by adding this value in a hidden field to a registration template, the end user does not need to take any additional action. Once the end user creates a file using a registration template, the hidden field is automatically displayed in both the file and the registration associated with it. To add these fields:
- In the toolbar of the Template Editor, click on Options;
- Using the drop-down arrow, select the field name to be added as hidden value;
- Enter the value to be displayed in the Default value field;
- Click on the (green) plus sign behind the default value if several hidden fields must be added;
- Repeat this until all fields have been added;
- An incorrect value can be removed by clicking on the red cross behind the field;
- Click Save to add the chosen fields to this registration template.
¶ Security of templates
In templates you can use the security option of MS Word. You can then protect certain pieces of text so that they cannot be changed after the creation of a document. You can also use form options such as check boxes and drop-down lists in your template. These must also be secured for proper operation.
To shield pieces of text, use the standard MS Word functionalities. Choose the Developer -> Protect Document tab. On the right side of your screen, a wizard will start with the option 2. Operation restrictions.
You check the option “Only allow edits of this type in the document” and then use the drop-down arrow to choose from four options. Two of them are important for creating templates in JOIN:
File: Template.png
- No changes (read-only): If you choose this option, you can select parts of text and then check the box for Everyone. The selected text can then no longer be edited by end users.
- Filling in forms: if you choose this option, form options will be secured (check boxes, drop-down lists, etc.).
Clicking “Yes, start security enforcement” at the bottom of the wizard will enable security for this template.
After you have enabled the security options, click Save in the MS Word toolbar.
You can also use various other MS Word functionalities to create advanced templates. For the correct application, please refer to the MS Word manual.
¶ Create templates outside of JOIN Admin
If you are creating a template outside the JOIN Admin, you will need the internal field names from JOIN to ensure correct use of the template. The internal field names can be found in the item profile of the book whose data you want to use in a new template.
- In the Navigation, select Application Manager -> Item Profiles.
- Select the desired profile type, for example address, document, file, DSP and workflow.
- In the Center, select the profile from which you need the internal field names.
- On the first tab you will find the internal field names in the Field Name column.
- You will now go to the application in which you want to create the template. You can start designing it.
- Place the correct field names in your document where you want them in the template. Put the field names between .
- Save the document in a folder on the JOIN server, for example P \ JOIN \ templates_msg \
- You then ensure that the template is made available to the end users of JOIN Case & Document. To do this, select Application Management -> Templates in the Navigation of JOIN Admin.
- Click New in the toolbar of the Center.
- Enter the data as described in the section Entering new template data. However, on the first tab you fill in the File location where the template is stored on the JOIN server, for example \ templates_msg . Please note that the relative file location relative to the default template directory is always entered here.
- When all data has been entered, click on Save in the toolbar to save the data. This template is immediately available to end users in JOIN Case & Document.
¶ Create templates with OpenOffice
Templates in OpenOffice are created outside of JOIN Admin. The method differs slightly from creating other templates outside of JOIN Admin, as adding manually is not recognized. You also need the internal field names from JOIN when creating a template in OpenOffice. This information can be found in the item profile of the book whose information you want to use in a new template.
-
In the Navigation, select Application Manager -> Item Profiles.
-
Select the desired profile type, for example file or document.
-
In the Center, select the profile from which you need the internal field names.
-
On the first tab you will find the internal field names in the Field Name column.
-
You open OpenOffice and start designing the template.
-
To add a macro, move the cursor to the desired location.
-
Then choose Insert -> Fields -> Other. A screen will open.
-
Select the Functions tab.
-
Then click on the type Placeholder and the format Text.
-
After this you can manually enter data in the Placeholder field using the internal JOIN fields, for example ADRESS_COMPANY. Note: the field names may not be placed between .
-
Click on Insert.
-
The macro will now be added to the template and will be displayed in a different color from the other text in the template. OpenOffice itself puts the angle brackets around the field name.
-
Save the document in a folder on the JOIN server, for example
P \ JOIN \ templates_odt \ -
In JOIN Admin, select Application Management -> Templates.
-
Click New in the toolbar of the Center.
-
Enter the data as described in the section Defining new template data. However, on the first tab you fill in the File location where the template is stored on the JOIN server, for example \ templates_odt . Please note that the relative file location relative to the default template directory is always entered here.
-
When all data has been entered, click on Save in the toolbar to save the data. This template is immediately available to end users in JOIN Case & Document.
¶ Edit templates
If you have an existing template that you want to edit, take the following steps.
- In the Navigation, select Application Manager -> Templates.
- In the Center, choose the template you want to edit and click on the name. The details of this template will appear on your screen.
- Clicking on Edit template in the Template Editor in the toolbar will open it.
- You can now make the changes. The available functionality of the JOIN Template Editor has been described in earlier sections of this chapter.
- Save the changes by clicking on Save in the MS Word toolbar.
- By clicking the Close button (cross at the top right) you will return to JOIN Admin.
¶ Organize templates
-
The list of available templates may be very long. To keep it clear, you can organize it in groups.
-
In the Navigation, select Application management -> Templates. The list of available templates appears in the Center.
-
In the toolbar of the Center, click New group for templates.
-
Enter a name for the new group in the screen that appears. Click OK.
-
In addition to the newly created group, you will now also see the Not classified group.
Next, you will group Templates into a group by dragging:
- Click on the group Not classified. The list of templates opens.
- Click the plus sign in front of the name of the template you want to place in the new group. Hold down the left mouse button.
- Now drag the template to the new group you created. A logo will appear when you perform the action.
- As soon as you release the left mouse button, the template is placed in the new group.
- To remove the template from the group, drag it back to the Unassigned group.
-