¶ Tables
You can create and manage tables from JOIN Admin. In addition, you can assign rights to a table so that end users in JOIN Case & Document can also manage tables via the Manage menu.
¶ Toolbar at Tables
| Button | Description | Key combination |
|---|---|---|
| Show full list | Alt A. | |
| New user | Alt N. | |
| New group for users | Alt G. | |
| Save | Alt S. | |
| Cancel | Alt C. | |
| Delete User | Alt R. | |
| Remove Sub-level | Alt L | |
| Import table values from file | Alt I |
¶ Create new table
In the Navigation, select Application Manager -> Tables. An overview of the available Tables appears in the Center.
Click New in the toolbar. At Table name enter the name for the new table. As soon as you press Save in the button bar, the first tab is given the name of this table.
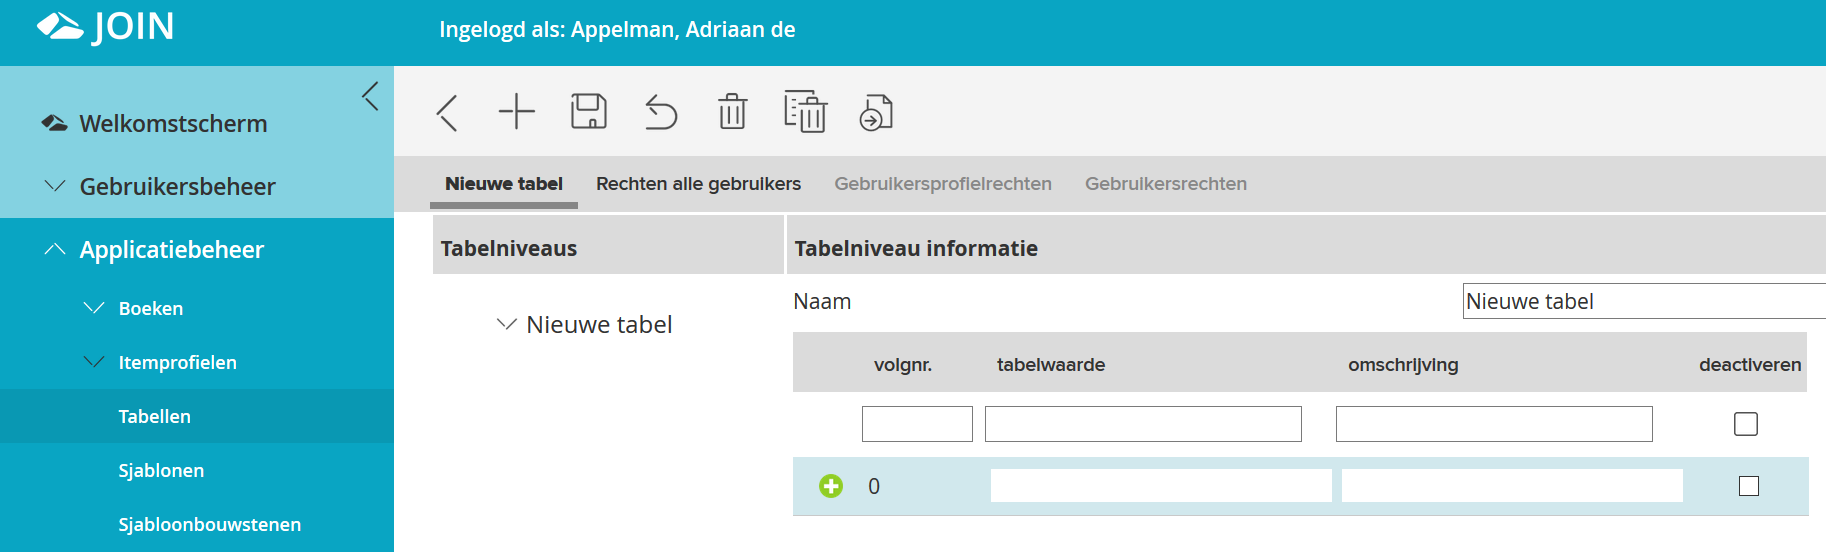
- You can now enter both the table value and a description in the fields below the column names.
- Enter the table value and a description in the fields, then press the (green) plus sign Icon Green Plus sign.png in front of the Sequence number row.
- The table value is added and a red cross appears in front of the line. By clicking on this the value can be removed if necessary.
- A new line also appears to add another table value. Repeat the above steps until you have added all table values.
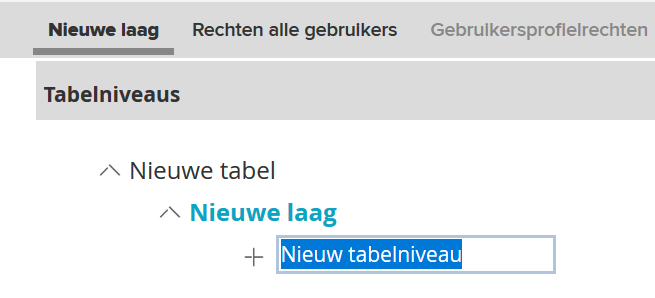
- If you want to create a layered table, you can do so in the left part of the Center.
-
Below the name of the table is . Click on this word and you can then enter the name of the second level. Pressing Enter will add this value.
-
You can then enter the table values of this second level on the right side of the Center, in the same way as for the top level.
-
Click the green button in front of the row to add a value.
-
To save the table, click on Save in the toolbar.
To assign rights to the use of tables, you can fill in the following tabs:
- Permissions tab all users
- User Profile Rights tab
- User Rights tab
The User profile rights and User rights tabs disappear as soon as you have ticked an option on the Rights all users tab. If you don’t do this, you can set the rights per user or per user profile on the User profile rights and User rights tabs.
¶ Permissions tab all users
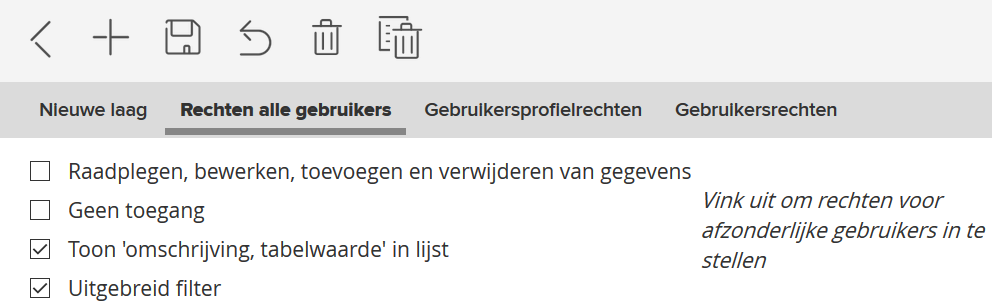
On the Permissions all users tab you have a number of options to select. These are:
| Option | Description |
|---|---|
| Consult, edit, add and delete data | This gives all users the right to use the table. The User profile rights and User rights tabs can no longer be filled in. |
| No access | Blocks use of this table by all users. The User profile rights and User rights tabs can no longer be filled in. |
| Show “Description table value” in list | Allows users to enter the table value or description in the field of the table. |
| Extensive filter | If this option is checked, the user can choose the table values from a list with filter bar in JOIN Case & Document via a button. |
You can save these rights by clicking on Save in the toolbar.
¶ User Profile Rights tab
On the User profile rights tab you determine which rights a user group has when using the relevant table.
The User Profile Rights tab lists the names of all available user profiles. If you have created a new Table, each user profile has a check mark in the Default column. That means that there are default permissions.
- Select the user profile to which you want to grant rights. This can be done using the search bar at the top of the columns.
- You can change the rights by placing a check mark in the column with the desired rights. Multiple permissions can be checked.
- The rights principle is identical to the rights distribution for books, item profiles, etc.
- Click the Save button to save the User Profile rights.
If you want to disconnect a user profile from this table, click on the check mark in the standard column, the check mark then automatically prints to No access.
¶ User Rights tab
By default, a user has the rights of the associated User Profile. If you want to assign different rights to a user for a specific Table, you can do so on the User Rights tab.
To change the user right of an individual user, proceed as follows:
- Select the user to whom you want to grant rights. This can be done using the search bar at the top of the columns.
- You can change the rights by placing a check mark in the column with the desired rights. Multiple permissions can be checked.
- The rights principle is identical to the rights distribution for books, item profiles, etc.
- Click on Save in the button bar to define the user rights.
¶ Import table
It is also possible to import an existing table. The relevant table must meet the conditions described below.
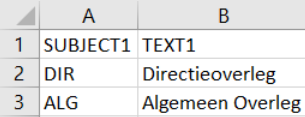
You can use a Word file, which is saved as a text file (.TXT). The format of this file must be uniform and there must be no empty lines between them. The same separator is used between the different values. It can be a comma, semicolon, or Tab character. At the top of the file you indicate the (internal) field names of JOIN where the data should end up. For a table that is:
| Description | Internal field name JOIN |
|---|---|
| Table Value | SUBJECT1 |
| Description | TEXT1 |
The file would then look like this (-> is a Tab character):
SUBJECT1 -> TEXT1 DIR -> Management Consultation ALG -> General Consultation
It is also possible to import data from MS Excel. The Excel file must meet the following conditions. At the top of the file, the field names are entered where the data should be placed. In our example, Cell 1A states: SUBJECT1 and Cell 1B states: TEXT1
The file must be further saved as a .csv file, see the following screenshot:

If you have a file that matches the above description, it can be imported into JOIN Admin.
- In the Navigation, select Application Manager -> Tables. The list of available tables appears in the Center.
- Click New in the toolbar.
- Under Table name enter the name for the new table. As soon as you press Save in the button bar, the first tab is given the name of this table.
- Then click the Import table values from file button in the Center’s toolbar.
- In the screen that appears, you can select the table you want to import into JOIN Admin using the Search button. Click on Open.
- You then choose the character used to separate the table values. For a .csv file this is a comma, for a text file it can be a comma, a semicolon or a tab character.
- Click on Import. The action will now be executed.
You can also import a table into an already existing table. You then select the table you want to change in the JOIN Admin Center. Then click on Import table values from file in the toolbar and perform the other actions described above.
¶ Organize tables
The list of available tables may be very long. To keep it clear, you can organize it in groups.
- In the Navigation, select Application Manager -> Tables. The list of available tables appears in the Center.
- In the toolbar of the Center, click New group for tables.
- In the screen that appears you can enter a name for the new group. Click OK.
- In addition to the newly created group, you will now also see the Not classified group.
Next, you will group tables by dragging:
- Click on the group Not classified. The list of tables opens.
- Click the plus sign in front of the name of the table you want to place in the new group. Hold down the left mouse button.
- Now drag the table to the new group you created. A logo will appear when you perform the action.
- As soon as you release the left mouse button, the table is placed in the new group.
- To remove the table from the group, drag it back to the Undivided group.