¶ Item profiles
An item profile is a profile in which you define fields for an address, document, file, or workflow profile. An item profile determines the way a book is displayed in JOIN Case & Document. By using item profiles you do not have to define the fields for each new book you create. You link the book to the desired item profile and the book is ready for use. For example, you can create an item profile for a Complaints book. You can then link this item profile to books Complaints 2018-2019-2020 etc. You only have to create the profile once and can use it again and again.
You can create an item profile yourself, but you can also use various standard profiles that JOIN makes available. This will save you a lot of time in setting up the fields. In this manual we describe how to create and edit item profiles yourself.
If you want to create a profile, you first determine for which part of JOIN Case & Document this profile is intended. You can choose from address, contact, document, file books, workflows and possibly also an item type of your own choice that can be made by JOIN for you. Then you create a design of the book that you want to make available to your users. You also determine which fields you want to see in the book, which properties belong to them and in what order the fields in the List and the Registration screen should be visible. After this you can create the item profile in the Admin Tool.
In addition to the profiles mentioned above, JOIN also has a DSP profile. This differs from other profiles because no new item profile can be added. In addition, it is also possible to let JOIN’s technical consultants create other item types, for example Projects, so that you can also create other item profiles.
¶ Toolbar for item profiles
There are several buttons in the toolbar of the Center next to the item profiles:
| Button | Position | Key combination |
|---|---|---|
| Back to the list | Alt B. | |
| New item profile | Alt N. | |
| To keep | Alt S. | |
| Cancel | Alt C. | |
| Import profile | Alt I. | |
| Export profile | Alt E. | |
| Delete profile | Alt R. | |
| Show active fields only | ||
 |
Language logos with which field names can be registered in another language. |
¶ Create new item profile
In the Navigation, select Application Manager -> Item Profiles. The different types of item profiles are opened in the Navigation below.
- Select a type of item profile. In our example we choose Document profiles. The overview of available document profiles appears in the Center.
- Click the New button in the toolbar of the Center.
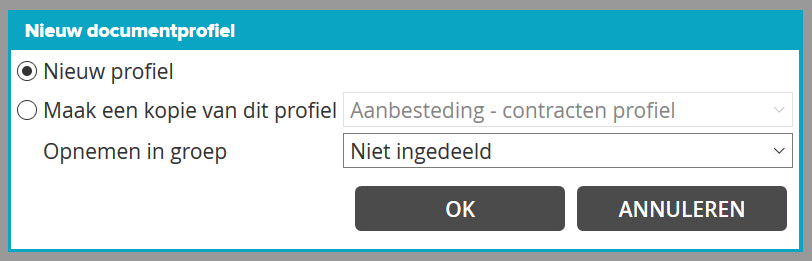
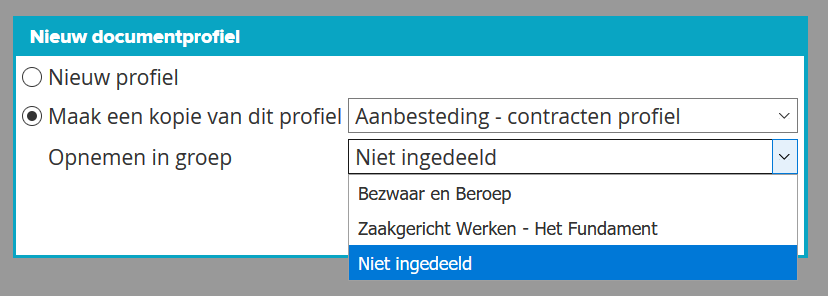
- In the screen that appears, you can choose between “New profile” and “Make a copy of this profile”.
- If you choose New, then click OK. A standard JOIN profile is then created, in which the fields, field settings and rights are predefined by JOIN.
- If you choose to make a copy, tick this option and use the drop-down arrow to choose from the different profiles that you have created yourself.

All fields, field settings and rights from the existing profile will then be transferred to your new profile. Then click on OK.
- If you have divided the item profiles into groups (see explanation in the next section), you can also indicate here in which group you want to include the new profile.
- Click OK and you can define the specifics of the new item profile.
¶ Specific features Item profile

There are several tabs below the Center’s toolbar. The name of the item profile can be entered directly under the tabs. Choose a clearly recognizable name for this, in our example Manual.
Below the name of the item profile is a thick gray bar with descriptions of the columns below it. By default, all fields below this bar are sorted by Field Name. Clicking on another description in the bar applies the sorting to this element.
Below the bar you will find the list of fields, field settings and rights. Because more things are available than can fit on one screen, there is a scroll bar to the right of and below the Center. You can also use the scroll wheel on the mouse to scroll down.
In an earlier phase you made a design for a new book in JOIN Business & Document (see the beginning of this chapter), now you are going to implement this design. In the design you have indicated which fields you want to see in the book, which properties belong to them and in which order the fields should be visible in the List and the Registration screen.
There are different types of field types and for each field that you want to make available to end users, you determine which type you need. JOIN has the following field types:
| Field type | Description |
|---|---|
| TEXT | Text with a maximum of 250 characters |
| MEMO | Text with a large content (extensive content) |
| BOL | Text with a maximum of 1 character is used as a yes / no field (check box) |
| DATE | Date field in the format day - month - year |
| NUM | Numeric field in which only numbers can be entered |
As an example, we create the Subject field. The field type TEXT is required for this. In JOIN Admin we choose a TEXT field type in the Field name column; we take SUBJECT1. The field names in this column are, by the way, internal field names that are visible to the application manager but not to the end users. By clicking SUBJECT1 you can make the specific settings for this field.
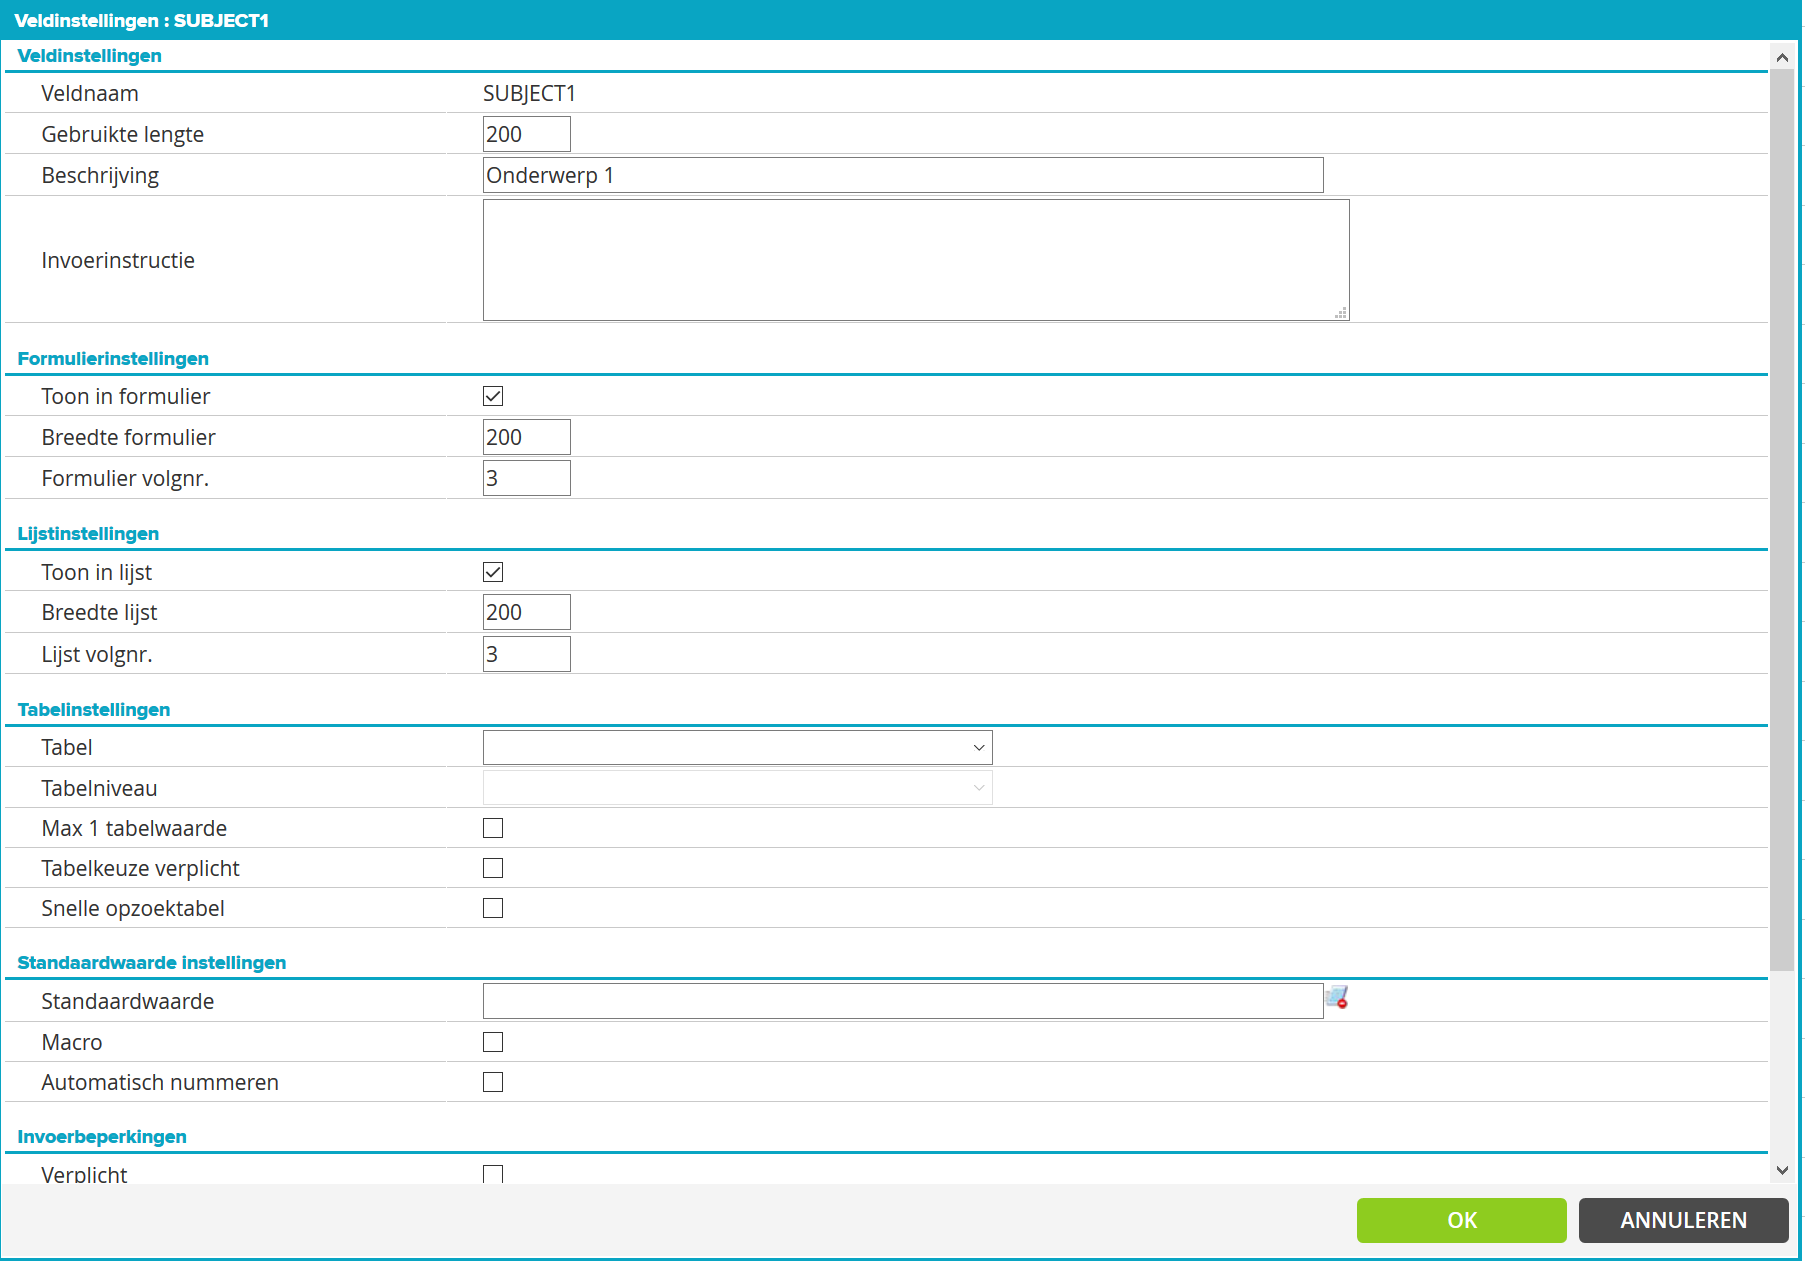
The following settings are possible:
| Option | Meaning |
|---|---|
| Field settings | |
| Field name | Fixed value, it cannot be changed. |
| Length used | Maximum characters to enter. |
| Description | The description shown to the end user |
| Input instruction | However, when the end user has clicked on the field, this text will appear in the field. |
| Form settings | |
| Show in form | Indicates whether this field should be visible in the Registration screen. |
| Width form | Indicates the number of characters visible in the Registration screen. |
| Form serial no. | Indicates the position of this field in the Registration screen. 0 is not visible. |
| List settings | |
| Show in list | Indicates whether this field should be visible in the List. |
| Frame width | Returns the number of visible characters in the List. |
| List serial no. | Indicates the position of this field in the List. 0 is not visible. |
| Table settings | |
| Table | Indicates which table should be linked to this field. No choice means that nothing is linked. From this place you can click directly to the relevant table. |
| Table level | For a layered table, indicates which level should be linked. |
| Max 1 table value | Indicates that a maximum of 1 value can be selected from the table. |
| Table selection mandatory | Indicates whether the chosen value should be in the table. |
| Quick lookup table | Ensures that large tables can also be searched quickly. The end user can type in the first letters of a value and JOIN automatically returns the word that most closely matches. |
| Default value settings | |
| Default value | Value already entered for new documents, files or addresses. Behind the value is a button with which the value can be tested when it is executed as a macro. |
| Macro | The default value is not taken literally, but as a variable. |
| Automatically | Automatic unique sequence number. |
| Import restrictions | |
| Obligated | Indicates that the end user is required to fill in this field. |
| Mandatory Macro | The field requirement depends on a macro, for example: |
| IF the COMPANY field is filled, THEN the MAILADDRESS field must also be filled in. | |
| Input pattern | The end user is obliged to fill in the field in the prescribed manner. Enter the following value here: |
| ~ A ~ B ~ -9999 \ .00 \ .999 Returns this for the end user: | |
| 10 digits are entered in place of the underline. | |
| Read only | Indicates that the field can only be read and cannot be changed. |
| Unique value | Indicates that two same values cannot be used in different registrations. |
| Limited input screen | Indicates whether this field is visible on the restricted input screen. |
Select the desired settings and save them by pressing OK. It is also possible to enter the field settings directly in the relevant columns. For the sake of clarity, we recommend using the method described above.
¶ Translate field names
If you have entered Dutch descriptions in an item profile, users who work in English, French or German will also see these field names in Dutch. However, you can also enter descriptions in other languages. You proceed as follows:
- Change the language to be used from Dutch to the language of your choice by clicking on a language flag in the toolbar above the tabs.

- In the fields under the Descriptions column, enter the field names as you want them to be displayed for non-native users of JOIN Case & Document.
- Click Save in the button bar to save the field descriptions.
Repeat steps 2 and 3 for all item profiles for which you want to enter a translation.
¶ The tabs for item profiles
After the specific characteristics of an item profile have been set, links can be made via the available tabs with books, user profiles, users and administrator levels. A number of other options can also be indicated and finally, an item profile for workflow has a tab promotion codes.
¶ Books tab
In the fields under the Descriptions column, enter the field names as you want them to be displayed for non-native users of JOIN Case & Document.
Click Save in the button bar to save the field descriptions.
Repeat steps 2 and 3 for all item profiles for which you want to enter a translation.
¶ The tabs for item profiles
After the specific characteristics of an item profile have been set, links can be made via the available tabs with books, user profiles, users and administrator levels. A number of other options can also be indicated and finally, an item profile for workflow has a tab promotion codes.
¶ Books tab
.png)
On the Books tab you will find the books that can be linked to the selected item profile (for example, only address books with the item profile ADDRESS).
- Place check marks in front of the relevant books that you want to link to the item profile.
- Click the Save button.
If the book for the item profile does not yet exist, you must create the book first. You can read how to do this in the chapter Creating books.
You can also link to a book that is already linked to another item profile. By checking such a book, the old link disappears and the new link takes effect.
Books that are not linked to an item profile are assigned the default item profile for this type of book. As soon as you link this book to an item profile that you have created, the link to the default profile will disappear.
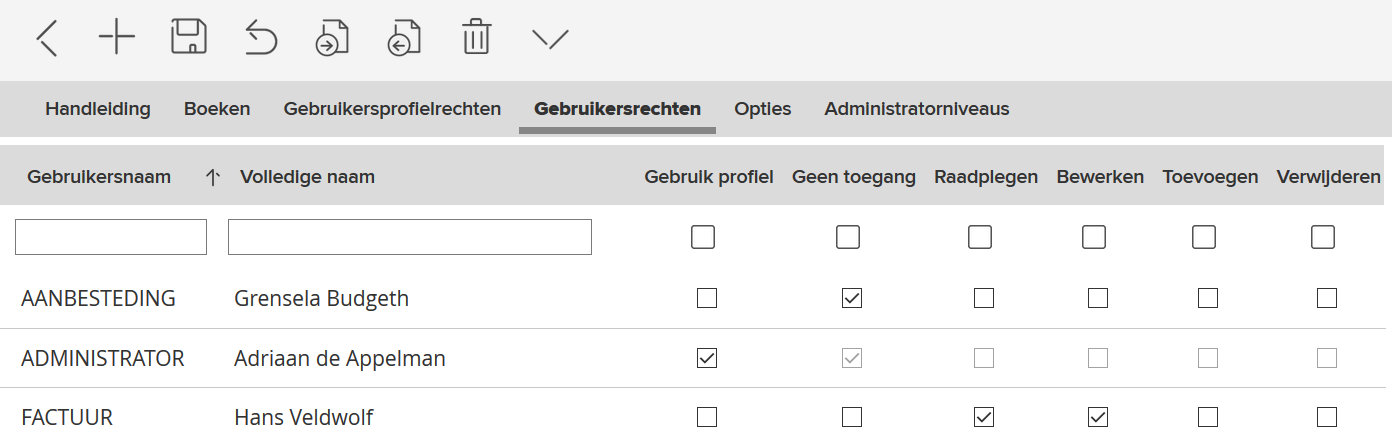
¶ User Profile Rights tab
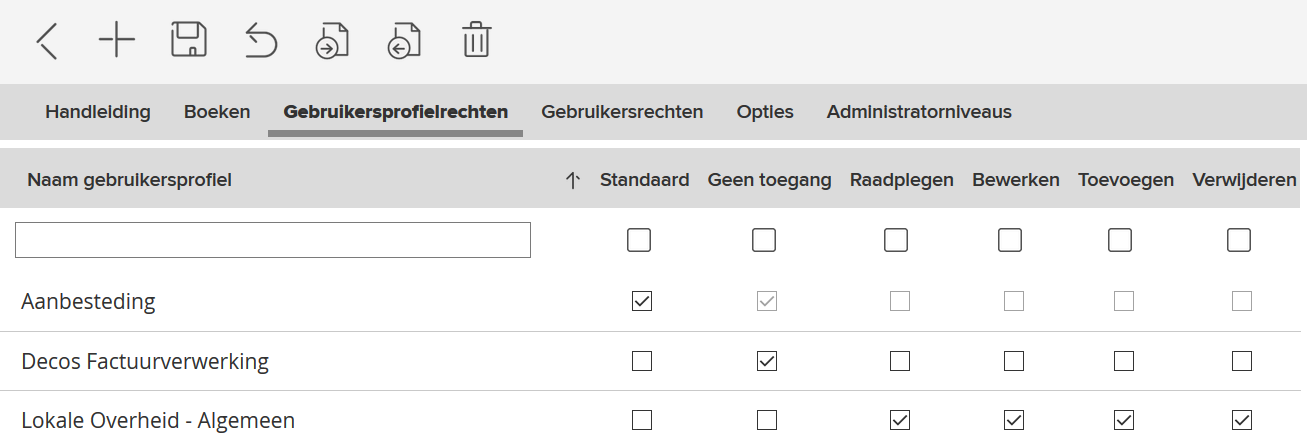
On the User profile rights tab you set the rights for each user profile. Determines what rights a user group has when using the books associated with the selected item profile. These rights apply unless you set specific rights on the book yourself.
The User Profile Rights tab lists the names of all available user profiles. If you have created a new item profile, each user profile has a check mark in the Default column. That means there are no rights. To set permissions:
- Click on the name of the user profile to which you want to assign rights. An arrow appears in front of the name.
- After the name of the user profile, click on the check mark in the standard column. This gives you the option to edit the other check boxes behind the selected user profile.
- Place a check mark in the column with the rights you want to assign to this user profile. The following rights are possible:
| Straight | Position |
|---|---|
| Standard | The user group does not have access to the objects associated with the item profile. |
| No access | The users do not have access to the objects associated with the item profile (objects disappear). |
| Consult | The users are allowed to view the data of the objects, but not change it. |
| edit | The users are allowed to change the data of the objects. |
| Add | The users are allowed to change the data of the objects and add new data |
| remove | The users have full access to the objects and are allowed to change, add and delete data |
- Click the Save button to save the rights.
¶ User Rights tab
By default, a user has the rights of the associated User Profile. If you want to assign other rights to a user, you can do so on the User Rights tab.
To change the user right of an individual user, proceed as follows:
- Select the user to whom you want to grant rights. This can be done using the search bar at the top of the columns.
- Click the username or the full name. An arrow appears in front of the username.
- After the name of the user, click the check mark in the Use profile column. This allows you to change the other check boxes behind the chosen username.
- Place a check mark in the column with the rights you want to assign to this user. The possible rights are described in the previous section.
- Click on Save in the button bar to define the user rights.
¶ Options tab
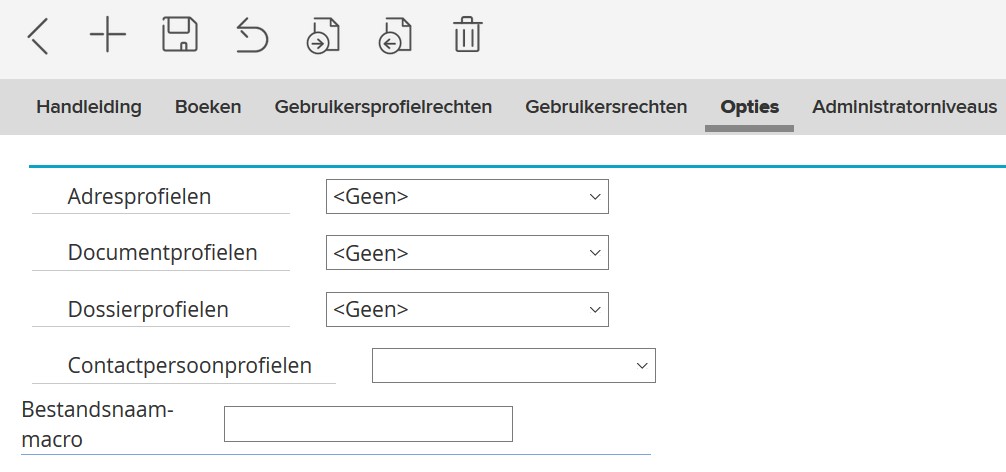
On the Options tab you can set a profile in which linked addresses, files or documents are shown.
We give an example: The documents tab of a file book contains several documents originating from different books. These books can be created based on their own item profile, so the field selection and order can be different. To display the above list in the desired way, you can select the most suitable item profile as the default layout for this tab.
- Click on the drop-down list behind each type of profile to select the correct profile.
- Click the Save button.
¶ File name macro
Via the option File name macro it is possible to enter an internal field name. If a file is then saved with JOIN Now in the relevant document book that uses the item profile, the name of the file will be changed. The value entered is the internal field name, used in the profile, preceding the equal sign (=).
¶ Administrator levels tab
If you want to give an Administrator level administrative rights to an item profile, you can indicate this on the Administrator levels tab. Two hyperlinks are visible on the tab: Linked administrator levels and Available administrator levels. Behind these hyperlinks is a number in brackets, indicating how many levels have administrative rights on the item profile (are linked) and which levels do not yet have these rights (are available). By clicking on a hyperlink, or by clicking on the arrow icon in front of the link, all Administrator levels from the relevant category are visible.
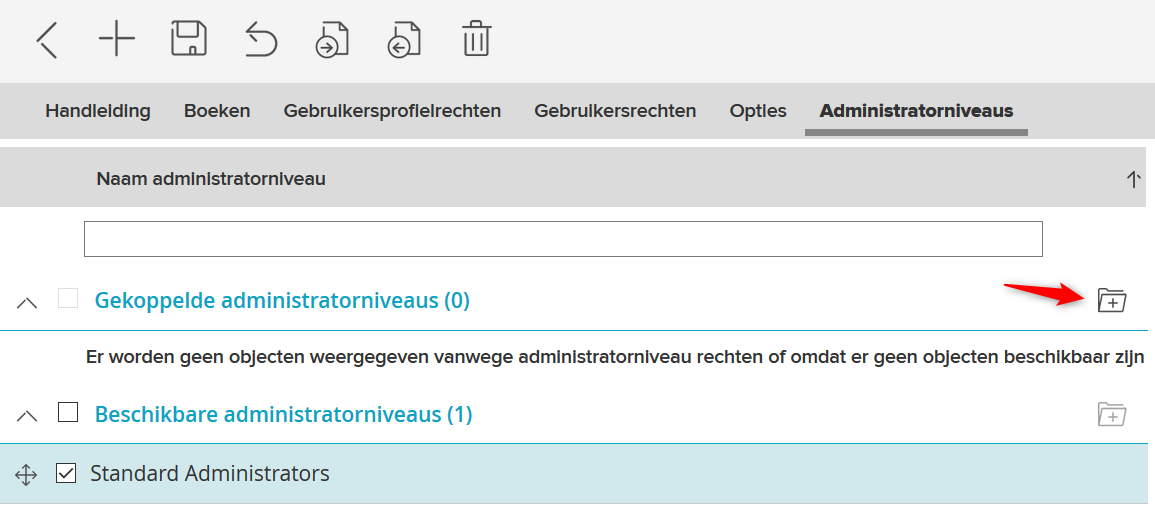
To link administrator levels:
- Click Available Administrator Levels.
- Check one or more levels. The line on which the level is then changes color.
- Click the Link items button next to Linked administrator levels.
- Click on Save in the toolbar.
To unlink an Administrator level:
- Click Associated Administrator Levels.
- Tick the level you want to disconnect. The line containing the name changes color.
- Click the Unlink items button next to Available administrator levels.
- Click on Save in the toolbar.
You can also link or unlink administrator levels by dragging:
- Click the plus sign for Available administrator levels.
- Hold down the left mouse button. The line containing the name changes color.
- Now drag the available administrator level to the Linked administrator levels line. A logo will appear as soon as you perform the action.
- As soon as you release the left mouse button, the administrator level is linked.
- To unlink an administrator level, drag it back to the Available administrator levels.
¶ Action Types tab
The Action Types tab is available under Workflow Profiles.
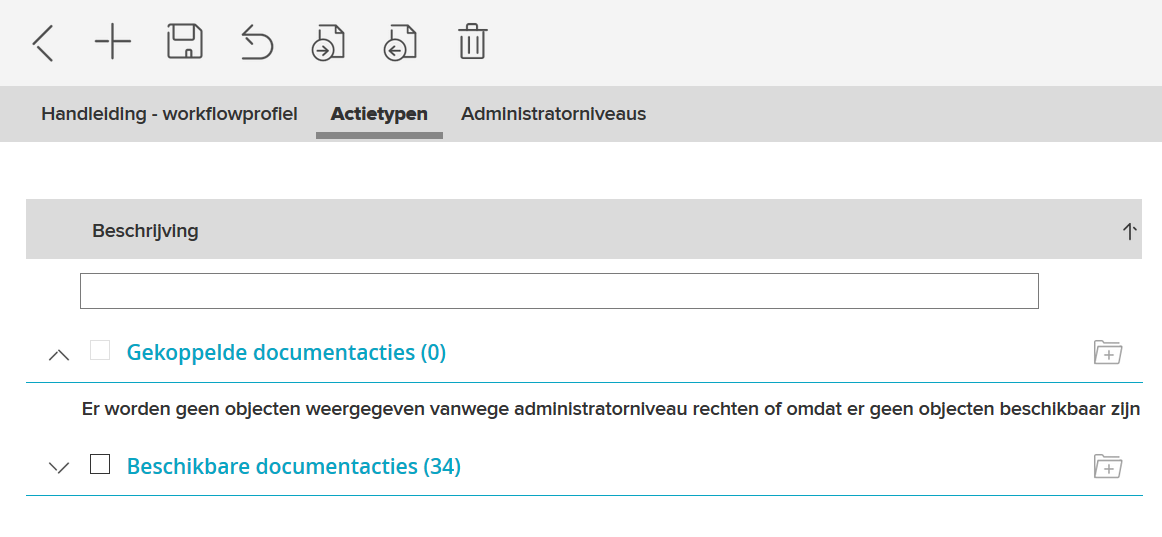
To guarantee a timely and correct handling of documents, files and addresses, various actions can be linked to a registration. For example, you can record which route must be followed, which actions must be taken, who is responsible for which action and when the final settlement date is.
The practitioner is always a user of JOIN Case & Document. Setting up and managing the action types is done in JOIN Case & Document by users who have rights to work in the Administration folder. You will find more information about this in the JOIN Zaak & Document manual.
You then link the action types to a workflow profile in JOIN Admin. If you choose Item profile -> Workflow profile, you will see the Action types tab in the Center. This tab is only available with a workflow profile, not with other types of item profiles. It consists of three subtabs: Address, Document and Dossier. You can specify which action types to associate with the workflow profile on each subtab.
Two hyperlinks are visible on each subtab: linked actions and available actions. Behind these hyperlinks is a number in brackets, which indicates how many actions are already linked and how many actions are available in total. By clicking on a hyperlink, or by clicking on the arrows in front of the link, all actions from the relevant category will be visible.
Link an action:
- Click Available Actions.
- Check one or more actions.
- Click the link button next to Linked Actions.
- Click the Save button to save the linked actions.
Unlink an action:
- Click Linked Actions.
- Check the action you want to unlink. The line containing the name changes color.
- Click the Unlink items button next to Available actions.
- Click the Save button to save the detached action.
You can also link or unlink actions by dragging:
- Click the plus sign in front of Available actions.
- Hold down the left mouse button. The line containing the name changes color.
- Now drag the available action to the Linked actions line. A logo will appear as soon as you perform the action.
- As soon as you release the left mouse button, the action is linked.
- To unlink an action, drag it back to the Available actions.
Export item profiles
If you have created an item profile in a test environment, it can be exported so that you can reuse the profile in your production environment. In the Navigation you select Application management -> Item profiles and then the desired profile type. The list of available profiles appears in the Center.
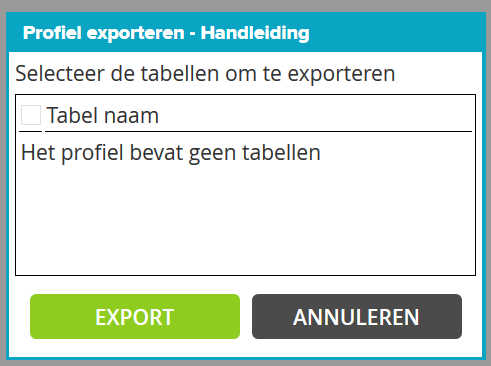
Click the item profile you want to export. Then click on Export profile in the toolbar of the Center. This allows an item profile to be exported as an XML file. By clicking this button, a screen will appear. You can now select the table name and the tables to be exported. By then pressing Export, the profile will be saved.
¶ Import item profiles

If you have created an item profile in a test environment and have exported this profile, you can then import it into the JOIN production environment. In the Navigation you select Application management -> Item profiles and then the desired profile type.
In the toolbar of the Center, click the Import profile button. This allows an item profile to be imported as an XML file. Pressing this button displays a screen. Via the Search button, select the location on your network drive or PC where you have saved the XML file. By then pressing Import the profile will be imported.
¶ Organize item profiles
The list of available item profiles may be very long. To keep it clear, you can organize it in groups.
- In the Navigation, select Application manager -> Item profiles -> the type of profile you want to organize. The list of available item profiles of that type appears in the Center.
- In the Center toolbar, click New Group for Item Profiles.
- In the screen that appears you can enter a name for the new group. Click OK.
- In addition to the newly created group, you will now also see the Not classified group.
Next, you will group item profiles by dragging:
- Click on the group Not classified. The item profiles list opens.
- Click the plus sign in front of the name of the item profile you want to place in the new group. Hold down the left mouse button.
- Now drag the item profile to the new group you created. A logo will appear when you perform the action.
- As soon as you release the left mouse button, the item profile is placed in the new group.
- To remove the item profile from the group, drag it back to the Unassigned group.