¶ Books
Under Application management -> Books you will find the following standard book types: address, contact person, document and dossier books. You can add new books here and edit existing ones. Adding a new book is the same for each book type. For each book type, several tabs are available where various things can be indicated. Every book you create here will be visible to the end user as a book in the Menu of JOIN Case & Document.
¶ Toolbar at Books
| Button | Description | Key combination |
|---|---|---|
| New book | Alt N. | |
| Save | Alt S. | |
| Cancel | Alt C. | |
| Delete current book | Alt R. | |
| Put the sequence number in front of the current book | Alt Q | |
| Importing documents from file | Alt I. |
¶ Create new book
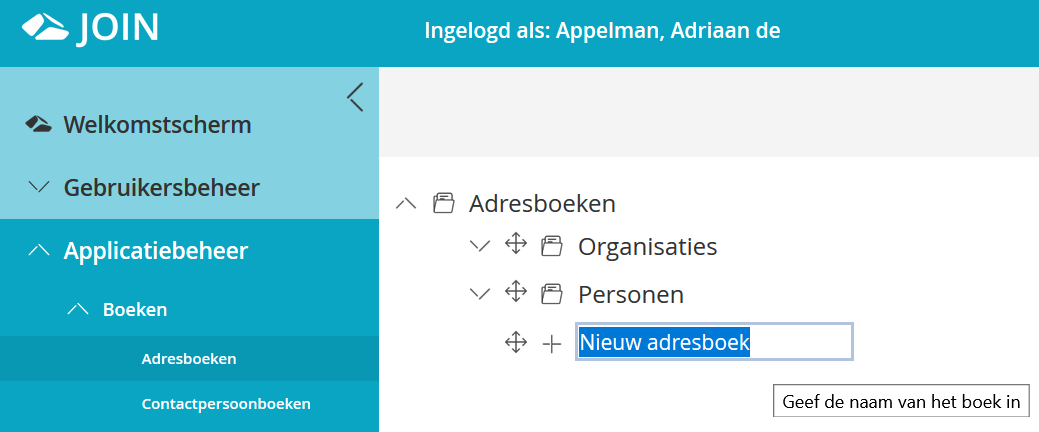
- In the Navigation, click on Application Management -> Books and then on the type of book you want to create. An overview of existing books appears in the Center.
- At the bottom of the overview of available books is . Click with the cursor on this word and you can enter the name of the new book. By pressing Enter the book will be saved and will automatically be in alphabetical order among the already available books.
-
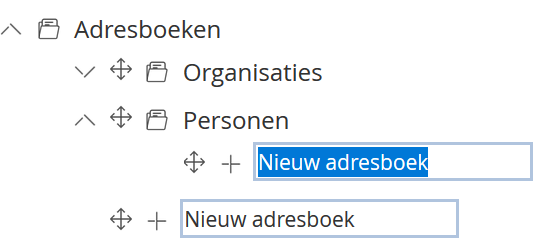
If you want to create a subbook, click on the plus sign that represents an existing book. You will then see the existing subbooks and at the bottom. You can now create a subbook in the same way as described above.
The end user will also see the main and sub books in JOIN Case & Document in the Menu as you create them here. No registrations can be created at the highest level (in this example Contract), but at the underlying levels you can.
¶ Tab < New Book>
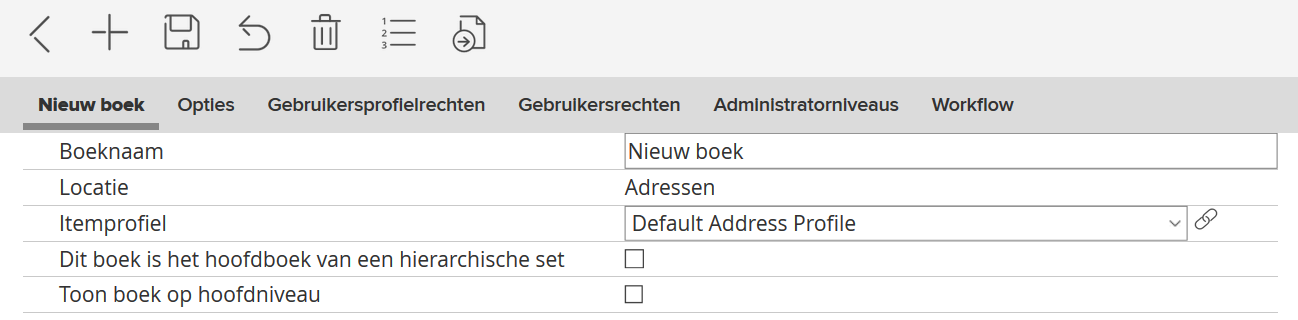
- In the list of available books, click the name of the book that has just been created.
- The tab of the leftmost tab has the name of the new book. On this tab, the Book name field contains the name you just gave the book. You can change it if necessary. Pressing Save in the toolbar saves the change.
- At Location, the name of the place in the navigation structure where the relevant book can be found is automatically entered. In the example above, that is Documents.
- At Files folder you enter where the files should be saved.
- The default item profile is selected for Item profile. You can select a different item profile using the drop-down arrow. If you click on the Icon Link.png button behind the field, you can edit this selected item profile immediately. (More information about item profiles can be found elsewhere in this guide.)
- If you choose to work with a hierarchical book structure, then place a check mark in front of the option: “This book is the main book of a hierarchical set”. The underlying subbooks automatically indicate that it is a subbook.
Explanation: You can choose to show the end user in the Menu of JOIN Business & Document the same book structure that you create in Admin. However, you can also choose to show the end users only the main books in the Menu. The user will then be given a choice in the Registration screen from the available subbooks and will then also immediately receive specific fields for each subbook that are relevant to this book. In addition to the advantages of a more compact Menu and the display of only relevant fields, the List can be used to search multiple (sub) books simultaneously.
¶ Options tab
The Options tab is available for all book types. The settings that can be made on this tab vary per type of book. Below you will find an overview of all common settings.
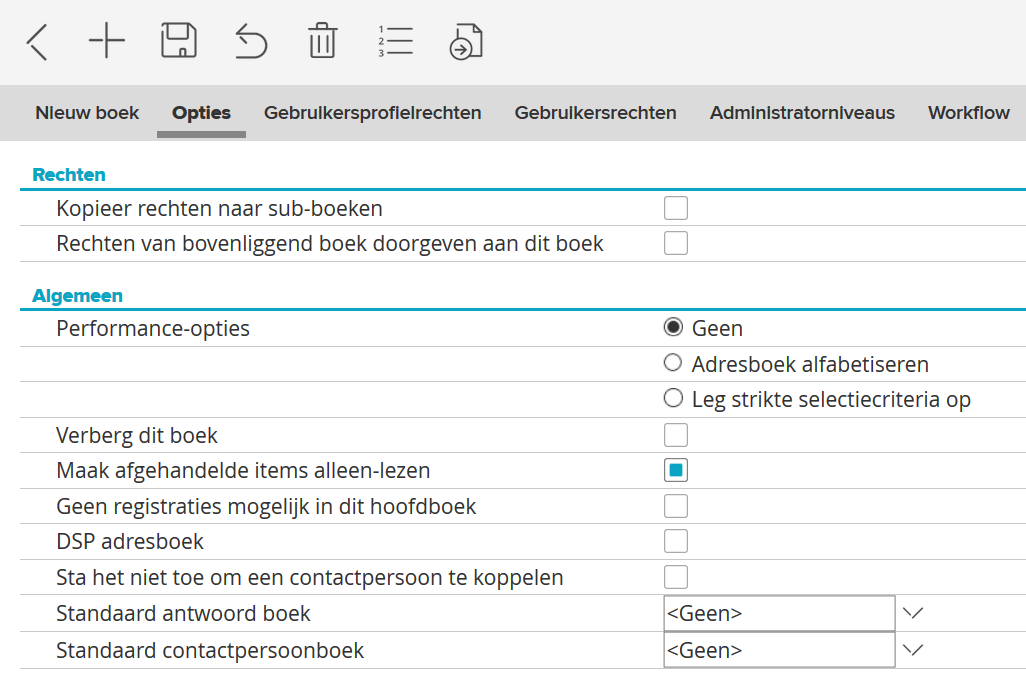
| Institution | Description | |
|---|---|---|
| Copy rights to subbooks | By checking this option, all subbooks automatically get the same rights as this book. | |
| Pass parent book rights to this book | By checking this option this book gets the rights of the parent book. This can only be set for a subbook. | |
| Empty address fields when unlinking address | You can set per document book whether address fields in the registrations should be cleared when the linked address is unlinked. | |
| Empty dossier fields when unlinking a dossier | You can set per document book whether file fields in the registrations should be emptied when the linked file is unlinked. | |
| Performance options | With the help of a check mark you indicate how a book is organized. You have three options: | |
| 1.No. This option is selected by default and is well suited for smaller books. | ||
| 2. Arrange book by serial number. Divides a book into (internal) blocks. This is useful when there are a large number of registrations in a book, which can take a long time to open this book. The registrations are offered to the user in blocks of a size that you can set, for example in blocks of 1000. We recommend that you apply this option for books of approximately 10,000 to 200,000 registrations. To set the block size, select Application Manager -> Options. In the Center, click on Preferences and in the Block size for sequence number filter field enter the desired block size. If you apply this in an address book, it will be sorted alphabetically. The user sees the addresses that start with the same letter in the application. In a Registration screen, when linking an address from this address book, the end user no longer sees the drop-down list containing the entire contents of the address book. The user can enter the initial letters of the desired address and then scroll through the book with the arrow keys. The user can also still jump to the address book via the Book button and the Addresses tab. | ||
| 3. Impose strict selection criteria. Choose this option if you work with extremely large books that contain more than 200,000 to several million registrations. This option changes the way of indexing so that the performance for the end user is good, despite the large number of registrations. The indexing takes place on the fields MARK, SUBJECT1, SURNAME, COMPANY and IT_SEQUENCE and not on the other fields. Advantage for the end user of JOIN Case & Document: it is possible to search very quickly in a book with extremely many registrations. Disadvantage for the end user: the relevant book cannot be searched in an advanced manner, the search functions “greater than”, “less than” and “not like” are no longer applicable for this specific book, only search terms can be entered in the fields in the filter bar of the list. that are indexed and the end user will see 10 registrations in the List by default. | ||
 If you want the indexing to take place on a different field than the ones mentioned above, please contact our Customer Support department. They will then ensure that you receive a script to implement this. Please note that an extra field that must be indexed is at the expense of performance. If you want the indexing to take place on a different field than the ones mentioned above, please contact our Customer Support department. They will then ensure that you receive a script to implement this. Please note that an extra field that must be indexed is at the expense of performance. |
||
| Hide this book | By checking this option, the relevant book is no longer visible. You can use this if you want to keep old books but no longer want them to be visible to end users. | |
| Only read completed registrations | Select this option if you want to make registrations with the Done field set to “J” available as “read only”. | |
| No registrations possible in this main book | By checking this option, only registrations in a subbook can be created. | |
| Standard answer book | If the end user sends a letter via the Answer button when answering an assigned activity, this answer can be automatically registered in the correct book. You can select the answer book here using the drop-down arrow. | |
| Standard template | Choose the template that will be chosen by default when a new file is created in this book. | |
| Standard file book | Selects the file book to be used by default for a document book. For example, you can show personnel files by default in document books related to P&O or Contracts for the Purchasing department. | |
| Documents in this book use the following profiles | A new file can be created from a file without having to include a document registration form as an intermediate step. The file inherits the rights of the file in which it is created. | |
| Standard check-out period | Allows you to set the number of days that users can have a piece checked out. | |
| Default contact book | Available at Books -> Address books | |
| Choose the contact book to be used by default for an address book. | ||
| Don’t allow linking a contact | Available at Books -> Address books | |
| This means that contacts cannot be linked to an address, for example if the address is a citizen | ||
| Show top level book | Available with all books. Sets this book to be displayed on the main node in the navigation tree in the registrations section and not below the object. |
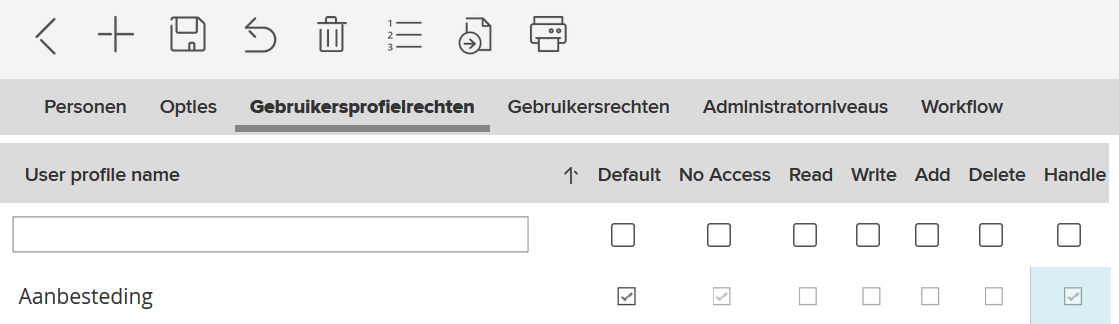
On the User profile rights tab you determine what rights a user group has when using the relevant book.
The User Profile Rights tab lists the names of all available user profiles. If you have created a new Book, each user profile has a check mark in the Default column. That means that the default permissions are used. To set permissions:
-
Place a check mark in the column with the rights you want to assign to this user profile. The following rights are possible:
Straight Position Standard The users in the group have default rights to the objects associated with the item profile. No access The users do not have access to the objects associated with the item profile (objects disappear). Consult The users are allowed to view the data of the objects, but not change it. edit The users are allowed to change the data of the objects. Add The users may change the data of the objects and add new data remove The users have full access to the objects and are allowed to change, add and delete data. To treat The users can get activities. -
Klik op de knop Bewaren om de rechten vast te leggen.
¶ Tabblad Gebruikersrechten

By default, a user has the rights of the linked User Profile. If you want to assign different rights to a user for a specific Book, you can do so on the User Rights tab.
To change the user right of an individual user, proceed as follows:
- Select the user to whom you want to grant rights. This can be done using the search field at the top of the columns.
- Place a check mark in the column with the rights you want to assign to this user profile. See the previous section for an overview of the rights.
- Click on Save in the button bar to define the user rights.
¶ Administrator levels tab
If you want to give Administrator levels rights to manage a book, you can indicate this on the Administrator levels tab. Two hyperlinks are visible on the tab: Linked administrator levels and Available administrator levels. Behind these hyperlinks is a number in brackets, indicating how many levels already have administrative rights and how many levels do not (yet) have this. By clicking on a hyperlink, or by clicking on the arrow icon in front of the link, all Administrator levels from the relevant category are visible.

To link administrator levels:
- Click Available Administrator Levels.
- Check one or more levels.
- Click the Link item button next to Linked administrator levels.
- Click on Save in the toolbar.
To unlink an Administrator level:
- Click Associated Administrator Levels.
- Tick the level you want to disconnect. The line containing the name changes color.
- Click the Unlink items button next to Available administrator levels.
- Click on Save in the toolbar.
You can also link or unlink administrator levels by dragging:
- Click the plus sign in front of Available administrator levels.
- Hold down the left mouse button. The line containing the name changes color.
- Now drag the available administrator level to the Linked administrator levels line. A logo will appear as soon as you perform the action.
- As soon as you release the left mouse button, the administrator level is linked.
- To unlink an administrator level, drag it back to the Available administrator levels.
¶ Workflow tab
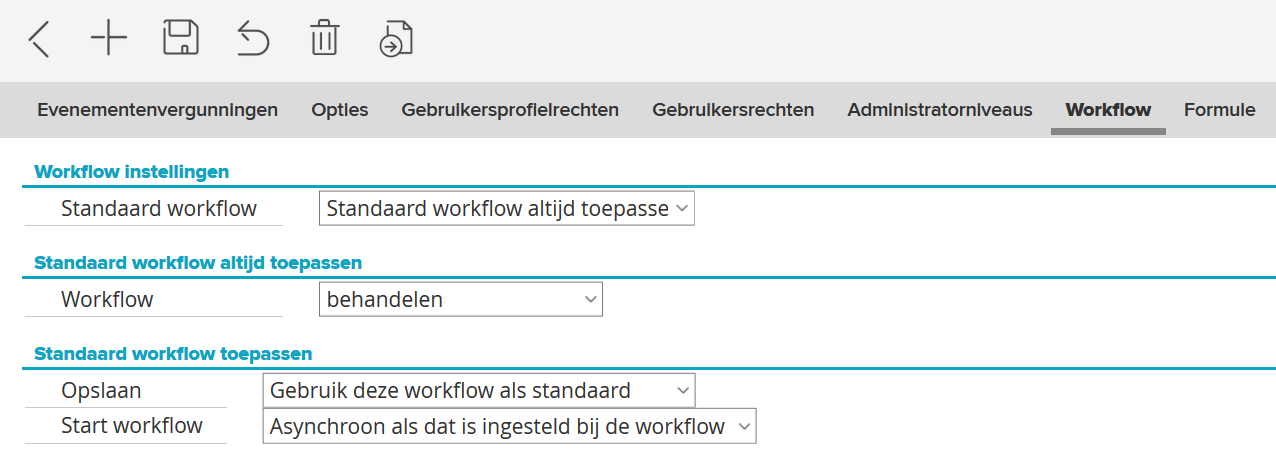
On the Workflow tab, if you are using the JOIN workflow module, you determine per book whether a workflow should always be started immediately when creating a new registration. You can also choose to automatically start a specific workflow based on a field value selected by the user in the registration.
If you choose to always apply a standard workflow via the drop-down arrow, you will then be given the option to link the desired workflow. You can then indicate whether you always use this workflow or only for registrations from a certain date. Finally, indicate whether you want to start the workflow based on a synchronous or asynchronous communication protocol. With synchronous, background processes such as computer actions are performed first. The user must wait for these to be displayed on the workflow tab before the next activity can be started. If you choose asynchronous, this means that the user can get started with the next activity while the first process is running in the background.
If you have opted for a workflow based on a field value for standard workflow, then choose the field in which the value should appear. Depending on your choice, you can then choose a field value and the workflow associated with this value. You indicate whether the workflow should always be used or only for registrations from a certain date. Finally, indicate whether you want to start the workflow based on a synchronous or asynchronous communication protocol.
¶ Formula tab
The Formula tab is only available for dossier books. On this tab you can see the formulas you added in the Navigation in the folder Application Manager -> Formulas. You link this to a file book. To do this:
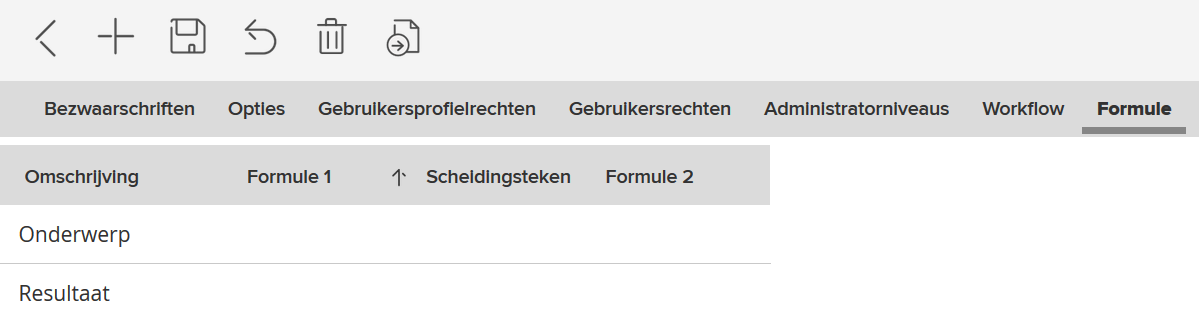
- In the field where you want to enter the calculation result, click in the cell below Formula 1.
- Click on the button the arrow at the end of this field to make the selection list visible. See the screenshot above.
- Select the desired formula from the selection table. Optionally, you can link a second formula (for Formula 2) to this field, and have the field separated by a separator.
- Click on Save in the toolbar.
- In JOIN Case & Document, the result of the formula is displayed as soon as the registration is saved or when the formula button is used.
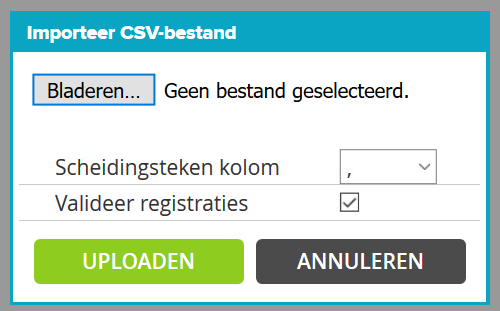
¶ Importing data into books
An application manager can import a .txt or .csv file via JOIN Admin.
-
Choose the book into which you want to import data.
-
Click the button Import document registrations from file Icon Importeren.png in the toolbar of the Center.
-
In the screen that appears, select the file you want to import via the Browse button.
-
Choose the correct separator. This is for a .txt file and, or a: for a .csv file (depending on the language settings on your PC).
-
Validate registrations is on by default; this checks the fields to be imported for correctness.
-
Click on upload. The data is imported and a new record is created for each line in the file.
If you are importing a .csv file, keep in mind that each column heading refers to an internal field name in JOIN. For example TEXT5, SUBJECT1, DATE4. If you want to import a file into a book that already contains registrations, you can do this while retaining the existing registrations. In this case, make sure the import file includes a column with the column heading KEY. Here you put the value that you want to use as a key. If there is a registration in the book you are importing into with the same value as in the KEY field of your file, the registration will be updated instead of created.