¶ JOIN Customer contact Cloudadmin Application Settings
The application settings section provides information about the configuration of the JKC and the configuration of the links with underlying systems.
¶ Application Settings
This column shows 6 categories, all related to the way the view is presented to end users:
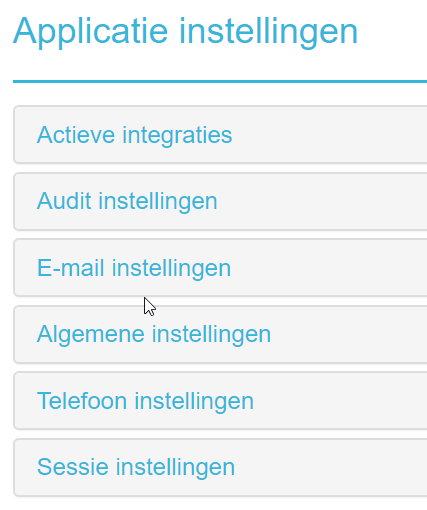
By clicking on one of these categories with the mouse, the column will be expanded. This information is then presented in the base column. Then click the Edit button in the top right corner and you can make the changes.
¶ Active integrations
By clicking on the Edit button and then clicking on one of the ‘open configurations’ buttons, you can enter per JKC part by means of check marks indicate whether the information from the relevant source should be displayed to the user. If multiple sources are used in a particular category, it can be useful for the end user to know from which source the information comes.
The following figure shows two sources for organizations: Decos JKC & Decos Connect. Both are checked, which means that when searching for an organization, users will see results from both sources. If you do not want this, you can uncheck one or more sources.
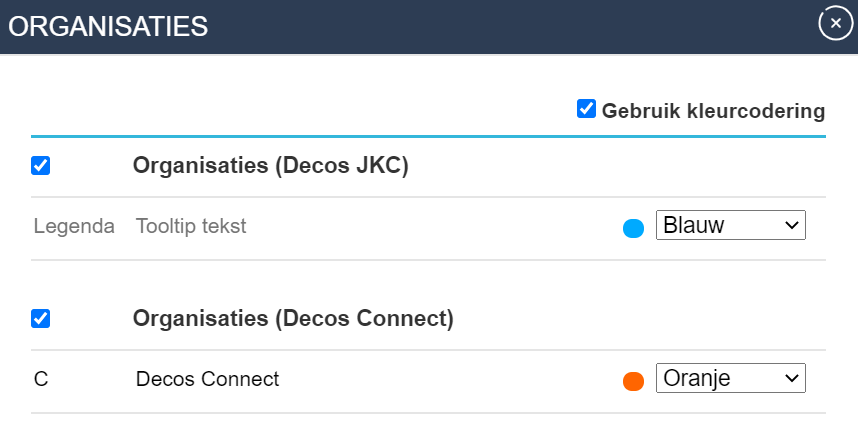
To make it clear to the employee from which source a search result comes, it is possible to add a legend, tooltip text and color coding to the source. The image below shows how this is reflected in the results overview in JKC.
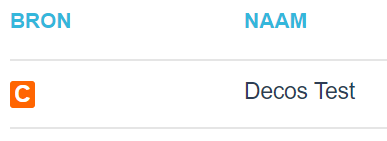
This is a result from the source ‘Decos Connect’. There you can see that the legend has been given the value ‘C’ and the source is orange. If you move the mouse over the source, the tooltip text will appear, in this case ‘Decos Connect’. To use color coding, it is important that the checkbox ‘Use color coding’ is checked.
¶ Audit institutions
For each source you can set which part must be audited. Subsequently, the audit information can be retrieved in the management console under ‘Change history’.
¶ Email settings
In E-mail settings you can adjust a number of general settings with regard to E-mail in the JKC application.
¶ Activate the following email functionality
When this setting is checked, an extra button with ‘Next E-mail’ will appear next to the search bar in JKC. You can use this if you do not want employees to be able to choose e-mails from the list of e-mails themselves. When the employee presses the button, open the next e-mail and the employee can then handle it. the button looks like this:

¶ Email Template
When opening this configuration, you can create email templates. You can link each template to a type. You can then choose this type when creating an e-mail in JKC (from the dropdown menu in the TBN button). After choosing a type, you will be given the option to choose one of the templates of that type.
Note: If you have created a new template type, you must give users access to this template type. If you do not do this, the user will not be able to choose the type when creating an email. You can give users access to this by typing privileges - email - template.
¶ Emails can be archived
This function makes it possible to archive e-mails.
¶ Include email reply in session notes
If this option is checked, the reply from an e-mail will be automatically copied into the reply from a contact session note after sending.
¶ Standard style configuration
With this setting you can change the default style of emails. Think of font, font size, etc.
¶ General settings
¶ Object notation
The object notation determines how the fields are displayed in JKC, this is already set up by default for customers.
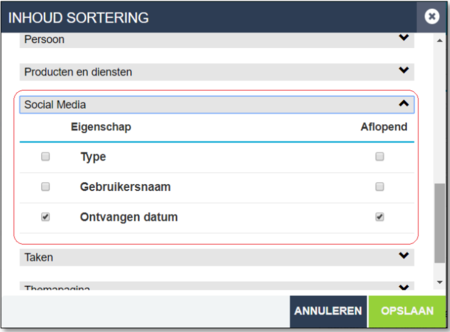
¶ Content sorting
The end user of the JKC is presented with the results in a specific order during a search. As an application manager, you can determine the order of this information or fields yourself. If you click on the Sorting button, you can indicate the order for each entity in the JKC. In the screen that appears, select the desired entity using the drop-down arrow (for example, person - organization - case - document). Depending on your choice, a list with corresponding fields is presented. Place a check mark in front of a field, and it will light up in a blue line. Then click the Up or Down button to achieve the correct sort order.
By default, the results are presented in ascending order, i.e. from A to Z. If you want to present the search results in descending order, you can place a tick behind the relevant field and after adjusting the settings, you can save them by clicking the Save button.
¶ Maximum days for callback time
The maximum number of days when an employee must call back.
¶ Maximum callback time
If you want a limit to a callback note for the period to call back a customer, please tick this box. You can then enter the desired number of days in the field “Maximum days for callback note”. This allows you to enforce that a callback note is not scheduled too far into the future.
¶ Turn on quiz suggestions
If you enter a search term incorrectly, it may be desirable to get a suggestion for an alternative term. Example: if paptype is entered as search term, the JKC will give passport as an alternative term. In the general settings - Enable search suggestions, you can indicate for which linked sources this is desirable. You can also indicate which alternative source should be searched if the preferred source does not return a result.
¶ Contact links settings
For each source you can set where the points for improvement of a source can be sent as standard
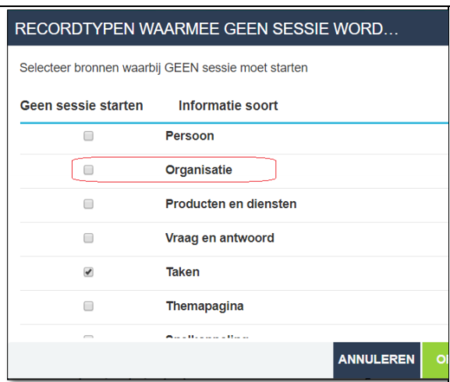
¶ Record types that do not start a session
Here you determine per source where no session should be started.
¶ Employee availability rules
At various places in the JKC, a color indicator indicates whether an employee is present and / or available. At this place of the JKC you determine which sources must be checked in order to give the correct indication. Click on the Edit button at the bottom and then on Employee availability integration, then you will get a screen in which the availability sources can be selected. For example, availability sources include a link with the calendar system that your organization uses and your access system / card control. By clicking on one of the arrows on the right you can select per JKC part by means of check marks indicate whether the relevant resource should be searched.
¶ Number of hits required for popular
Here you determine how many hits are necessary to be shown as Popular in the Dashboard or Search box.
¶ Search description for content types
Per source you can adjust the description to make searching easier. for example Search by {Case description} or {Case number} or
¶ Activate all resource configuration
When one searches in the search box for all sources, the application manager can determine which sources are searchable. For example, turn off the Business / Documents resource, so that the search speed is improved.
¶ External data properties
Organization and Persons come from the source BRP, normally it is not possible to edit the fields telephone and e-mail, however, by checking the boxes here, the field values are stored at the Person or Organization.
¶ Update period popular keywords (days)
Here you determine in how many days the part is popularly refreshed.
¶ Activate “next email” functionality
For this functionality you need EWS, this ensures that the end user can process email via the button “Next Email”.
¶ External appointment system URL
If you want to go directly to an external appointment system, you can set the link here when you click on the Appointment button.
¶ Configure Map Layer
Here you have the option to add Open Source Map Layers, for example to see where the lampposts are located
¶ Callback note mailbox configuration
Here you add a Mailbox, which you can access in the Callback Notes screen. At the practitioner you select which practitioners can see the callback note.
¶ Handling types for callback notes and notes (user, department, mailbox)
For the end user, it can be determined whether all treatment types are visible in a callback note screen or
- Collaborator
- Employee and Department
- Department
- Employee and Mailbox
- Mailbox Department
¶ Default search type for text input
When you type text in the search box, you can determine which source will be searched / blue first.
¶ Phone settings
¶ Use leading value for Telephony
When the telephone integration uses a leading 0 to call out, we can enable this by default.
¶ Phone pre-condition value
In this field you can indicate how many leading 0 should be applied.
¶ Allow cold transfers
This function makes it possible to immediately put through a line instead of first speaking warmly to an employee.
¶ Show Busy / Available setting
This option ensures whether you see whether an employee is busy (color orange) or available (color green Image: phone.png)
¶ Number of digits for extension number
Here you set how many digits you want to see of a telephone number of an employee in the organization. for example the last 4
¶ Session settings
¶ Contact history required
If you want an end user to register all contact moments, you can indicate this in the Session settings. Place a tick behind Contact history required. A session can then only be closed when the contact moment has been registered. If no check mark is placed after this option, the end user will be asked when closing the session whether the contact history should be recorded with a choice of Yes or No. Click Save to save the settings.
¶ Session duration alert (minutes)
Here you set when the timer of the session turns red.
¶ Show contact history screen when session ends
This option is on by default to improve the user-friendliness of the end user.
¶ After making a callback note or appointment, go directly to the contact history screen
This option is on by default to improve the user-friendliness of the end user.
¶ Link always viewed information to session
In relation to the option not to start a session with certain consultations (relevant when no Telephone integration is used, in that case a session starts automatically after recording), with the help of the option below it can be enforced that the information viewed is linked be added to the callback note or contact history